Acceleration
| | ||
| | ||
| | ||
Its common to think of acceleration as speeding up and deceleration as slowing down. And while this is not incorrect, for this book, I use a slightly more technical definition for acceleration.
Many similarities exist between velocity and acceleration in terms of how they are described. They are both vectors. Like velocity, acceleration is described as a value and a direction. However, whereas velocity changes the position of an object, acceleration changes its velocity.
Think of it this way. You get in your car, start it up, and put it in gear. What is your velocity? Its zero. By stepping on the gas pedal (also known as the accelerator , hmmm . . .), your velocity begins to change (at least the speed portion of it; the direction is changed with the steering wheel). After a second or two, youre going 4 or 5 miles per hour (mph). Then your speed increases to 10 mph, 20 mph, 30 mph, and so on. The engine is applying force to the car to change its velocity.
Thus, you have the laymans Flash definition for acceleration: A force that changes the velocity of an object.
In purely ActionScript terms, you can say that acceleration is a value that you add to a velocity property.
Heres another example. Say you have a spaceship that needs to go from planet A to planet B. Its direction will be whatever direction planet B happens to be in relation to planet A. It points in that direction and fires its rockets. As long as those rockets are firing, force is being applied to the ship, and its velocity is going to change. In other words, the spaceship will continue to go faster and faster.
At some point, the captain decides the ship is going fast enough, and he might as well conserve fuel, so he shuts down the rockets. Assuming there is no friction in space, the ship is going to continue along at the same velocity. As the rockets are no longer firing, no more force is being applied to the ship. Since there is no more acceleration, the velocity does not change.
Then the ship approaches its goal. It needs to slow down or its going to fly right past planet B (or if the navigator was accurate enough, the ship is going to become a part of planet B). So what does the captain do? You dont have brakes in spacetheres nothing for them to grab a hold of. Instead, the captain turns the ship around so it faces the opposite direction, and fires up the rockets again. This applies negative acceleration, or acceleration in the opposite direction. Really, this is the same thing I covered while discussing vectors. The force is again changing the velocity, but this time it is reducing the velocity. The velocity will get less and less, and eventually arrive at zero. Ideally, that will coincide with the point when the ship is a couple of inches above the surface of the planet. At that point, the captain can kill the rockets and let gravity finish the job. (Ill talk about gravity in the Gravity as acceleration section, coming up soon.)
Acceleration on one axis
Lets put it into practice in Flash. Like the first velocity example, this first acceleration example stays on one axis. Well jump back to the ball movie clip for the next few examples.
Heres the code for the first example ( ch05_06.fla ):
init(); function init():Void { vx = 0; ax = 0.2; attachMovie("ball", "ball", 0); ball._x = 0; ball._y = Stage.height / 2; } function onEnterFrame():Void { vx += ax; ball._x += vx; } Here, you start out with velocity ( vx ) being zero. The acceleration ( ax ) is 0.2. This is added to the velocity on each frame, and then the velocity is added to the balls position.
Test this example. Youll see that the ball starts out moving very slowly, but by the time it leaves the stage, its zipping right along.
Now, lets get closer to the spaceship example, and allow the ball to turn the acceleration off and on, and even reverse it. You can use the cursor keys for this. You can easily check if a particular key is currently being pressed with the Key.isDown() method, passing in the constant name for the key you want to check. (All the constants are listed in the Flash help files.) For now, we just care about the left and right cursor keys, which are Key.LEFT and Key.RIGHT . Heres the code ( ch05_07.fla ):
init(); function init():Void { vx = 0; ax = 0.2; attachMovie("ball", "ball", 0); ball._x = Stage.width / 2; ball._y = Stage.height / 2; } function onEnterFrame():Void { if (Key.isDown(Key.LEFT)) { vx -= ax; } else if (Key.isDown(Key.RIGHT)) { vx += ax; } ball._x += vx; } In this example, youre simply checking if either the left or right cursor key is down. If the left cursor key is down, you subtract the ax value from the velocity. If the right cursor key is down, you add it. If neither is down, the velocity stays the same. Finally, the velocity is added to position.
Test the example. Youll see that you dont have complete control over the speed of the object. You cant stop it on a dime, so to speak. You can only slow it down to the point it stops. And if you slow it down too much, it starts going in the opposite direction. See if you can stop it just before it hits the edge of the stage.
Im sure some game ideas are already popping into your head. Hold onto them, Youre about to expand your mastery of this technique many times over.
Acceleration on two axes
As with velocity, you can have acceleration on the x axis and y axis at the same time. You just set up an acceleration value for each axis (I usually use the variable names ax and ay ), add those to vx and vy , and finally add vx and vy to the _x and _y properties.
Its pretty easy to adapt the previous example to work with the y axis as well. You just need to add the following:
-
The ay and vy variables
-
Checks for the up and down cursor keys
-
The right acceleration to the right velocity
-
Velocity to the corresponding axis position
Heres the code ( ch05_08.fla ):
init(); function init():Void { vx = 0; vy = 0; ax = 0.2; ay = 0.2; attachMovie("ball", "ball", 0); ball._x = Stage.width / 2; ball._y = Stage.height / 2; } function onEnterFrame():Void { if (Key.isDown(Key.LEFT)) { vx -= ax; } else if (Key.isDown(Key.RIGHT)) { vx += ax; } if (Key.isDown(Key.UP)) { vy -= ay; } else if (Key.isDown(Key.DOWN)) { vy += ay; } ball._x += vx; ball._y += vy; } Notice that I put the left/right checks and up/down checks in separate if statements. You could put the check for each key in its own separate if statement, but if the left key is down, you dont really need to check for the right key. The else statement shortcuts this: If the first if statement is true, it wont evaluate the else part. Similarly, you could continue with up and down checks as additional else statements. But by splitting them up, you can have, for example, the up and left cursor keys pressed at the same time and respond to them both, allowing for diagonal motion.
Play around with this one for a while. Youll see that you can now navigate all over the screen. Try to get the object moving say, left to right, and then press the up key. Note that the x velocity is not affected at all. The object keeps moving on the x axis at the same rate. Youve just added some y velocity into the picture. This is equivalent to the spaceship turning 90 degrees and firing the rockets.
Gravity as acceleration
So far, Ive been talking about acceleration in terms of a force being applied to an object by the object itself, such as a car engine or a rocket. Thats certainly valid, but theres another aspect to acceleration. It happens that any force that acts to change the velocity of an object uses the principle of acceleration. This includes such things as gravity, magnetism , springs, rubber bands, and so on.
You can look at gravity in a couple of ways. From the wide-angle perspective of the solar system, gravity is an attraction between two bodies. The distance and angle between those two bodies must be taken into account to figure the actual acceleration on each body.
The other way to look at gravity is from a close-up viewpoint, here on earth, or very near it. In our everyday existence, gravity does not noticeably change depending on our distance from the earth. Although technically speaking, the force of gravity is slightly less when you are flying in a plane or up on a mountain, its nothing you would notice. So, when simulating gravity on this level, you can pretty much define it as a set value, as you saw in the earlier examples with the acceleration variables.
Also, because the earth is so large and we are so small, its easy to ignore any actual direction of acceleration and just say that the direction is down. In other words, no matter where your object is, you can safely define gravity as acceleration on the y axis alone.
To put it into ActionScript, all you need to do is define a value for the force of gravity and add it to the vy on each frame. Generally speaking, a fraction works well, something like 0.5 or below. Much more than that, and things will feel too heavy. With smaller values, things seem to float like feathers. Of course, you can always use these effects to your advantage; for example, to create simulations of different planets with varying gravities.
This next example adds gravity. Heres the code ( ch05_09.fla ):
init(); function init():Void { vx = 0; vy = 0; ax = 0.2; ay = 0.2; grav = 0.1; attachMovie("ball", "ball", 0); ball._x = Stage.width / 2; ball._y = Stage.height / 2; } function onEnterFrame():Void { if (Key.isDown(Key.LEFT)) { vx -= ax; } else if (Key.isDown(Key.RIGHT)) { vx += ax; } if (Key.isDown(Key.UP)) { vy -= ay; } else if (Key.isDown(Key.DOWN)) { vy += ay; } vy += grav; ball._x += vx; ball._y += vy; } Here, I made the gravity value pretty low so the ball doesnt go off the screen too quickly, and you can still control it with the keys.
Notice that first you add the acceleration from the key presses to the vx and vy , then you add the gravity to the vy . Dealing with complex systems of multiple forces winds up not being that complex. You just calculate the acceleration of each force and tack it onto the velocity. No complex averaging or factoring is going on. Each force just gets added on. When youve gone through and handled all the forces, you add the velocity to the position. Here, you are using only a couple of forces, but later in the book, you will be calculating many different forces acting on a single object.
This goes right back to vector addition. If you start off with the original velocity as a vector, each acceleration, gravity, or force is an additional vector tacked on to that velocity. When youve added all of them on, you just draw a line from the beginning to the end, and you have your resulting velocity. Youll find its the same as if you had added on the x and y components of each force.
Now imagine that your movie clip is a hot air balloon. You probably want to add a force called lift . This is another acceleration on the y axis. This time, however, its negative, or in the up direction. Now, you have three forces acting on the object: the key force, gravity, and lift. If you think about it, or try it out, youll see that the lift force needs to be slightly stronger than the gravity force in order for the balloon to rise. This is pretty logicalif they were exactly equal, they would cancel each other out, and youd be back to square one, with only the key force having any effect.
Another one to try is creating some wind. Obviously, this is a force on the x axis. Depending on which direction the wind is blowing, it could be a positive or negative force, or as you now know, a 0 or 180 degree direction.
Angular acceleration
As I mentioned, acceleration has a valuethe forceand a direction, just like velocity. And like velocity, if you are starting with those two factors, you need to break them down into the component x and y forces. Now, If youve been paying attention, you know that the way to do that is by using Math.cos and Math.sin . Heres how that looks:
var force:Number = 10; var angle:Number = 45; // degrees var ax:Number = Math.cos(angle * Math.PI / 180) * force; var ay:Number = Math.sin(angle * Math.PI / 180) * force;
Now that you have acceleration for each axis, you can update the velocity on each axis, and from that, update the objects position.
Lets resurrect the mouse follower from earlier in the chapter and make it work with acceleration instead of just plain velocity. Remember that in the earlier incarnation, you took the angle from the arrow to the mouse and used that to determine vx and vy . This time, youll use the same calculations, but employ them to determine ax and ay instead. Then youll add the acceleration values to the velocity values and the velocity values to the _x and _y properties. Heres the code ( ch05_10.fla ):
init(); function init():Void { force = 0.5; vx = 0; vy = 0; arrow = attachMovie("arrow", "arrow", 0); arrow._x = Stage.width / 2; arrow._y = Stage.height / 2; } function onEnterFrame():Void { var dx:Number = _xmouse - arrow._x; var dy:Number = _ymouse - arrow._y; var angle:Number = Math.atan2(dy, dx); arrow._rotation = angle * 180 / Math.PI; var ax:Number = Math.cos(angle) * force; var ay:Number = Math.sin(angle) * force; vx += ax; vy += ay; arrow._x += vx; arrow._y += vy; } Notice that I also turned speed into force and made it much smaller. Since acceleration is additive, you want to start with small amounts. It builds up quickly. Also note that now vx and vy are declared without var , making them timeline variables, which will be accessible from any function. Earlier, they were calculated newly on each frame, but now you need to keep track of them and add or subtract from their value each time. Of course, you could do away with the ax and ay variables here altogether, and just add the result of the sine and cosine lines directly to the velocities. I kept them separated for clarity.
Now, that code isnt too complex is it? But look back to the first motion example you did at the beginning of the chapter, and see just how far youve come. The first one was so flat, it might as well have been a tween. By learning just a couple of basic principles, youve now created something a million times more fluid and dynamicsomething that almost feels alive . And youre not even at the end of the chapter yet!
OK, lets pull everything together and see how much farther you can go with it.
A spaceship
Ive been talking a lot about spaceships traveling from here to there. Well, with the ground youve covered so far, you should be able to put together a reasonable spaceship simulation.
Heres the plan. The spaceship will be a movie clip. You can use the left and right keys to rotate it left and right. The up key will act to fire the rocket. Of course, the rocket is in the back of the ship and fires straight back. Thus, the force that the rocket applies will cause acceleration in the direction the ship is facing at that time. Actually, what youre going to make is a lot like the ship in the old game, Asteroids , minus the actual asteroids.
First, you need a ship. I made a pretty basic one out of four short, white lines, as a homage to the original that Im copying. If you have more artistic talent than I seem to have, go right ahead and whip something up in PhotoShop or Swift 3D. It will work the same when you get to the code. At any rate, Figure 5-8 shows what I came up with ( ch05_11.fla ).
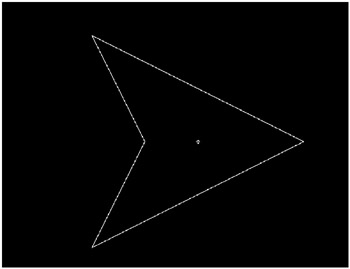
Figure 5-8: Behold the future of space travel.
This graphic is built in a movie clip symbol in the library called ship . It is set to export with the linkage name ship , so I can create an instance of it at runtime. Note also that the registration point is in the center of the ship, to allow for smooth rotation.
I also wanted to have some way of indicating visibly that the rocket was being fired . So inside the ship movie clip, I created a new keyframe and drew in a stylized flamevery stylized , as you can see in Figure 5-9.
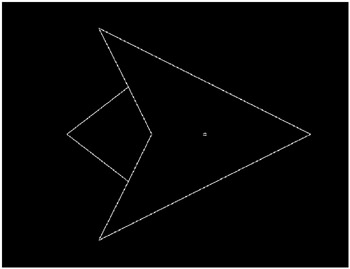
Figure 5-9: Beware of flame.
Now that the ship has two frames , its going to play them one after the other, creating a flickering flame. While you might want to build that into some kind of cool effect, that wasnt what I was looking for. I just wanted the flame to be on or off, so I added another layer to the timeline, clicked frame 1 of this new layer, and added the following code to it:
stop();
Now, youre ready to call me out on this, arent you? I told you that you should avoid putting code anywhere but frame 1 of the main timeline, and here, only a few chapters into the book, Im putting code on the timeline of a movie clip. What gives? Well, every rule has its exceptions. This is one of those.
Many times, it is useful to use the frames in Flash to hold various visual states of an object; in this case, the states of the ship firing and the ship not firing. Of course, I could do this another way. I could make two ship symbols, export them from the library, and attach one or the other dynamically, depending on the state of the ship. Or, I could make a flame movie clip and attach that when the ship is firing, and remove it when its not. I could even use the drawing API to draw the ship and the flame, which would be completely dynamic. However, for a simple case like this, most of those solutions would be pure overkill. All I want to do is swap images, and frames offer a very efficient, built-in way for me to do that. So I use it.
OK, youre cool with that, but what about the code? Well, its hardly code. Its a single statement, and it needs to run only one time to stop the movie clip from automatically playing. Its not affecting the logic of the ship program, the ships motion, or anything else. Its just controlling a display factor.
No future developer is going to be pulling his hair out trying to figure out why this ship movie clip isnt playing, because its obvious from the start that it isnt an animation, but a set of states. The alternative would be to tell the ship movie clip to stop somewhere in the code on the main timeline. This mixes in this one line for stopping the clip with all the motion code, and might actually be more confusing. Why is he stopping the ship before it even starts? Furthermore, this exact scenario has been used often enough by enough developers that it has become an accepted practice. A single stop action on the timeline of a movie clip is not a sin.
Ship controls
OK, now that you have built your ship, lets get its controls working. As I just mentioned, it has three controls: turn left, turn right, and fire rocket, mapped to the left, right, and up keys, respectively. You can use Key.isDown within the onEnterFrame handler function to test for these keys and update the display of the ship. Lets start out with just the code for that and nothing else. As usual, this will go right on the main timeline, frame 1, Actions panel ( ch05_11.fla ):
init(); function init():Void { vr = 5; ship = attachMovie("ship", "ship", 0); ship._x = Stage.width / 2; ship._y = Stage.height / 2; } function onEnterFrame():Void { if (Key.isDown(Key.LEFT)) { ship._rotation -= vr; } else if (Key.isDown(Key.RIGHT)) { ship._rotation += vr; } if (Key.isDown(Key.UP)) { ship.gotoAndStop(2); } else { ship.gotoAndStop(1); } } First you define vr , rotational velocity, or how fast the ship is going to turn when you tell it to turn. Remember, its best to keep hard-coded numbers out of your functions. Define them as variables somewhere at the top of your code and use the variables in your calculations. If you find that the ship rotates too quickly or slowly, you can change this value.
In the onEnterFrame handler function, you check for the left or right keys, and if either of them is down, you either add or subtract vr to the ships current rotation. Finally, check if the up key is being pressed. If so, send the ship to frame 2, If not, send it to frame 1. Now, here you see some numbers in the code. For this simple two-state ship, I stuck with frame numbers. A better solution, especially if you may have additional frames or multiple-frame animations as states, would be to use frame labels. For example, frame 1 could be labeled "rocketoff" and frame 2 could be labeled "rocketon" . Then your goto statements would be something like this.gotoAndStop("rocketon"); . This is not only clearer, but if you move your frames around, you dont have to worry about your goto statements suddenly referring to the wrong frames. Again though, for such a simple example, Im going to leave them as numbers.
Go ahead and test this example. You should be able to use the keyboard to rotate the ship and fire the rocket. It doesnt do anything yet, but its starting to look good. Lets make it move.
Thrust
OK, youve got your spaceship there, youve aimed it where you want it to go3, 2, 1, blastoff! So, how do you get this thing to go somewhere? Well, its pretty much just the opposite of what you just did in the revised mouse follower example. In that example, you calculated an angle and then figured out rotation and acceleration based on that. Here, youll start with the rotation and work backward to find the angle and then the force on x and y.
Obviously, acceleration is going to happen only if the rocket is being fired, so this code will go in the if statement that checks for the up key. Youll know the rotation, which is in degrees. Convert that to radians and use sine and cosine, along with the force variable, to find out the acceleration on each axis. Ive renamed force to thrust here. Heres the final code for the example, with the new parts shown in bold ( ch05_11.fla ):
init(); function init():Void { vr = 5; thrust = 0.2; vx = 0; vy = 0; ship = attachMovie("ship", "ship", 0); ship._x = Stage.width / 2; ship._y = Stage.height / 2; } function onEnterFrame():Void { if (Key.isDown(Key.LEFT)) { ship._rotation -= vr; } else if (Key.isDown(Key.RIGHT)) { ship._rotation += vr; } if (Key.isDown(Key.UP)) { var radians:Number = ship._rotation * Math.PI / 180; var ax:Number = Math.cos(radians) * thrust; var ay:Number = Math.sin(radians) * thrust; vx += ax; vy += ay; ship.gotoAndStop(2); } else { ship.gotoAndStop(1); } ship._x += vx; ship._y += vy; } Test it and fly your ship around. Its pretty amazing just how easily you can make some complex motion like that.
| | ||
| | ||
| | ||
EAN: 2147483647
Pages: 137
- Chapter I e-Search: A Conceptual Framework of Online Consumer Behavior
- Chapter III Two Models of Online Patronage: Why Do Consumers Shop on the Internet?
- Chapter IV How Consumers Think About Interactive Aspects of Web Advertising
- Chapter X Converting Browsers to Buyers: Key Considerations in Designing Business-to-Consumer Web Sites
- Chapter XVII Internet Markets and E-Loyalty