The Third Dimension and Perspective
| | ||
| | ||
| | ||
It goes without saying that the main concept behind 3D is the existence of another dimension beyond x and y. This is the dimension of depth, and it is usually labeled z.
Flash does not have a built-in z dimension, but it isnt too difficult to create one with ActionScript. Its actually far less complex than a lot of the stuff youve just done in the previous chapters!
The z axis
To begin with, you need to decide which direction the z axis is going to go: in or out. Let me explain. If you recall back to Chapter 2s discussion of Flashs coordinate system, youll remember that it is in some ways opposite to most other common coordinate systems. The y axis goes down instead of up, and angles are measured clockwise instead of counterclockwise.
So, should you make the z axis so that as an objects z position increases , it is going away from you or towards you? Neither way is necessarily more correct than the other. In fact, this subject has been addressed enough times that there are even names to describe the two methods : left-hand system and right-hand system.
Take your right hand and form an L with your thumb and forefinger, and then bend your middle finger 90 degrees from your index finger, each one will be pointing in another dimension. Now point your index finger in the direction the positive x axis goes, and your middle finger in the direction of the positive y axis. In a right-hand system, your thumb will now be pointing in the direction of the positive z axis. For Flash, this means the z axis will increase as it goes away from the viewer, and decrease as it goes toward the viewer, as shown in Figure 15-1.
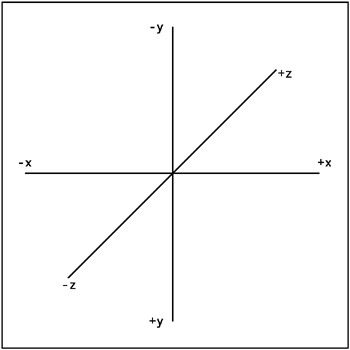
Figure 15-1: Right-hand coordinate system
If you try it with your left hand, youll get the opposite result. Figure 15-2 shows the left-hand coordinate system.
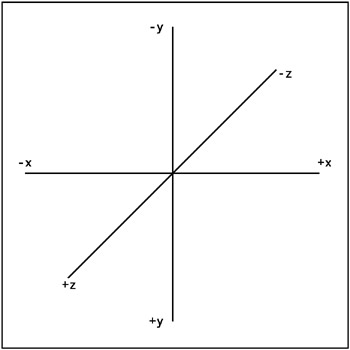
Figure 15-2: Left-hand coordinate system
I use the right-hand coordinate system (Figure 15-1) for the examples here. Theres no reason that you couldnt make a left-hand system, but it seems to fall together a little better to make the z axis go in.
The next step in creating a third (z) dimension in Flash is to figure out how to simulate perspective.
Perspective
Perspective is how we tell if something is closer to us or farther away. Or, to put it another way, how we make something look like it is closer or farther. While the field of fine arts has a number of techniques for presenting perspective, Ill be concentrating on two here:
-
Things get smaller as they get farther away.
-
Things converge on a vanishing point as they get farther away.
I wont labor the pointIm sure youve seen enough examples of train tracks coming to a point on the horizon. So basically, when you move something on the z axis, you need to do two things:
-
Scale it up or down.
-
Move it closer or further to the vanishing point.
In working with only two dimensions, you can generally get away with using the screen x and y coordinates for your objects x and y position. You just do a one-to-one mapping. This isnt going to work in 3D, because two objects can have the same x and y position, and yet, due to their depth, have a different position on the screen. So, each object you move in 3D will need to have its own x, y, and z coordinates that have nothing to do with the screen position. These now describe a location in virtual space. The perspective calculation will tell you where to put the object on the screen.
The perspective formula
The basic idea is that as something gets further away (z increases), its scale approaches 0 and its x, y position converges on the 0, 0 of the vanishing point. The good news is that the ratio of distance to scale is the same as the ratio of distance to convergence. So, you just need to figure out what that ratio is for a given distance and use it in both places. The diagram in Figure 15-3 helps to explain.
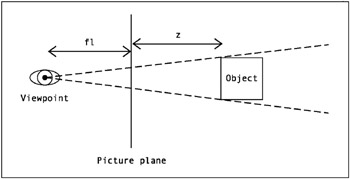
Figure 15-3: Perspective seen from the side
You have an object off in the distance. You have a viewpoint: your eyes. And you have a picture plane, which you can consider the computer screen. You have the distance of the object to the picture plane, which is the z value, and, finally, you have the distance from the viewpoint to the picture point. This last one is the key. Its not exactly the same as the focal length of a camera lens, but it is analogous, so I usually use the variable fl to represent it.
Heres the formula:
scale = fl / (fl + z)
This will usually yield a number between 0.0 and 1.0, which is your ratio for scaling and converging on the vanishing point. However, as z goes negative, fl + z approaches 0 and scale approaches infinity. This is the ActionScript equivalent to being poked in the eye.
So, what do you do with this scale value? Well, assuming you are dealing with a movie clip (which you will be throughout this chapter), you multiply scale by 100 and assign that to the clips _xscale and _yscale . You then multiply the objects x and y position by this factor to find its screen x and y position.
Lets look at an example. Usual values of fl are around 200 to 300. Lets use 250. If z is zeroin other words, the object is exactly on the picture planethen scale will be 250 / (250 + 0). This comes out to exactly 1.0. Multiplied by 100, you get 100 for _xscale and _yscale . And multiplied by the objects x and y positions , this gives the same numbers as result, so the objects screen position is exactly equal to its x and y.
Now move it out so that z is 250. That makes scale 250 / (250 + 250), or 0.5, which makes _xscale and _yscale 50. It also moves the objects screen position. If the object were at 200, 300 on x, y, its screen position would now be 100, 150. So, it has moved halfway to the vanishing point. (Actually, the screen position would be in relation to the vanishing point, which youll see shortly.)
Now, move z way out to 9750. This makes scale 250 / 10000, or 0.025, and _xscale and _yscale are just 2.5. The object will become just a speck, very close to the vanishing point.
OK, enough theory. Time for some code.
Perspective in ActionScript
Start with a new FLA file. Create some new movie clip and put an instance of it on stage. Ill continue to use the red ball that Ive grown so attached to, and name it ball . For interaction, lets get fancy and use the mouse and keyboard. Youll use the mouse to control the balls x and y position, and the up and down keys to move it forward and back on the z axis.
Heres the code to put on frame 1 of the main timeline ( ch15_01.fla ):
var x:Number = 0; var y:Number = 0; var z:Number = 0; var fl:Number = 250; var vpX:Number = Stage.width / 2; var vpY:Number = Stage.height / 2; function onEnterFrame():Void { x = _xmouse - vpX; y = _ymouse - vpY; if(Key.isDown(Key.UP)) { z+=5; } else if(Key.isDown(Key.DOWN)) { z-=5; } var scale:Number = fl / (fl + z); ball._xscale = ball._yscale = scale * 100; ball._x = vpX + x * scale; ball._y = vpY + y * scale; } First, you create variables for x , y , and z , as well as fl . Then you create a vanishing point, vpX , vpY . Remember that as things go off in the distance, they converge on 0, 0. If you dont offset this somehow, everything will converge at the top-left corner of the screen, which is not what you want. Youll use vpX , vpY to make the center of the stage the vanishing point.
Next, set x and y to equal the mouse position, as offset by the vanishing point. In other words, if the mouse is 200 pixels right of center, x will be 200. If its 200 pixels left of center, x will be ˆ 200.
Then check the state of the up and down cursor keys, and change z accordingly . If the up key is being pressed, z increases, and down decreases it. This will make the ball move farther or closer to the viewer.
Finally, calculate scale using the formula I just covered, and size and position the ball accordingly. Note that the screen x and y positions ( _x and _y ) are calculated from the vanishing point, adding on the x and y times the scale . Thus, as scale becomes very small, the ball will converge on the vanishing point.
When you test it, at first it looks like youre simply dragging the ball with the mouse. This is because z is zero, making scale 1.0. So, no noticeable perspective is being applied. As you press the up cursor key, the ball appears to slide into the distance, as shown in Figure 15-4. Now as you move the mouse around, the ball moves with it, but much less, giving you a parallax effect.

Figure 15-4: Perspective in action.
One thing you might notice is that if you hold down the cursor key too long, the ball starts getting very large. This is fine. If you held a pebble up close to your eye, it would look like a boulder. If you keep holding the key down, though, youll see that it grows to an infinite size and then shrinks down again, but now its upside down and reversed . What has happened is that the ball has gone behind the viewpoint. So, I guess this must be what you would see if your eyes could look behind you.
Mathematically, what happens is that when z is equal to -fl , the formula scale = fl / (fl + z) becomes scale = fl / 0 . In many languages, dividing by zero gives you an error. In Flash, it gives you Infinity . As you decrease z even more, youre now dividing fl by a negative number. Scale becomes negative, which is why your ball goes upside down and backwards .
How can you handle this? A simple way is to just make the ball invisible if it goes past a certain point. If z is less than or equal to ˆ fl , youll have a problem, so you can test for that condition and handle it like so ( ch15_02.fla ):
var x:Number = 0; var y:Number = 0; var z:Number = 0; var fl:Number = 250; var vpX:Number = Stage.width / 2; var vpY:Number = Stage.height / 2; function onEnterFrame():Void { x = _xmouse - vpX; y = _ymouse - vpY; if(Key.isDown(Key.UP)) { z+=5; } else if(Key.isDown(Key.DOWN)) { z-=5; } if(z <= -fl) { ball._visible = false; } else { ball._visible = true; var scale:Number = fl / (fl + z); ball._xscale = ball._yscale = scale * 100; ball._x = vpX + x * scale; ball._y = vpY + y * scale; } } Note that if the ball is not visible, you dont need to worry about scaling and positioning it. Also note that if the ball is in visible range, you need to make sure it is visible. It adds a little extra overhead, but its necessary overall.
Well, there you have it, the barebones basics of 3D. Not so painful is it? Make sure you play around with this example a bit to get a good feel for it. In particular, try changing the value for fl and see the different effects you get. This is equivalent to changing the lens of a camera. High values for fl are like a telephoto lens, giving you a small field of view, with less visible perspective. A low fl will create a wide-angle lens, with exaggerated perspective.
The rest of the chapter is devoted to ActionScripting the various motion effects covered in previous chapters, but now in 3D.
| | ||
| | ||
| | ||
EAN: 2147483647
Pages: 137