| Most sounds in Director movies don't need to be precisely synchronized. If you have background music playing while action is happening on the Stage, it usually doesn't matter whether particular points in the music coincide with particular points in the action. Occasionally, however, you do want sounds to be synchronized with events on the Stage. For example, you may have an animation of a ball bouncing, and you want an impact sound to be heard each time the ball hits the floor ( Figure 13.16 ). In this case, you can note the frames in which the ball hits the floor, and place a sound sprite in each of those frames ( Figure 13.17 ). Though this technique works well with brief sounds, it doesn't work nearly as well with longer sounds, which often take an unpredictable amount of time to load into memory or to begin streaming. Figure 13.16. An animated ball bounces on the Stage. To synchronize the sound of the bouncing ball with the animation, you must first make note of each frame in the Score in which the ball hits the floor. 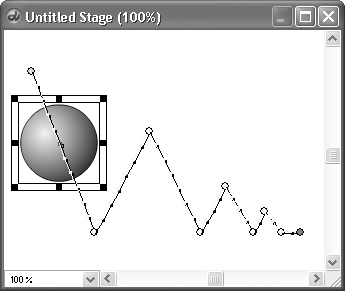 Figure 13.17. Sprites representing the ball-bounce sound effect have been placed in a sound channel. Each sprite begins in a frame in which the ball hits the floor. 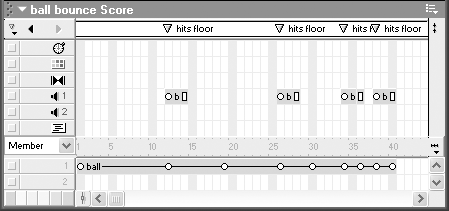 Because of the ways tempo and loading times vary from computer to computer, it's a good idea to avoid situations where you need to synchronize longer sound files to action on the Stage. If you do need to synchronize sound precisely to animation, you might consider exporting your movie as a QuickTime file. (See the sidebar "Exporting an Animation Sequence as a QuickTime File" later in this chapter.) You'll find it much easier to do the opposite synchronize action on the Stage to a sound track. Through the use of cue points, you can make the playhead pause and wait for a particular point in a sound file, then resume playing when that point is reached. (See the sidebar "Using Cue Points" in Chapter 5.) If you don't have access to one of the third-party programs that allow you to insert cue points in a sound file, you can achieve a similar result by using any sound-editing program to divide the sound file into smaller segments. Then, in Director, you can synchronize your action to the {End} cue point for each segment. To synch animation to sound by using cue points: -
Using a third-party program, create cue points in your sound file at the points where visual elements of your movie need to be synchronized to the sound ( Figure 13.18 ). Figure 13.18. This is a window in Peak LE, displaying a sound file containing a drum roll followed by a cymbal crash. A cue point has been placed at the beginning of the cymbal crash. 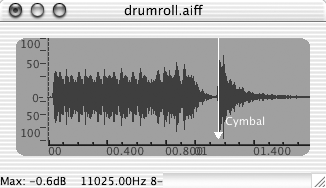 The Windows programs that allow you to insert cue points are Sound Forge 4.0 or later, or Cool Edit 96 or later. On the Mac you can use SoundEdit 16 version 2.07 or later, or Peak LE 2 or later. (In some of these programs, cue points are called Markers.) -
Save the sound file in WAV format (Windows) or AIFF or Shockwave Audio format (Mac). -
Import the sound file into Director. (See "Importing and Previewing Sound Files" at the beginning of this chapter.) The sound file appears in the Cast window. -
If you haven't done so already, create the animation that will be synchronized to the cue points in the sound file. Include natural places for the animation to pause while Director waits for a cue point ( Figure 13.19 ). Be sure that each portion of the animation is shorter than the corresponding portion of the sound file, so there's time to include a pause. Figure 13.19. In this animation sequence of a rabbit being pulled out of a hat, you can see that once the hand is fully in the hat, the animation will pause until the end of the drum roll. 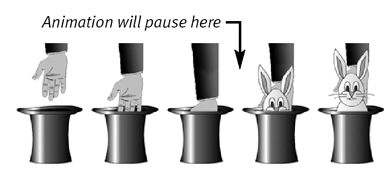 -
Drag the sound cast member to either of the two sound channels in the Score, placing its first frame wherever you want the sound to start in the movie. -
Drag the last frame of the sound sprite to line up with the last frame of the corresponding animation ( Figure 13.20 ). Figure 13.20. The drum-roll sound sprite containing the cymbal cue point is placed in the Score, with its first and last frames corresponding with the first and last frames of the animation. 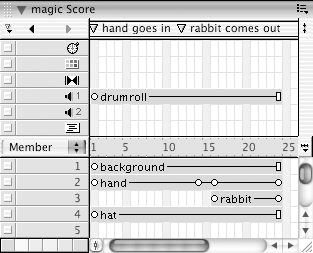 -
In the tempo channel of the Score, double-click the frame where you want the playhead to pause and wait for a cue point ( Figure 13.21 ). Figure 13.21. In the tempo channel, double-click the frame in which you want the animation to pause. 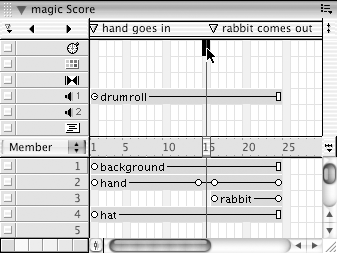 The Frame Properties: Tempo dialog box opens. -
Choose the Wait for Cue Point option ( Figure 13.22 ). Figure 13.22. The cue point settings for the cymbal crash in the Frame Properties: Tempo dialog box.  -
From the Channel pop-up menu, choose the sound channel that contains the sound sprite. -
From the Cue Point pop-up menu, choose the cue point to wait for. -
Click OK to close the dialog box. -
Repeat steps 7 through 11 for each additional cue point to which you want to synchronize an action. If nothing else, you'll probably want to place a Wait for Cue Point command in the last frame of the sound sprite, using {End} as the cue point, so that the sound file can play to completion ( Figure 13.23 ). Figure 13.23. There are now two Wait for Cue Point commands in the Tempo channel: one to pause the animation before the cymbal crash, the other to pause it at the end so that the sound file can play to completion.  -
Rewind and play the movie. The playhead pauses at each frame where you inserted a Wait for Cue Point command, and resumes playing when the specified cue point is reached in the sound file. To synch animation to sound without using cue points: -
Using any third-party sound-editing program, divide your sound file into individual segments. Make the divisions at the points where visual elements of your movie need to be synchronized to the sound ( Figure 13.24 ). Figure 13.24. In Windows Sound Recorder, the sound file containing the drum roll and cymbal has been divided into two sound files, one for the drum roll and one for the cymbal. 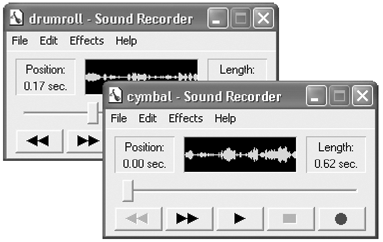 -
Save the segments as individual sound files in any format that Director can import. -
Import the sound files into Director. The sound files appear in the Cast window. -
If you haven't done so already, create the animation that will be synchronized to the segmented sound file. Be sure that each portion of the animation is shorter than the corresponding segment of the sound file, so there's time to include a pause. -
Drag the sound cast members , in sequence, to either of the two sound channels in the Score. -
Drag the last frame of each sound sprite to line up with the last frame of the corresponding animation ( Figure 13.25 ). Figure 13.25. The drum roll and cymbal sound sprites together in the Score. The last frame of the drum roll sprite is dragged to the frame where the animation is intended to pause. The last frame of the cymbal sprite is dragged to the last frame of the animation. 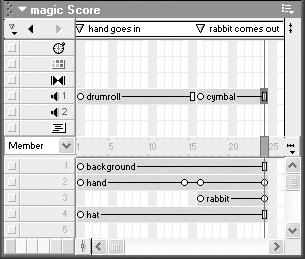 -
In the tempo channel of the Score, double-click the frame in which the first sound sprite ends. The Frame Properties: Tempo dialog box opens. -
Choose the Wait for Cue Point option. -
From the Channel pop-up menu, choose the sound channel that contains the sound sprite. -
From the Cue Point pop-up menu, choose {End}. -
Click OK to close the dialog box. -
Repeat steps 7 through 11 for each additional sound sprite ( Figure 13.26 ). Figure 13.26. A Wait for Cue Point command corresponds with the end of each sound sprite. 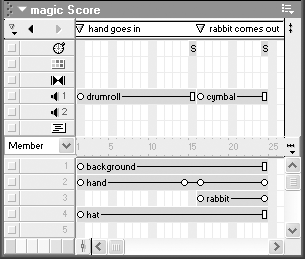 -
Rewind and play the movie. The playhead pauses at each frame where you inserted the Wait for Cue Point command, and resumes playing when the corresponding sound file comes to an end. Exporting an Animation Sequence as a QuickTime File If you have a movie that relies on precise correspondence between animation and sound, you may be unpleasantly surprised when you test the movie on other hardware. Because the tempo of a Director movie varies from computer to computer (see "Comparing Target Tempo with Actual Tempo" in Chapter 5), the synchronization that seemed perfect on your computer may be a mess on someone else's. It this situation, one option you might consider is exporting your animation sequence as a QuickTime file. By doing so, you capture the movie exactly as it plays on your computer and "freeze" it in QuickTime formatwhich, unlike Director, is designed to keep the video and audio tracks in perfect sync at all times. To export a QuickTime file, do the following: -
In the Score, select the frames that you want to export. (If you want to export the entire movie, you can skip this step.) -
Choose File > Export. The Export dialog box opens ( Figure 13.27 ). Figure 13.27. The Export dialog box. 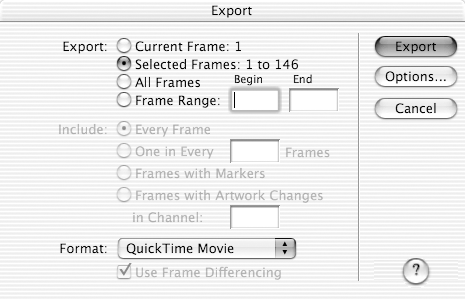 -
Under Export, choose Selected Frames (if you selected frames in step 1) or All Frames (if you didn't). -
Under Format, choose QuickTime movie. -
Click the Options button. The QuickTime Options dialog box opens ( Figure 13.28 ). Figure 13.28. The QuickTime Options dialog box appears. 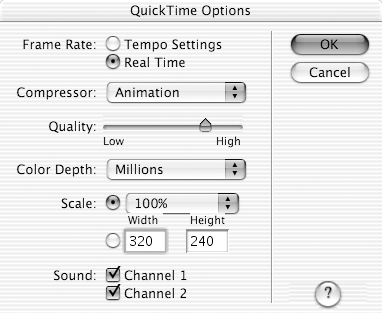 -
Under Frame Rate, choose Real Time. -
(optional) Set the other QuickTime export options as desired. (See the Director documentation or Help menu for details.) -
Click OK. The QuickTime Options dialog box closes . -
In the Export dialog box, click Export. A Save As dialog box appears. -
Choose a name and location for the QuickTime file and click Save. An alert box appears, warning you to disable any screensavers. -
Click OK to close the alert box. Director switches to full-screen mode, plays the animation, and captures it to QuickTime. The new QuickTime file appears in the location you specified in step 10. You can now import the QuickTime file into your Director movie and use it to replace the animated scene. (Be sure to save the original first!) | |