| When you place a visual cast member on the Stage, it's automatically surrounded by a rectangular bounding box. This bounding box usually appears as a white rectangle behind the sprite ( Figure 8.2 ). (If the sprite is based on a vector-shape cast member, the rectangle is filled with the cast member's background color , which is usuallybut not necessarily white.) Figure 8.2. Most sprites are surrounded by a white rectangle when they first appear on the Stage.  If the sprite itself is perfectly rectangular, the rectangle is completely hidden behind the sprite ( Figure 8.3 ). But with most sprites, at least part of the rectangle remains visible, resulting in unsatisfactory compositing against anything other than a pure white background ( Figure 8.4 ). Figure 8.3. If the sprite itself is perfectly rectangular, then the white rectangle isn't visible.  Figure 8.4. This sprite looks fine against a white background (left), but the white rectangle becomes visible when the background is changed (right). 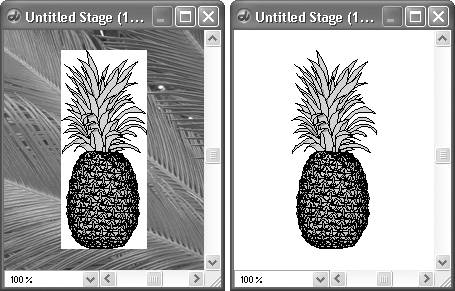 You can easily solve this problem by changing the ink effect applied to the sprite. (For more information on ink effects, see "Sprite Ink Effects" in Chapter 3.) The default ink effect applied to every new sprite is Copy. If you change the ink effect to Background Transparent, the white rectangle disappears ( Figure 8.5 ). This is because the Background Transparent ink effect makes all white pixels in a sprite (or all pixels of the background color you specify) invisible, allowing whatever is behind those pixels to show through. Figure 8.5. Changing the sprite's ink effect from Copy to Background Transparent makes the rectangle disappear. 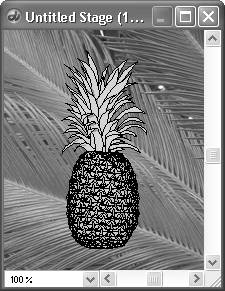 The Background Transparent ink effect is a quick, simple way to composite a sprite against a background. However, it only works for sprites based on a specific kind of cast member: -
The cast member must have a pure, flat-white or solid-color background. (Note that many backgrounds that seem to be solid actually have slight color variations. Uneven color backgrounds are especially common in cast members imported from JPEG files. Figure 8.6 shows what happens to background color variations when you use Background Transparent ink.) Figure 8.6. Because the background in this JPEG file isn't consistently white, parts of it remain visible when Background Transparent ink is applied. 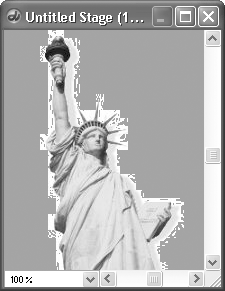 -
If the cast member is a bitmap, it must have sharp boundaries, with no anti-aliasing, blurring, or smoothing. If the edges of the cast member are blended into the background in any way, there will be a "halo" around the sprite when Background Transparent ink is applied. (See "Eliminating Halos in Imported Images," later in this chapter.) To make a sprite's background transparent: -
Select the sprite on the Stage or in the Score. -
Set the background color in the Tool palette to match the background color of the sprite's cast member ( Figure 8.7 ). Figure 8.7. Set the background color in the Tool palette to match the background color of the cast member. 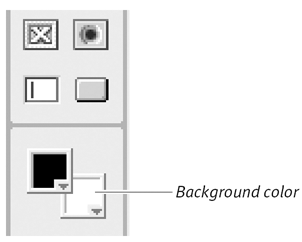 If the cast member's background is white, make sure the background color in the Tool palette is set to white. If the cast member's background is a color other than white ( Figure 8.8 ), set the background color in the Tool palette to match that color ( Figure 8.9 ). (Use the color picker if necessary.) Figure 8.8. This falling snow was made with the Air Brush tool. Because the snow is white, it was sprayed onto a red background instead of the usual white background. 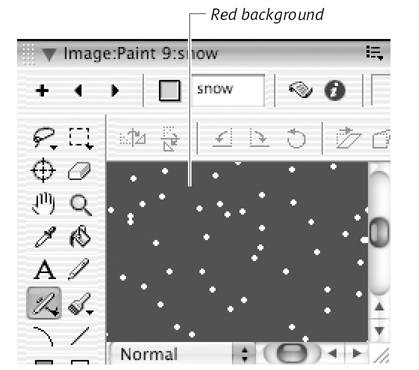 Figure 8.9. The background color in the Tool palette is set to match the red used for the background of the snow. 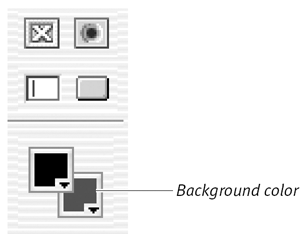 -
In the Property Inspector, select the Sprite tab. -
In the Sprite tab's Ink menu, choose Background Transparent ( Figure 8.10 ). Figure 8.10. Select Background Transparent ink in the Property Inspector. 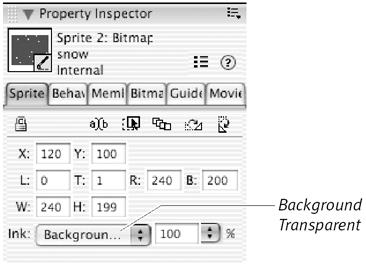 The sprite's background becomes invisible on the Stage ( Figure 8.11 ). Figure 8.11. The snow's red background becomes invisible, allowing the falling snow to be composited into the scene.  If there are pixels in the sprite that are the same color as the background, they become invisible as well ( Figure 8.12 ). Figure 8.12. Left: a cast member whose background and eyes are both white. Right: the same cast member as a sprite on the Stage, with Background Transparent ink applied. The background and eyes both become transparent. 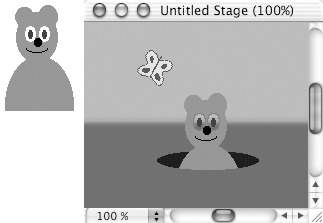  Tip Tip -
In order for the Background Transparent ink effect to work, the background color set in the Tool palette must match the cast member's background color exactly. If necessary, sample the sprite's background color in the Paint window or in an external image-editing program to get the color's exact RGB values. Then match those RGB values in the Tool palette, using the color picker if necessary.
To make a sprite's background transparent without affecting pixels that are the same color as the background: -
Follow the steps in the previous task, "To make a sprite's background transparent," but use the Matte ink effect instead of Background Transparent ( Figure 8.13 ). Figure 8.13. The same sprite using Matte ink instead of Background Transparent. The Matte ink makes the background transparent but leaves untouched the pixels that were the same color as the backgroundsuch as the eyes, in this case. 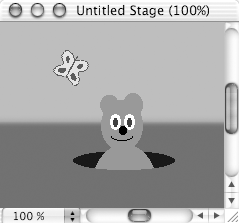 or Change the pixels (either foreground or background) to a different color ( Figure 8.14 ); then follow the steps in the previous task. Figure 8.14. Repainting the eyes with a slightly off-white color allows them to stay visible when Background Transparent ink is used.  Tips -
The Matte ink effect takes more processing power than Background Transparent and can slow down your movie, so avoid it if you can. -
There are other ink effects that will make background pixels transparent, such as Transparent, Reverse, and Ghost. (See the "Score Ink Effects" sidebar in Chapter 3 for descriptions of all the ink effects.) However, unlike Background Transparent and Matte, these other effects may change the appearance of foreground pixels as well ( Figure 8.15 ). Figure 8.15. Other ink effects (such as Reverse, shown here) also make a sprite's background disappear, but they affect the foreground as well. 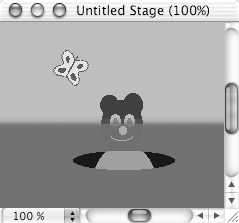 -
The Background Transparent and Matte ink effects work for both vector and bitmapped cast members. The remaining compositing techniques in this chapter are for bitmapped cast members only.
|