Making Film Loops Director allows you to turn any animated sceneno matter how many frames or channels it occupies in the Scoreinto a single cast member called a film loop . Film loops work best with repetitive movements, such as walking ( Figures 4.56 and 4.57 ). If you create a film loop ( Figure 4.58 ) of a man taking two strides (one with the left foot and one with the right), the film loop will repeat those strides endlessly, causing the man to run in place. Figure 4.56. These six cast members , showing a running figure... 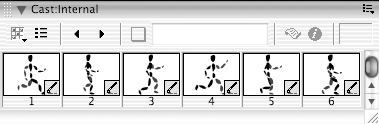 Figure 4.57. ...are combined into a multiple-member sprite. 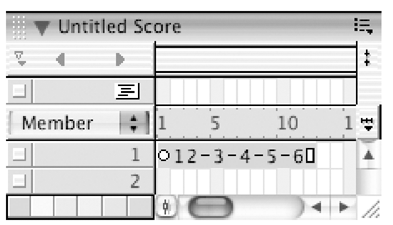 Figure 4.58. The multiple-member sprite is made into a film loop.  Like any other cast member, a film loop can be dragged to the Stage or Score and tweened ( Figure 4.59 ). If the film loop of the walking man is tweened from one side of the Stage to the other, the man will appear to be walking across the Stage ( Figure 4.60 ). Figure 4.59. A sprite based on the film loop is tweened in the Score.  Figure 4.60. In the final result, the figure appears to run across the Stage. 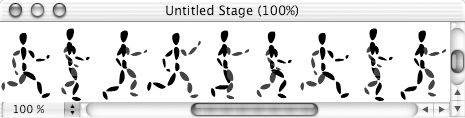 A film loop can contain other film loops. Suppose you have two film loops in the Score: one of the walking man and the other of his running dog. You can create a single film loop to include both loops. In this way, film loops make it easy to assemble complex movies. To create a film loop: -
In the Score, select all the sprites for the film loop. You can include effects sprites from the effects channels. -
Choose Insert > Film Loop. The Create Film Loop dialog box opens ( Figure 4.61 ). Figure 4.61. Choose a name for the film loop. 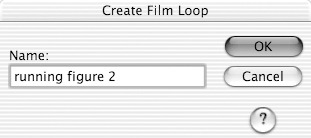 -
Type a name for the film loop. -
Click OK. Director puts the film loop in the next available position in the Cast window.  Tips Tips -
A shortcut for creating a film loop is to drag the selected sprites directly from the Score to the Cast window. -
After creating a film loop, you can, if you wish, delete the original sprites from which the film loop was made. -
Do not delete the cast members that are used in the film loop. If you delete them from the Cast window, they will vanish from the film loop as well.
Flash Talk: Film Loops vs. Movie Clips A film loop is the closest equivalent Director has to a Flash movie clip. Both allow a complex sequence to be reduced to a single, tweenable object that repeats the same series of frames indefinitely. However, since a film loop stops playing when the movie ends, it's closer to an animated graphic symbol than to a movie clip. In Flash, one of the significant features of movie clips is that they are scriptable. In Director, everything is scriptable, including film loops. Unlike Flash symbols, a film loop doesn't have its own timeline, so the only way to edit a film loop is to paste it into the Score, make your changes, and then convert it back to a film loop. This is one area in which Director is noticeably more primitive than Flash. | To use a film loop in a movie: -
Create a sprite by dragging the film loop from the Cast window to the Score or the Stage. -
If necessary, extend the sprite by dragging its end frame to the right. The sprite should be at least long as the original sprite (or sprites) from which the film loop was made, so the action of the film loop will be able to play at least once. The longer you extend the sprite, the more times the action of the film loop will repeat. ( Figure 4.62 ). Figure 4.62. If the action in the film loop is 12 frames long, this 36-frame sprite will repeat the action two more times. 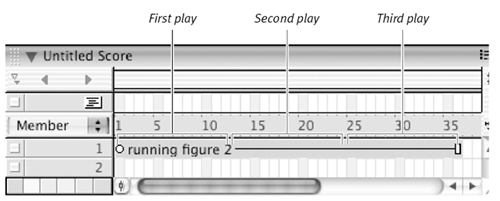 -
(optional) Tween the film loop as you would any other sprite. Tips -
Film loops animate only when you play your movie; you won't see the animation if you step through the frames or drag the playhead across the frames. -
You can't apply ink effects to film loops. You must apply ink effects to the individual sprites before you include them in a film loop.
To edit a film loop: -
Select the film loop in the Cast window ( Figure 4.63 ). Figure 4.63. Select the film loop whose contents you want to edit.  -
Choose Edit > Copy Cast Members. -
Click a cell in a clear part of the Score. -
Choose Edit > Paste Sprites. The sprites that make up the film loop will be pasted into the Score ( Figure 4.64 ). Figure 4.64. The sprites contained in the film loop are pasted into the Score.  -
Edit or adjust the sprites as necessary ( Figure 4.65 ). Figure 4.65. Make whatever changes you like. (You can even add or delete sprites.)  -
Select the sprites. -
Choose Insert > Film Loop. The Create Film Loop dialog box opens. -
Type a name for the revised film loop. You may, if you wish, give it the same name that you gave the original film loop. -
Click OK. Director puts the revised film loop in the next available position in the Cast window ( Figure 4.66 ). Figure 4.66. The revised film loop doesn't overwrite the original; it simply gets added as a new cast member. 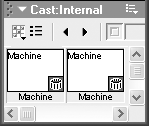 -
Select the new film loop in the Cast window. -
Choose Edit > Cut Cast Members. -
Select the old film loop in the Cast window. -
Choose Edit > Paste. The new (edited) film loop replaces the old one. Tips -
If you haven't deleted the original sprites from which the film loop was made, you can skip steps 1 through 4. -
If you want to keep both the old and new versions of the film loop, you can skip steps 10 through 13.
|