| You can create a projector using two different approaches. The first approach is to embed a Director movie (or multiple movies) inside the projector file, along with any external casts that the movie requires. The result is a single, self-contained file that includes everything necessary to play your movie. This is the easiest sort of projector to create, and it's especially suitable for a nontechnical audience that can't be relied on to handle multiple files. The second approach is to place the movie (or movies), along with any external casts, outside the projector file. In this case, the projector can contain only a single, tiny movie containing a Lingo script that causes it to play the other movies. This sort of projector is called a stub projector, and it has several advantages over a self-contained projector: -
A stub projector starts playing more quickly than a self-contained projector. -
Because the movie files are stored outside the projector, you can easily modify them without having to re-create the projector file each time. -
If you're distributing a cross-platform CD-ROM or DVD-ROM, you can conserve disk space by including one stub projector for Windows, one stub projector for Mac, and a single movie (or set of movies) playable by both projectors. Keep in mind that linked external cast members, unlike external casts, can't be embedded in a projector file. (For information about casts and cast members, both internal and external, see Chapter 2, "Assembling Casts.") Therefore, if your movie makes use of cast members linked to external files, you'll need to distribute multiple files anywayso you might consider using a stub projector instead of a self-contained projector. To prepare movies for distribution in a projector: -
If you plan to include multiple movies in your projector, copy all the original movie files (along with external casts, if any) into a single distribution folder ( Figure 16.2 ). Figure 16.2. Copy all of the original movie files and external casts into a single folder.  You can name the distribution folder whatever you like, but we'll call it Distribution Folder in this example. -
If any of the movies that you plan to embed in the projector have cast members linked to external files, create a subfolder within the distribution folder, and copy the linked files into that subfolder ( Figure 16.3 ). Figure 16.3. Create a subfolder, and copy all linked external files into it.  Note: If none of the movies has cast members linked to external files, you don't need to do anything else to prepare movies for distribution in a projector. You can skip this and all remaining steps in this task. -
In Director, open one of the movies that has cast members linked to external files. Director attempts to load each external file. If it's unable to locate a file, it presents you with a Locate Replacement dialog box ( Figure 16.4 ). Figure 16.4. If Director doesn't find a linked external file in the expected location, it asks you to locate the file manually.  -
If the Locate Replacement dialog box appears, navigate to the proper file and click OK to reestablish the link. -
In the Cast window, select any cast member that's linked to an external file. -
Click the Member tab in the Property Inspector. -
In the Filename field of the Property Inspector, check whether the cast member is linked to the proper filethe one that's in the subfolder you created in step 2 ( Figure 16.5 ). If notif it's linked to another copy of the file elsewhere on your hard driveupdate the link. Figure 16.5. Check and update the link to an external file on the Member tab of the Property Inspector.  You can update the link by typing a new pathname directly into the Filename field, or you can click the Browse button (labeled with three dots) and navigate to the new file. -
Repeat steps 5 through 7 for each remaining cast member that's linked to an external file. -
Save your changes to the movie. -
Repeat steps 3 through 9 for each remaining movie that has cast members linked to external files. To create a self-contained projector: -
Prepare the movie files as described in the preceding task, "To prepare movies for distribution in a projector." -
In Director, choose File > Create Projector. If a movie is currently open with unsaved changes, an alert box asks whether you want to save the changes ( Figure 16.6 ). Figure 16.6. This alert box gives you the opportunity to save changes to an open movie before creating a projector. If you choose not to save them, the changes will be lost.  -
If the alert box appears, click Yes (Windows) or Save (Mac) if you want to save the changes; or click No (Windows) or Don't Save (Mac) if you don't want to save the changes. The Create Projector dialog box appears ( Figure 16.7 ). (On the Mac, this dialog box is mistakenly titled Open.) Figure 16.7. The Create Projector dialog box allows you to embed movies in a projector.  -
Click the Options button. The Projector Options dialog box opens ( Figure 16.8 ). Figure 16.8. The Projector Options dialog box is where you specify how your movies will be displayed.  Choose from the following options: -
Check Play Every Movie if you plan to include several movies in the projector and want them all to play ( Figure 16.9 ). Figure 16.9. The Playback options.  If you leave this option unselected , the projector plays only the first of the embedded movies. (However, the other movies will play if they're triggered by Lingo commands in the first movie.) -
Choose Animate in Background if you want the projector to continue playing when users switch to another application. If you don't select this option, the projector pauses when a user switches to another program, and resumes playing when the projector once again becomes the active window. -
Select the Full Screen option if you want the movie to play in Full Screen mode ( Figure 16.10 ). (For more information about Full Screen mode, see "To view the Stage in Full Screen mode" in Chapter 9.) Figure 16.10. These projector-window options are displayed differently in Windows and Mac, but they accomplish the same thing.  If you don't want the movie to play in Full Screen mode, select In a Window (Windows), or deselect the Full Screen check box (Mac). The projector will play in a window just large enough to hold the Stage, with the name of the projector displayed in its title bar ( Figure 16.11 ). Figure 16.11. A projector window, with and without a title bar. 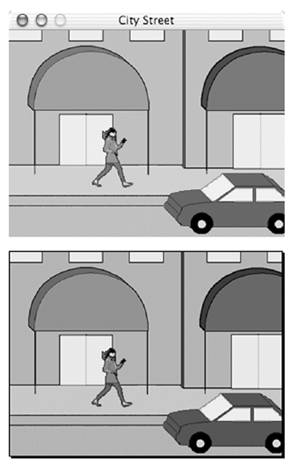 -
Deselect the Show Title Bar check box if you want the projector window to display without a title bar. (This option is unavailable if you selected Full Screen mode in the previous step.) Without a title bar, the projector window can't be moved by the user. -
Select either Use Movie Settings or Match First Movie if you plan to include several movies in the projector ( Figure 16.12) . Figure 16.12. If you have multiple movies in a projector, choose a Stage Size setting.  If you choose Use Movie Settings, the projector window will resize itself to match the Stage dimensions of each movie ( Figure 16.13 ). (See "To change the size, location, and background color of the Stage" in Chapter 9.) Figure 16.13. If you choose Use Movie Settings, the size of the projector window changes for movies that have different stage sizes. If you choose Match First Movie, the window stays a constant size. 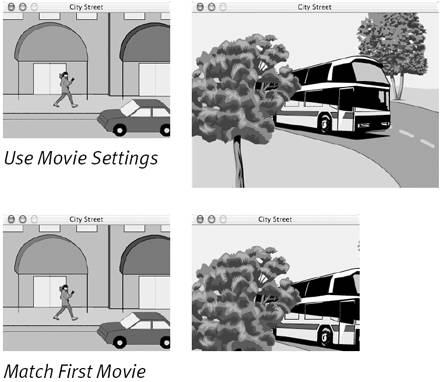 If you choose Match First Movie, the projector window will match the Stage dimensions of the first movie in the projector, then remain at that size when it plays the other movies in the projector. If the projector contains only one movie, it doesn't matter which option you choose. -
Select the Center check box if you want the projector window to be centered on the user's computer screen ( Figure 16.14 ). Figure 16.14. Select Center to place the stage at the center of the user's screen. The Reset Monitor option, found only on the Mac, is rarely used anymore.  If you don't select this option, the projector uses the Stage location saved with each movie file. (See "To change the size, location, and background color of the Stage" in Chapter 9.) -
(Mac only) Select the Reset Monitor to Match Movie's Color Depth check box if your projector includes an old Director movie that has an 8-bit color depth and uses palette effects. (Since Director no longer supports the creation of 8-bit movies, you'll rarely have any reason to select this option.) -
Select the Compress (Shockwave Format) check box if you want Director to compress each movie file when it's embedded in the projector ( Figure 16.15 ). Figure 16.15. Select Compress (Shockwave Format) to compress the projector's embedded movies.  This option reduces the projector's file size, but it could result in pauses during movie playback, because each movie file will need to be decompressed before it plays. Despite the use of the phrase Shockwave Format , this option doesn't create a Shockwave movie, andunlike the Shockwave Player option, which you'll encounter belowit doesn't require the user to have the Shockwave Player installed on his or her computer. -
Choose a Player option to determine what kind of mechanism will be loaded into the projector to play back the movies ( Figure 16.16 ): Figure 16.16. Choose a player option for your projector.  Standard embeds an uncompressed version of the Director player. This option produces a large projector file, but one that starts relatively quickly. Compressed embeds a compressed version of the player, which reduces projector size but adds a few seconds' delay before playback while the player is decompressed. Shockwave produces the smallest projector file by not embedding the player at all, relying instead on the Shockwave player installed on the user's system. If the player is not installed, the user is prompted to download it. This type of projector is called a Shockwave projector or slim projector . (Note: The Shockwave option is not available in the educational version of Director.) -
(Mac only) Select the MacOS X option if you want to create a projector that will run in native mode under OS X, or select the Classic MacOS option if you want to create a projector that will run under Mac OS 9 and earlier ( Figure 16.17 ). Figure 16.17. On the Macintosh, select the operating system on which you want the projector to play.  A projector created with the Classic MacOS option will still run under OS X, but only in Classic mode. If you select the Classic MacOS option, the Use System Temporary Memory option becomes available. This option allows the projector to use system memory when its own memory partition is full. It's selected by default, and there's generally no need to deselect it. -
Click OK to close the Projector Options dialog box. -
In the Create Projector dialog box, select the first movie that you want to include in the projector ( Figure 16.18 ). Figure 16.18. Select the first movie that you want the projector to play, and click Add.  -
Click the Add button. -
Repeat steps 6 and 7 as many times as necessary to add additional movies or external casts to the projector. As noted in the introduction to this section, only Director movies and external casts can be embedded in a projector. All other types of linked external files (including digital video files) must remain outside the projector. If your projector includes multiple movies, they will play in the order in which they appear in the File List (Windows) or Playback Order list (Mac) ( Figure 16.19 ). Figure 16.19. Movies in a projector play in the order in which they appear in the Playback Order list (called the File List in the Windows version, shown here).  -
If necessary, change the order of movies in the list by selecting a movie and clicking Move Up or Move Down ( Figure 16.20 ). Figure 16.20. You can change the order of movies by clicking the Move Up and Move Down buttons . Here, the movie earth.dir has been moved up in the list.  If you need to remove a movie from the list, select it and click Remove. -
Click Create ( Figure 16.21 ). Figure 16.21. After you double-check all the settings, click Create to create the projector.  The Create Projector dialog box closes , and the Save dialog box appears. -
Name the projector and click Save. If any of the movies in the projector has linked external cast members, be sure to save the projector to the same distribution folder that the original Director files are in, in order to preserve the file links. -
Double-click the projector to test it. -
Delete the original movie files from the distribution folder ( assuming you have backup copies elsewhere). The contents of the distribution folder may now be copied to a CD, or to the distribution medium of your choice ( Figure 16.22 ). Figure 16.22. The final contents of the distribution folder.   Tips Tips -
Whenever you click the Options button in the Create Projector dialog box, Director displays the same options you used the last time you created a projector. -
After a projector has been created, it can't be modified, so check all the settings carefully before you complete the process. The only way to make changes in a projector is to re-create it from scratch. -
Projectors made with the educational version of Director begin and end with a Macromedia splash screen that says "Not intended for commercial use or distribution." The only way to eliminate that splash screen is to create a projector with the full commercial version of Director.
To create a stub projector with external movie files: -
Prepare the movie files as described in "To prepare movies for distribution in a projector," earlier in this section, but place the movies in a subfolder within the distribution folder ( Figure 16.23 ). Figure 16.23. Place the movie files in a subfolder within the distribution folder.  The subfolder can be called whatever you want; we'll call it Movies in this example. -
Create another subfolder within the distribution folder, and call it Xtras ( Figure 16.24 ). Figure 16.24. The folder that holds resources needed by the projector must be called Xtras.  The folder must be called Xtras, or else it won't be recognized. (To understand what you're doing in this and some of the following steps, you might want to skip ahead and read Chapter 19, "Using Xtras.") -
Copy the following files from the Director MX application folder to the newly created Xtras folder: -
Windows: dirapi.dll, imi32.dll, proj.dll, msvcrt .dll -
Mac: DPLLib, IMLLib, ProjLib, MacromediaRuntimeLib The projector will need these resource files in order to run properly. -
For each of the movie files in the Movies folder, follow the directions in "To distribute Xtras with a projector (without embedding them in a movie)" in Chapter 19, "Using Xtras." You can ignore step 9 of those directions, which tells you to create an Xtras folder, since you've already done so. -
If you want to keep users from opening your movie files, convert them to protected format. (See the next section, "Protecting Movie Files.") or If you want to protect your files and save disk space at the same time, compress them in Shockwave format. (See "Converting Multiple Movies" in Chapter 17) Of course, you're not required to do either of these things; you're free to leave the movie files as they are. -
In Director, choose File > New > Movie to create a new, empty movie. This will be the stub movie, the only movie embedded in the stub projector. -
If you wish, set the stub movie's Stage size and background color to match those of the first movie that the projector is intended to play. Doing so will "camouflage" the stub movie if it flashes on the screen when the projector first opens. -
Choose Modify > Movie > Xtras. The Movie Xtras dialog box opens ( Figure 16.25 ). Figure 16.25. The Movie Xtras dialog box lists software plug-ins used by the movie. For more information, see Chapter 19, "Using Xtras."  -
Select the first Xtra in the list. -
Deselect the Include in Projector check box ( Figure 16.26 ). Figure 16.26. For each Xtra in the list, deselect Include in Projector.  -
Repeat steps 9 and 10 for all the remaining Xtras in the list. -
Double-click the first frame in the Script channel of the Score ( Figure 16.27 ). Figure 16.27. Double-click the first frame in the Script channel to create a new frame script.  A script window opens, containing the first and last lines of an exitFrame script ( Figure 16.28 ). (For more information about frame scripts, see Chapter 15, "Scripting Lingo.") Figure 16.28. The Script window opens with two lines already written for you.  -
In the Script window, type the following as the second line of the script ( Figure 16.29 ): Figure 16.29. Enter this command to play the first movie.  play movie "@:moviefolder:myMovie.dir" For moviefolder , substitute the name of the folder in which you placed the movies in step 1 (which, in this case, would be Movies). For myMovie.dir , substitute the name of the first movie you want the projector to play. (If the movie has been protected and has a .dxr extension, or has been converted to Shockwave format and has a .dcr extension, use those extensions instead of .dir.) -
If you want the projector to play an additional movie, type the following as the third line of the script ( Figure 16.30 ): Figure 16.30. The command to play additional movies doesn't need the @ character.  play movie "moviefolder:myMovie.dir" (Make substitutions for moviefolder and myMovie.dir as described in step 13.) Note that there's no @: this time; the @ character was necessary in the first play command, to tell Director to use a relative path ; but it must be omitted in succeeding lines.) -
Repeat step 14 for all the movies you want the projector to play, in the sequence in which you want them played ( Figure 16.31 ). Figure 16.31. Add as many lines to the script as you need to play all the movies.  -
Choose File > Save to save the movie.. You can give it whatever name you like; in this example, we'll call it "stubmovie." -
Choose File > Create Projector to open the Create Projector dialog box. -
Set options for the projector, as described in step 4 of "To create a self-contained projector," earlier in this section. -
In the file-selection pane of the Create Projector dialog box, select the stub movie. -
Click the Add button to embed the stub movie in the projector ( Figure 16.32 ). Figure 16.32. Click Add to embed the stub movie in the projector.  -
Click Create. The Create Projector dialog box closes, and the Save dialog box appears. -
Name the projector and click Save. Be sure to save the projector to the highest level of the distribution folder (that is, not in any subfolders ). -
Double-click the projector to test it. -
Drag the original stub movie file out of the distribution folder and place it elsewhere for safekeeping. The contents of the distribution folder may now be copied to a CD, or to the distribution medium of your choice ( Figure 16.33 ). Figure 16.33. The final contents of the distribution folder.  A Note about Copyright Macromedia allows unlimited distribution of projectors, with no payment or royalty required (subject to certain licensing restrictions, which you can read about on the Web at www.macromedia.com/support/programs/mwm). However, this permission does not apply to the content of your movie. If you're going to make even a few copies of your movie, you have to make sure that you have the right to distribute every element that's in it: graphics, sounds, video clips, and so on. As a general rule, you have the right to copy, distribute, and sell anything that you create on your own, but if you include other people's work (such as third-party clip art, photographs, or sound recordings), you must get written permission from the copyright holders, and you may have to pay them a fee. If you distribute any third-party Xtras with your movieseither embedded in the movies or as external files (see Chapter 19, "Using Xtras")be sure to check the licensing agreements that accompany them. Some Xtras developers include unlimited distribution in the purchase price of the Xtra, but others have more stringent requirements. | |