Paragraph Formatting
| You can change the format of entire paragraphs of text, such as the line spacing, justification, and indention of text. You can apply that format to selected paragraphs or to all the paragraphs in your document. This section describes the essentials for formatting your paragraphs so that your documents look the way you want them to look.
Justifying TextPerhaps the most common way to format a paragraph is to justify it. When you justify text, you determine the text's alignment in relation to the right and left margins. Word supports these justification options:
The simplest way to justify existing text is to click anywhere inside the paragraph that you want to justify (or select multiple paragraphs if you want to justify several) and then click the toolbar's Align Left, Center, Align Right, or Justify (for full justification) buttons . Before you start a paragraph, you can click at the left, middle, or right of an empty line of text to justify the text that you then type there.
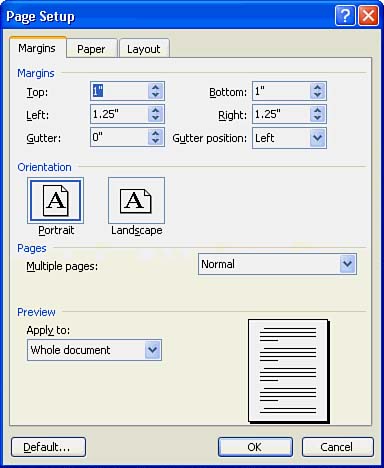
Setting Margins and MoreDisplay the Page Setup dialog box (shown in Figure 3.5), by selecting the File, Page Setup command. In addition, you can double-click the top gray area of the ruler. This dialog box enables you to control your paragraph and page margins. Enter values for your top, bottom, left, and right margins so that your text does not extend past the margin limits. Figure 3.5. The Page Setup dialog box enables you to set margins, page size, and page layout.
Using Tab SettingsA tab stop controls the horizontal placement of text on a line. When you place a tab stop at a particular location on a line, Word moves the insertion point to that point when you press the Tab key. To set tab-stop values, click the Tabs command button in the Format, Paragraph dialog box to display the Tabs dialog box, as shown in Figure 3.6. The bottom line is that a tab keeps you from having to press your spacebar many times when you want to insert multiple spaces in your text. In addition, a tab is more accurate when aligning text. Figure 3.6. The Tabs dialog box enables you to specify multiple tab settings. Table 3.1 describes each of the options in the Tabs dialog box. After you set tabs, press your Tab key as you enter paragraph text to move the insertion point to the next tab stop. Table 3.1. Tabs Dialog Box Options
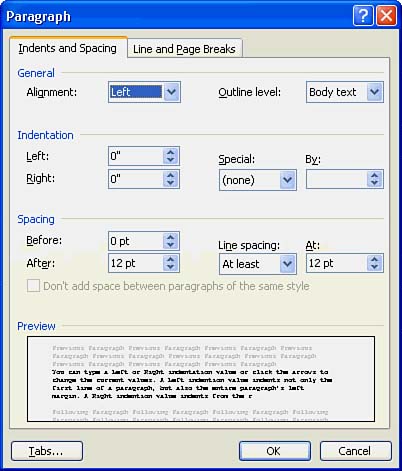
Setting Indentation and SpacingIf you need to change indentation (the space between the page margin and where the text aligns) or line spacing (the amount of blank space between lines), select Format, Paragraph to display the Paragraph dialog box, as shown in Figure 3.7. Figure 3.7. The Paragraph dialog box holds indentation and spacing values. You can type a Left or Right indentation value or click the arrows to change the current values. A Left indention value indents not only the first line of a paragraph but also the entire paragraph's left margin. A Right indention value indents from the right. You can set off a particular paragraph from surrounding paragraphs, such as a quoted paragraph, by indenting the paragraph by specifying either a Left, Right, or Full (using both) indention value. As you change the indentation, Word updates the Preview area at the bottom of the Paragraph dialog box to show your setting results.
You can determine how indentation applies itself to the paragraph by clicking the Special drop-down list arrow and then choosing (none), First Line, or Hanging. If you leave (none) selected, Word indents the complete paragraph by the Left and Right indentation values that you supply. If you select First Line, Word uses the value in the By field to indent only the first line of the selected paragraph. If you select Hanging, Word indents all the lines of the paragraph except the first line.
The Spacing section enables you to specify exactly how many points you want Word to skip before or after each paragraph. You can also request that Word double-space, triple-space, and perform other multispacing options by changing the value under Line Spacing.
Making the Ruler Work for YouAs you specify indentation and tab information, the ruler updates to indicate your settings. Not only does the ruler show settings, but you can also make indentation and tab changes directly on the ruler without using dialog boxes. Figure 3.8 shows the ruler's various tab stops and indentation markers. Click anywhere on the ruler to add a tab stop after you select the appropriate tab from the tab selection area. To remove a tab, drag the tab stop off the ruler into the document area before releasing the mouse. By dragging an indentation handle, you can change a paragraph's indentation on-the-fly . Figure 3.8. Use the ruler to set and change tabs and indents.
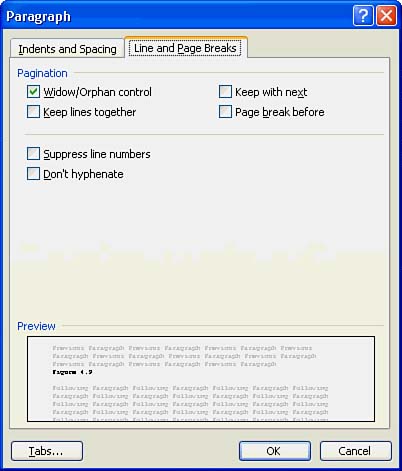
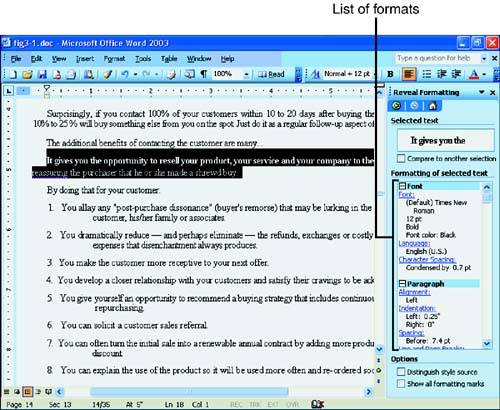
Inserting Line and Page BreaksLines and pages do not always break the way you need them to because they break according to Word's default. For example, you might want to end a page early because you want to insert a chart at the top of the next page or start a new chapter. Or perhaps you want to put a sentence on a line by itself to make it stand out from the surrounding text. The Format, Paragraph dialog box's Line and Page Breaks page enables you to control the way your document's lines and pages start and stop. When you click the Paragraph dialog box's Line and Page Breaks tab, Word displays the settings shown in Figure 3.9. Figure 3.9. Control the way your paragraph lines break. Here's a quick run-through of the options: A widow is the last line of a paragraph that prints at the top of the next page, and an orphan is the first line of a paragraph that prints at the bottom of a page. Usually, widowed and orphaned lines look incomplete. If you click the Widow/Orphan control option, Word adjusts page breaks, if necessary, so that two or more paragraph lines always begin a page and so that two or more paragraph lines always end a page. The Keep Lines Together check box ensures that a page break never splits the selected paragraph. The Keep with Next check box ensures that a page break never appears between the current paragraph and the next. The Page Break Before check box forces a page break before the selected paragraph even if a page break would not normally appear for several more lines. By enabling the Suppress Line Numbers check box, law pleadings and other documents with line numbers will not print the numbers on the selected paragraph lines. If you have set up automatic hyphenation, the Don't Hyphenate option deactivates automatic hyphenation for the selected paragraph. Viewing Your Document's FormattingYou can view the existing format on text that you've already typed. Click anywhere within a paragraph and press Shift+F1. The mouse pointer changes to a question mark. When you click over text, Word displays all the information about that selected text, including the character and paragraph formatting, inside the Reveal Format task pane. This feature is neat! (Figure 3.10 shows an example.) To get rid of the formatting description, click the task pane's Close button. Figure 3.10. You can find out a lot about formats! | ||||||||||||||||||||||||||||||||||||||||||


EAN: 2147483647
Pages: 272