Beginning Words About Word
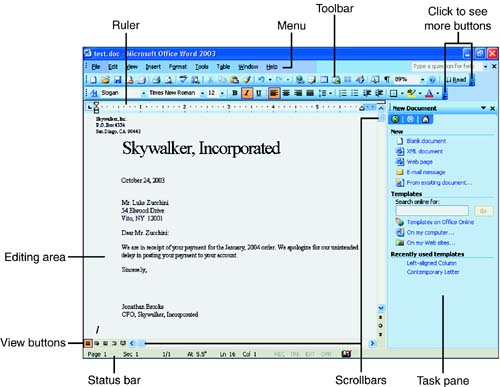
| Given that Word is probably the most advanced word processor ever produced for a computer, you might think that Word's interface would be complicated. Although some of Word's more advanced features can seem tricky at first, you'll be using Word's most popular and regular features quickly. Microsoft made a huge effort to streamline Word's (and all the Office 2003 products') interface so that you can get to the most common features without a fuss. Figure 2.1 shows Word's typical screen during the editing of a document. Your screen might differ slightly depending on the options currently set on your installation. Figure 2.1. Word's editing screen enables you to locate tools easily.
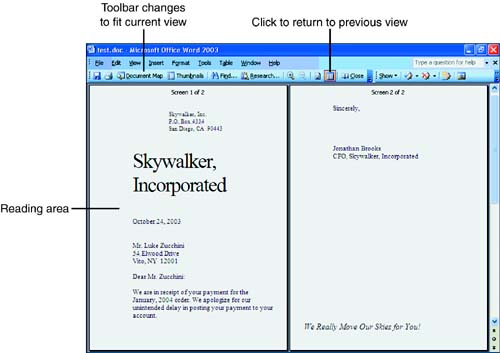
The most important area of Word's screen is the editing area. That's where the document you want to edit appears. If the document does not all fit on one screen, you can use the scrollbar to scroll down the page. Word offers several ways to view your document, but you'll almost always work inside Normal view (as shown in Figure 2.1) or Print Layout view. In Normal view ” chosen from the View menu or by clicking the Normal view button in the lower-left part of the screen ”more of your document's text fits on the screen than in any other view. In Print Layout view (selected also from the View menu or by clicking the Print Layout button), you gain a better perspective of how your document's text fits onto a printed page, in addition to seeing header and footer text such as page numbers if any appear.
The task pane is an area to the right of Word's screen that you can display or hide. You can close the task pane by clicking its Close button (the X in the task pane's upper-right corner). The task pane keeps editing tools that you might need nearby during your editing session. You can always turn the task pane back on when you want to use it. (Subsequent sections in this and later chapters explore ways to take advantage of the task pane.) The toolbar actually consists of two separate toolbars next to each other, the Standard toolbar and the Formatting toolbar. Some users prefer these to reside on two separate rows on the screen. You can change to the more common two-row setup by right-clicking the toolbar, selecting Customize, and checking the option marked Show Standard and Formatting toolbars on Two Rows. When you separate these toolbars , the top one is the Standard toolbar with typical file and editing commands, and the second toolbar is the Formatting toolbar in which common character, paragraph, and document formatting tools await your click.
Working with the Word and other Office menus is simple. Either press Alt followed by an underlined menu key or point and click with your mouse to open any of the pull-down menus. Office 2003 features personalized menus that, over time, change as you use Word and the other Office products. The often-used menu commands appear, and those you don't use much or at all do not show up when you first display a menu. If you double-click a menu name , keep a menu open for a few moments, or click the arrow at the bottom of a drop-down menu, all of that menu's options appear. By keeping the most-used commands on the menu and hiding the others (for a short period), Word keeps your screen clutter down but sometimes makes locating a more obscure menu option harder. You can elect to keep the personalized menus on. You also can turn on all menu options at all times (the option set for this book's figures) by selecting Tools, Customize and checking the option labeled Always Show Full Menus. |
EAN: 2147483647
Pages: 272