Entering Table Data
| Access gives you two primary means for adding data to tables that you create:
The Datasheet view that you saw in Hour 17, "Access 2003 Basics," enables you to enter and view several records at one time as well as edit any record that you view. When you use a form, on the other hand, you typically work with only one record at a time. The record takes on the format of a printed form, giving you a better focus on individual records. You learn more about forms in a later section, "Using Forms to Enter and Edit Data." The next section focuses on the Datasheet view. Using the Datasheet ViewIn the previous hour, you learned how to display the Datasheet view. The Datasheet view offers one of the simplest ways to enter and edit data in an Access database. The rest of this section shows you how Access makes entering data easy. Entering DataTo enter data in the Datasheet view after you display the Datasheet view, just click the Datasheet view's first field and enter the field information. When you enter data into the first field, Access opens an additional blank record below the one you are entering. Access always leaves room for additional records. As you enter data, press Tab, Shift+Tab, or the arrow keys to move from field to field. You can also click any field into which you want to enter data. As you enter data, watch the status bar at the bottom of your screen. When you designed your table, if you enter a description for a field, Access displays that description in the status bar as you enter data in that field.
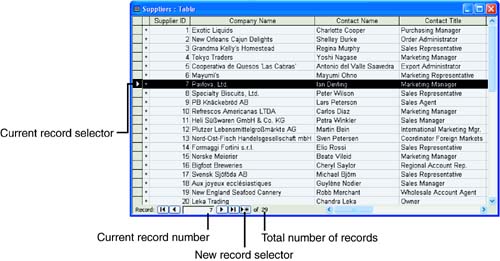
Figure 18.1 shows a Datasheet view that contains several records. The record selector always moves as you enter and edit data to show the current record. When you edit one row and then move to another, Access automatically saves that row to the table. As you make an edit, the Editing icon appears to the left of the row to indicate the row being edited. A second kind of record selector, an asterisk, always appears to the left of the next empty record and indicates a new record into which you can enter data. Figure 18.1. A Datasheet view can show several records of data.
As you enter data, take advantage of the Office AutoCorrect feature. Just as Word and Excel support AutoCorrect entries, so does Access. All the Office products share the same AutoCorrect abbreviations you have defined. When you enter AutoCorrect abbreviations and shortcuts, Access substitutes the shortcut for the AutoCorrect correction. Access does not automatically enable automatic spell-checking as you enter data because much of your table data contains data such as formal names and product codes that would appear to the spell-checker as misspellings. You can check your table's spelling by selecting Tools, Spelling. To change a mistake, such as a transposed number, click the mistake to display the insertion point inside the Datasheet view's field and correct the entry. You can also press the arrow keys to move to any field and press F2 to edit the field's text. Formatting Your DataAccess is forgiving when you enter special data such as dates, times, monetary amounts, and memo field values. You can basically enter data in these fields in whatever way seems best to you! You can enter a date in a date field, for example, using any of the following formats: 05/12/2005 5/12/2005 May 12, 2005 May 12 2005 Access uses a predefined date format to display dates and times in the Datasheet view, so after you type a date, it can be immediately reformatted to match this view. By default, Access uses the date format mm/dd/yyyy. As with dates, you can enter time in several common ways. Add a.m. or p.m. or use 24-hour clock time. Access, by default, formats your time values to the hh:mm:ss format.
Access currency fields accept a wide variety of formats. You can type a dollar sign (or whatever currency symbol matches your Windows international country setting) and decimals, and you can even place commas in currency values. After you enter a currency amount, Access displays the amount with the default format. The default currency format is based on your International settings. For North America, the default will be a dollar sign. If you fail to type the dollar sign, Access supplies one automatically. Your Windows Control Panel contains an icon labeled Regional and Language Options. (Pre-Windows XP versions typically call this icon Regional Settings .) The language specified in your PC's regional settings determines how Access displays data. Therefore, you can maintain one database for multiple users around the world. The PC running the Access database determines how the data appears on the screen and in reports .
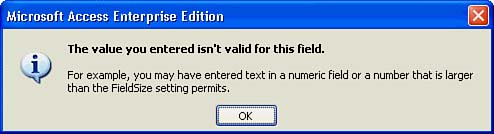
If you enter a value that does not meet the Field Properties requirements, such as placing two decimal points inside a single dollar amount, Access displays a dialog box (shown in Figure 18.2), indicating that you should correct the value before entering the next field. Figure 18.2. Access lets you know if you enter an incorrect format. Access does not let you leave a record that contains a bad format. As a matter of fact, Access will not even let you move to another row in the database if a field does not meet the Field Properties requirements. Therefore, when you close your tables, you can be assured that Access saves all the data with the proper data type. Although the data values might not be correct, you will know that the data does fit within the specified formats you declared for the table. Editing DataAll the editing skills you mastered with the other Office products work with Access. You can rearrange the order of fields and records by dragging the record or field selectors with your mouse. You can select more than one field or record at a time by dragging your mouse through the record or field selectors or by holding down Shift while you click record or field selectors. Press Ctrl+A to select all the records in the table. To delete one or more records or fields, select the records or fields you want to delete and right-click the record selector to display a shortcut menu. Select Delete Column or Delete Record. Access provides several shortcut menus that help you perform needed tasks . For example, when you right-click the selected records or fields, the shortcut menu that appears provides familiar Cut, Copy, and Paste commands as well as Insert and Delete commands for records and fields. When you right-click a record selector, a different shortcut menu appears that enables you to work with the rows. Right-clicking a column selector produces a shortcut menu with the Hide Columns command that temporarily hides fields (they physically stay in the table). These fields stay out of the way while you work with other data, and you can choose Format, Unhide Columns to reveal the data when you are ready to work with the entire table again. Other right-click options can be helpful too, such as the sorting commands. You can sort records in ascending order or descending order with the shortcut menu's options when you right-click over data in the table.
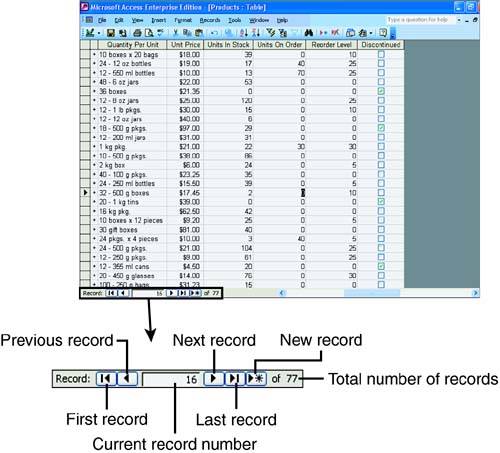
Navigating Large TablesUse the navigation buttons at the bottom of the Datasheet view (see Figure 18.3) to move through and jump over large blocks of records that don't interest you at the time. The navigation buttons work similar to those on a VCR, enabling you to move forward and backward through your data. Figure 18.3. The Navigation buttons help you navigate through database tables. Here are a few pointers:
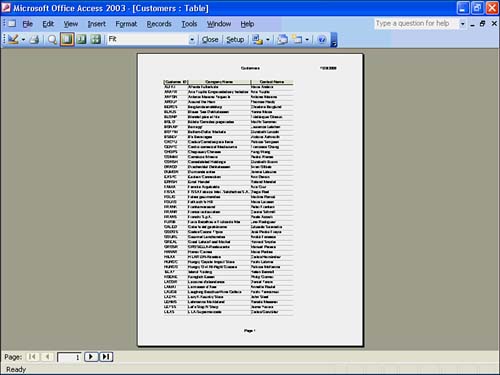
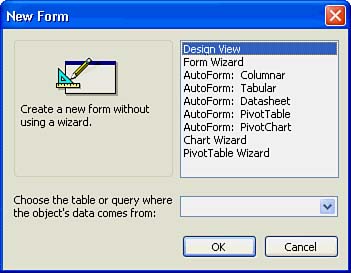
Simple PrintingAccess includes powerful reporting tools, but they take some time to master. You learn about reporting in Hour 20, "Reporting with Access 2003." If you just want to print a listing of your data, however, you can do so easily from the Datasheet view. Access automatically prints the Datasheet view with field titles. Perhaps you need to check a table listing for errors, or you want a printed listing (called a hard copy ) so that you can proofread the data values that you entered. Before printing, display a preview (similar to the one shown in Figure 18.4) by selecting File, Print Preview. Move the magnifying glass mouse pointer over any portion of the preview and click to see a close-up. To close the print preview without closing the table, click the toolbar's Close button. Figure 18.4. Get a preview of printed datasheet tables. To print a Datasheet table, select File, Print (or click the Print button on the toolbar). Using Forms to Enter and Edit DataWhen you computerize your records, you want to make it as easy as possible for people to enter, edit, and view data in your database. Often, Access reduces paperwork. A credit agency might use Access to keep track of loan applications that borrowers fill out, for example. As borrowers bring in their completed applications, a clerk types the data from the application into an Access table. Although a Datasheet view would work fine for the data entry, a form works even better! The form can, while onscreen, mimic the look and feel of paper forms that many people are accustomed to using. You do not have to keep files of paper forms now that you use Access. To Do: Use the Form Wizard to Generate FormsYou probably want to use the Form Wizard to create your first form. The Form Wizard generates simple forms that work well in most cases. Follow these steps to start the Form Wizard:
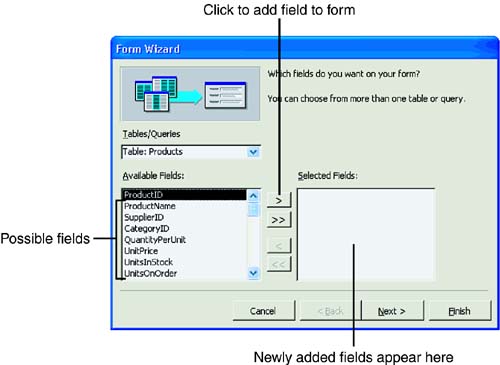
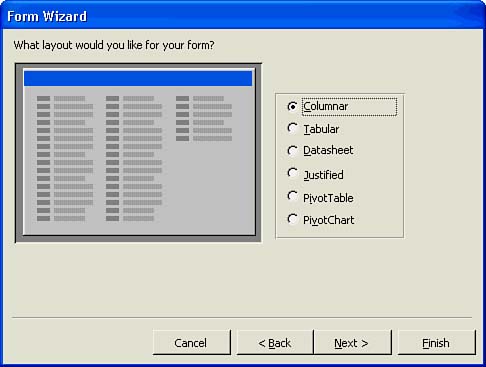
You might or might not want to include every field on every form you create. Suppose, for example, that you want to create a form for your company's personnel that contains employee names and extension numbers but not employee pay rates. The next step in creating your form is to indicate to Access which fields to include. To add table fields to the form, select a field and click the button labeled >. Access adds that field to the selected field list. To include all the fields, click the button labeled >>. The Form Wizard sends all the table's fields to the selected field list. If you send a field to the form accidentally , select that field and click the button labeled < to remove the field from the form. Clicking << removes all the fields, so you can start over if you want to rearrange the fields or copy new ones from scratch. Click the Next button to display the Form Wizard layout screen (shown in Figure 18.7). Click the different options to see a preview of how that option changes the form's layout. Figure 18.7. Select a layout for your form.
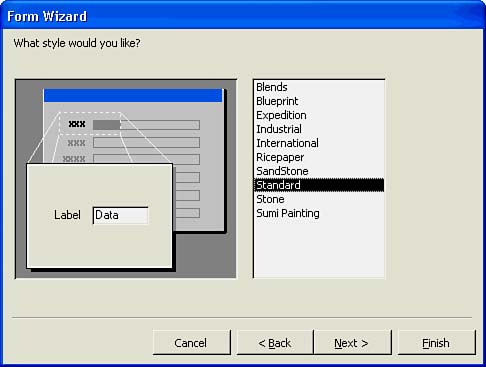
When you click the Next button, the Form Wizard displays a screen from which you can select a form style (as shown in Figure 18.8). Click through the style selections to see a preview of those available. Many styles have unique personalities that can add eye- catching appeal to an otherwise dull form. Figure 18.8. The Form Wizard supports several form styles. When you click the Next button, you see the Form Wizard's closing screen, which asks for a form title. (The default title is the name of your selected table.) Click Finish to generate the form.
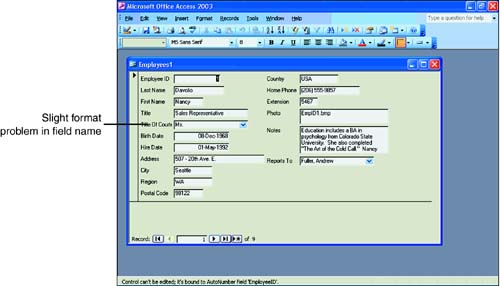
Figure 18.9 displays its form in the Form view. The Form view displays records in the form-like format. Access also contains a form's Design view (not unlike the table's Design view), in which you can edit the form and change its appearance. When using forms, you must understand how all the data types appear. If your table contains Yes/No data-type fields, those fields appear with an x to indicate the Yes value. If you name a rental property's tenant field Pet Deposit? , for example, and assign the Yes/No data type to the field, those owners who pay a pet deposit have an x for this field value. Memo fields can hold a lot of data, so if you use a memo field, keep typing when the insertion point reaches the right side of the field. Access scrolls the field to enable you to continue. Form views display memo fields with scrollbars so you can look at all the data in the fields. Navigating FormsForms typically show only single records. Unlike the Datasheet view, the form is a much better tool for working with single records. In the Datasheet view, you can often see many records, but not all the fields in those records, because the fields rarely fit on the Datasheet view screen. The form shows only a single record but often manages to include all fields from the records because of the form layout. Access offers several ways to move through records in the Form view. Press the up arrow, down arrow, Tab, and Shift+Tab to move from one field to another. Press PageUp and PageDown to move to the previous and next table record, respectively. The record number appears at the bottom of the form window's record selection control. As in the Datasheet view, you can click the record selection control to move from record to record.
Editing Form DataAs you move through the form records, feel free to change data in the record. The record selector arrow changes to an editing pencil to show that you are editing the record. If you use Tab or Shift+Tab to move from field to field, press F2 when the highlight appears over the field you want to edit. When you change data within the Form view, Access changes the data in the underlying tables.
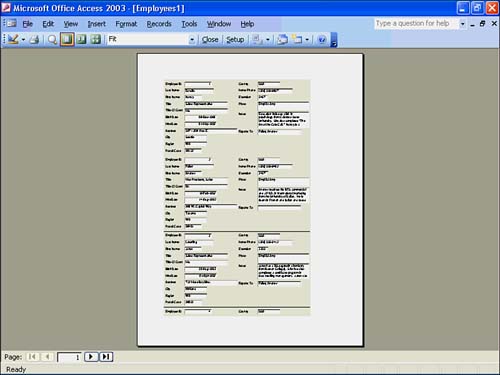
Printing FormsIf you select File, Print from the Form view, Access prints the forms. Unlike the onscreen Form view, Access prints as many forms on the page as will fit. (Select the File, Print Preview to see what will print, such as the preview shown in Figure 18.10.) Figure 18.10. Access prints multiple records per form. |
EAN: 2147483647
Pages: 272
- Case Study-Hub and Spoke MPLS VPN Network Using BGP PE-CE Routing for Sites Using Unique AS Numbers
- Option 3: Multi-Hop MP-eBGP Between RR and eBGP Between ASBRs
- Introduction to Layer 2 VPNs
- Case Study 3: Implementing Layer 2 VPNs over Inter-AS Topologies Using Layer 2 VPN Pseudo-Wire Switching
- Case Study 10: BGP Site of Origin