| Outlook includes a calendar that not only enables you to organize and record dates, but also enables you to keep track of birthdays and anniversaries (and gives you automatic time-for-a-gift reminders), find open dates, keep a task list, and schedule meetings. It can also remind you of appointments, even if you are working in a different program window. The following sections show you how to use the Outlook Calendar to organize your life.  | Not only does Outlook remind you of specific appointments with an audible and visible reminder, but Outlook also easily sets up recurring appointments, such as weekly sales meetings or annual birthday reminders. |
When you are ready to work with Outlook's Calendar, display the Calendar by clicking the Calendar button in the lower-left corner of the window. Navigating Times and Dates Notice that the Calendar appears with these major sections: -
Date Navigator Appears as a monthly calendar pane with one month displayed by default and enables you to move quickly through the calendar year -
Daily Scheduler Enables you to enter and edit appointments for today or other days When you first open Calendar, the Date Navigator always highlights the current date (getting its information from your computer's internal clock and calendar) by placing a square outline around the day. The current date's daily scheduler appears at the bottom of the screen, showing the current day's appointments if any exist. You can navigate the Calendar through days and months by following these simple guidelines: -
Change days by first clicking inside the Date Navigator and then clicking either your left- or right-arrow keys; you can also click a specific date with your mouse. -
Change months by clicking to the left or right of the Date Navigator's month name or by clicking the Calendar's month name and selecting from the pop-up month list that appears. Figure 16.1. Working with the Calendar. 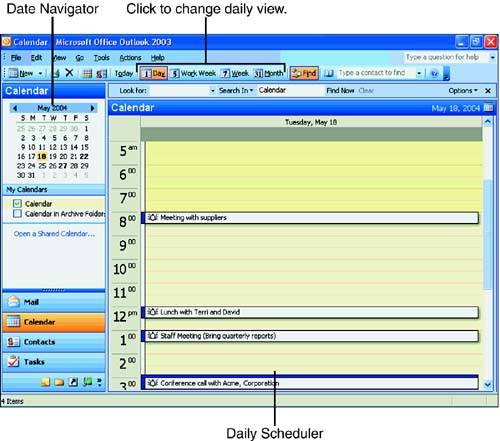 Click through the Calendar's days and notice that the daily time planner changes days as you do so. Although you might not have any appointments set yet, you quickly see how you can look at any day's appointments by clicking that day's date in the Date Navigator. The Calendar also provides a month-at-a-glance format when you click the Month button on the toolbar. (Figure 16.2 shows the month-at-a-glance calendar that appears when you click Month.) When you click any of the month's weekday abbreviations in the Date Navigator area, Outlook displays the schedule for the entire month. If you click either the Work Week or Week toolbar buttons , Outlook shows the week's daily appointments but also still shows the Date Navigator in the upper-right corner. To return to the daily appointment view for today, click Day on the toolbar. Figure 16.2. The month-at-a-glance calendar provides a long-range overview of your scheduled appointments. 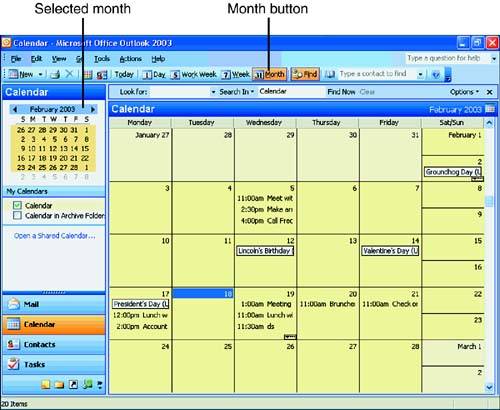 | | Use the Date Navigator to show the daily appointments you need to see. As Figure 16.3 shows, if you select two days in the Date Navigator, both those days' appointments show in the center of the Calendar screen. The multiple days that you select in the Date Navigator do not have to be contiguous; hold Ctrl and click the days you want to see, and Outlook displays the daily appointments for those days. Figure 16.3. You can view appointments for two noncontiguous days. 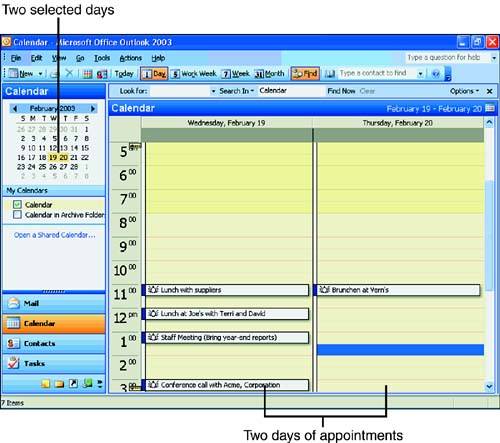 |
As you acquaint yourself with Outlook's Calendar, select from the View menu to customize the screen for your particular needs. In addition, you can drag any bar separating the window panes to provide more or less room to any portion of the Outlook screen that you need. To Do: Set Appointments To schedule an appointment, perform these steps: -
Click the Day button to display a single Day view. -
Select the day on which you want to schedule the appointment by clicking it in the Date Navigator. -
Locate the appointment time. You might have to click the daily appointment area's scrollbar or use your up- and down-arrow keys to get to the time you want to use. -
Double-click the appointment time to display the Appointment dialog box, shown in Figure 16.4. Figure 16.4. Scheduling an appointment is easy. 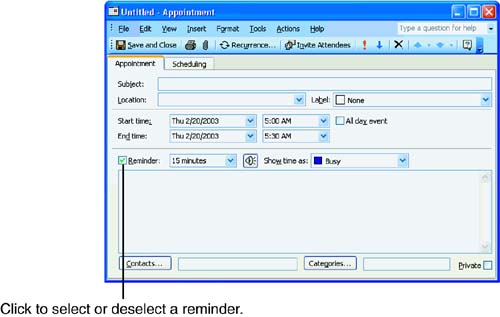 -
Enter the appointment's subject and location. Outlook keeps track of your locations as you add them, so you don't have to retype them for subsequent appointments. (You need only to select them from the drop-down list that Outlook adds to as you enter new locations.) -
Set the start and end times or click the All Day Event option if you want to schedule an all-day appointment. -
If you want a reminder for this appointment, make sure the Reminder check box is marked and enter the reminder lead time if you want a reminder. Outlook audibly and visibly reminds you of the appointment at whatever time you request. -
Click the Recurrence toolbar button if the appointment occurs regularly. Outlook displays the Appointment Recurrence dialog box, shown in Figure 16.5. Set the recurrence options to enable Outlook to schedule your recurring appointment. Figure 16.5. Calendar easily accommodates appointments that occur regularly. 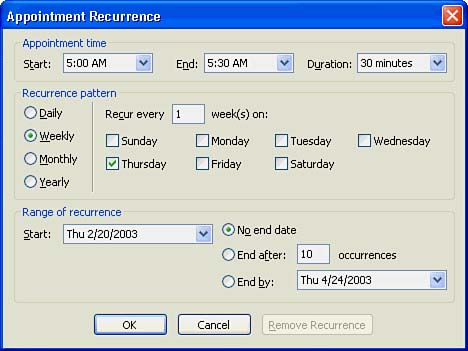 | | Instead of opening a daily appointment window first, you can select Actions, New Recurring Appointment from Outlook to go directly to the Appointment Recurrence dialog box when you set up recurring appointments. |
-
Click OK to close the Appointment Recurrence dialog box. -
Click the Save and Close button. Outlook displays your appointment in the time planner by showing the subject in the daily appointment planner at the time of the appointment.  | If you don't always start Outlook as you work on your computer from day to day, Outlook cannot remind you of pending appointments. Therefore, add Outlook to your Windows Startup folder so that Outlook starts automatically every time you start up your computer. |
If you need to change a set appointment, double-click the appointment to display the Appointment dialog box, in which you can change the appointment details. Drag the appointment's top or bottom edges from the time planner to increase or decrease the appointment's duration. Drag the appointment's side edges to change the appointment's start time. You can remove an appointment at any time by right-clicking over the appointment to display a shortcut menu and then selecting Delete. You can also click on an appointment and then click the toolbar's Delete button. Instead of using the Appointment dialog box to schedule an appointment, you can enter an appointment quickly by clicking the appointment time once to highlight it and entering the text for the appointment directly on the daily appointment pane. When you press Enter, Outlook adds the appointment to the daily planner. Outlook reminds you of the appointment with an audible alarm 15 minutes before the appointment. In addition, Outlook displays a Reminders window, such as the one in Figure 16.6. From the Reminders window, you can dismiss a reminder or click Open Item to modify the appointment's details. Click the Snooze button to be re-reminded of the appointment and select how much time you want to pass before being reminded once again. Figure 16.6. Outlook reminds you of any appointments.   | You might not want an audible alarm on all appointments. If you use your laptop in meetings and do not want audible alarms interrupting conversations, for example, you can remove any appointment's audible alarm by double-clicking the appointment and clicking the speaker icon to uncheck the Play This Sound option. (You can also change the sound; play "Happy Birthday" on your spouse's special day if you have a Happy Birthday audio clip on your computer!) |
Scheduling Meetings In Outlook terminology, a meeting differs somewhat from an appointment. An appointment is for you; it does not involve other resources (such as people and equipment). A meeting, however, requires that you schedule more people than yourself and perhaps requires that you reserve other resources (such as audio-visual equipment and a room in which to hold the meeting). If you work in a networked environment and others on the network use Outlook, Outlook can scan other people's computer schedules to help you plan meetings that others can attend . To Do: Schedule a Meeting Follow these steps to schedule a meeting: -
Create an appointment for the meeting's day and time. -
Click the Scheduling tab in the Appointment window. (Figure 16.7 shows the page that appears.) Figure 16.7. You can schedule meetings, invite people, and reserve resources. 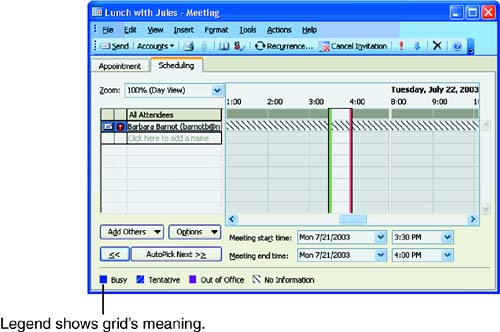 -
Click the All Attendees box to enter the names of those whom you want to invite. -
Click the Invite Attendees button and type the names of those attending . If you begin typing a name from your Contacts list and then press Ctrl+K after typing enough of the name for Outlook to locate the contact, Outlook retrieves the name from your Contacts folder and completes it. If two or more names exist that begin with the letters you've entered before pressing Ctrl+K, Outlook lets you select the correct name. Outlook displays the attendee 's busy and free time in the grid to the right of the names. -
Use the scrollbars to view the free and busy times for the people you invite. You must also select the meeting time. Outlook shows you the attendees' available free time when you click AutoPick Next, or you can use your mouse to schedule the attendees even if their free times conflict. (Outlook adjusts for time zones if you invite someone from another time zone.) | | Obviously, you must be organized and know the attendees quite well to have access to their schedules. Outlook will search your network for the contacts and their free times. If you are not on a network, you do not have access to the free times of the people you invite. |
When you click Send, all recipients (if networked or available by email) get invited to your meeting by being sent the appointment's request. To Do: Schedule an Event An event is an activity not specifically tied to a time frame, such as a holiday or birthday. When you want to record an event, such as your boss's birthday, perform these steps: -
Select Actions, New All Day Event. The Event dialog box appears (looking very much like the Appointment dialog box) with the tabbed Appointment page displayed. -
Schedule the event as you would schedule an appointment, but click the All Day Event check box to show that the event lasts the entire day. (Otherwise, the event automatically turns into an appointment.) -
Select the Show Time As option if you want your calendar to show the time as Free, Tentative, Busy, or Out of Office. Outlook uses this value to send to others on your network who might invite you for an appointment during this time. -
Select an appropriate reminder time from the Reminder list, such as 2 days, to receive an audible alarm and reminder window entry that informs you of the event so that you can purchase gifts or prepare for the event in some other way. -
Click the Save and Close button to return to Calendar. If the event is recurring, click Recurrence to initiate a new recurring event. When you view the event, Outlook shows it in a banner (a highlighted heading) for that day in the day planner's views. Managing a Task List A task is any job that you need to track, perform, and monitor to completion. Outlook tasks (such as appointments and meetings) might be recurring, or they might happen only once. You can manage your Outlook task list by clicking the Tasks button at the left of your Outlook screen. | | Unlike appointments, meetings, and events, tasks don't belong to any specific date or time. Tasks are jobs you need to finish but are not linked to a date or time. |
To Do: Create a Task To create a one-time task, perform these steps: -
Click the New Task toolbar button or select File, New, Task. -
Enter a task description. -
Select a due date (the date you must complete the task, but not necessarily the day you perform the task). If you click the Due Date drop-down list, you can select from a calendar that Outlook displays. You can enter virtually any date in virtually any format, including Next Wednesday . Outlook converts your format to a supported date format. -
Click Save and Close to finalize the task. After you complete a task, click the task's check box to cross the task from the list. Delete a task by selecting it and clicking the toolbar's Delete button. | | If you want to remind yourself of a task's deadline, make an appointment for the deadline on the task's due date. Set the alarm for 24 hours or 2 days. When the deadline draws near, you then are reminded that the task is wrapping up fast. |
The Task window's Details page (see Figure 16.8) displays fields you fill out as you complete the task. The Details page even tracks such task- related information as mileage, time involved, companies utilized, and billing information. Figure 16.8. You can track a task's completion details. 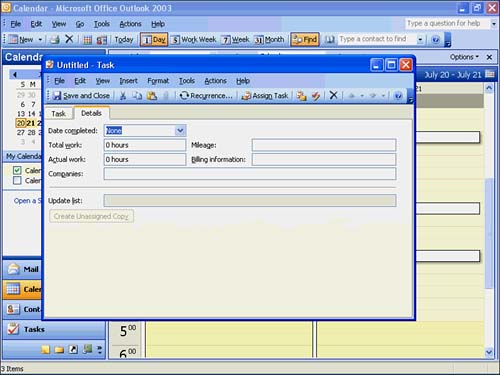  |