Hack 18. Dynamically Generate a New Checkbox Group with Server Data
| Let a web page's checkbox content evolve from a user's interaction with an application. Most web forms are static, meaning the text labels and entry widgets (e.g., textareas, checkboxes, and radio buttons) are hardcoded into the HTML. Lots of applications, however, can benefit from the ability to whip together form elements on the fly, based on the user-interface widgets the user is clicking. The content for the forms, if necessary, can even be derived from a server, such as questions for various types of quizzes and polls. "Dynamically Generate a New Selection List Using Server Data" [Hack #15] showed how to do this with a select list widget, so why don't we auto-generate a bunch of checkboxes? This hack gives users a choice of "Team Sports" or "Individual Sports" in two radio buttons and then, when they click either button, grabs the sports categories from a server component and creates a new group of checkboxes. Choose Your ActivityFigure 2-12 shows our barebones web page to begin with, before the DOM magic starts. Figure 2-12. Let the web form evolve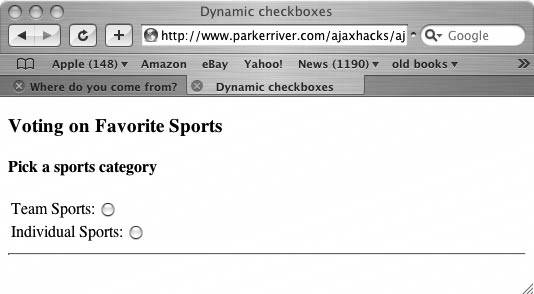 What follows is the HTML for the form. The dynamic behavior for this page is all contained in the JavaScript file hacks2_7.js. The two radio buttons that the users can click to get things going are represented by the two input elements, and the newly generated checkboxes appear within the div element with the id checks: <!DOCTYPE html PUBLIC "-//W3C//DTD XHTML 1.0 Strict//EN" "http://www.w3.org/TR/2000/REC-xhtml1-20000126/DTD/xhtml1-strict.dtd"> <html xmlns="http://www.w3.org/1999/xhtml" xml:lang="en" lang="en"> <head> <meta http-equiv="content-type" content="text/html; charset=utf-8" /> <script type="text/javascript" src="/books/4/254/1/html/2/js/hacks2_7.js"></script> <title>Dynamic checkboxes</title> </head> <body> <h3>Voting on Favorite Sports</h3> <h4>Pick a sports category</h4> <form action="javascript:void%200"> <table border="0"> <tr><td> Team Sports: <input type="radio" name="_sports" value="team" /> </td></tr> <tr><td> Individual Sports: <input type="radio" name="_sports" value="individual" /> </td></tr> </table> <hr /> <div ></div> </form> </body> </html> When the user clicks a checkbox, the page instantly displays either of two different sets of new checkboxes, representing either individual sports or team sports. The actual lists of sports that make up the checkboxes are arrays of strings that the server returns. They obviously could be hard-coded into the JavaScript to prevent a network hit, but the approach discussed in this hack is useful if the checkbox widgets represent values that change frequently and/or must be derived from persistent storage on the server (think product information, or complex multiple-choice questions in a questionnaire). Figure 2-13 shows the web page after the user has clicked a radio button. This action submits only the value associated with the radio button that the user clicked, not the entire form. Figure 2-13. Widgets spawning other widgets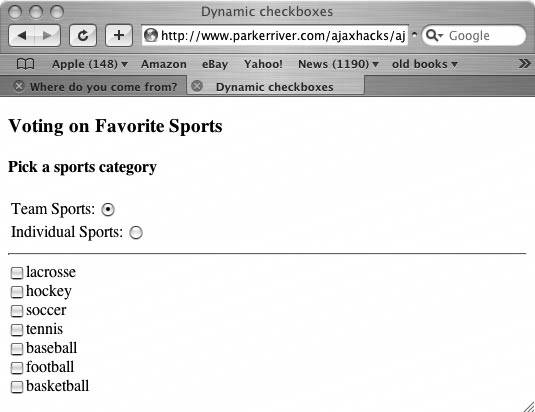 Okay, Where's the Code?The JavaScript contained in the file hacks2_7.js is reproduced below. I've omitted the code that creates and initializes the request object, which you can review in "Detect Browser Compatibility with the Request Object" [Hack #1] and several other earlier hacks. The first thing you may notice in the code is that it assigns a function to handle the radio buttons' onclick event handlers. The user triggers these events by clicking either radio button.
This assignment begins in the window's onload event handler. This event takes place when the browser has finished loading all the elements in the HTML page: var sportType=""; var request=null; window.onload=function( ){ var rads = document.getElementsByTagName("input"); if(rads != null) { for(var i = 0; i < rads.length; i++) { if(rads[i].type=="radio"){ rads[i].onclick=function( ){ getSports(this)};} } } } function getSports(obj){ if (obj == null ) { return; } var url = ""; var val = ""; if(obj.checked) { val=obj.value; sportType=val; url = "http://www.parkerriver.com/s/fav_sports"+ "?sportType="+encodeURIComponent(val)+"&col=y"; httpRequest("GET",url,true); } } //event handler for XMLHttpRequest function handleResponse( ){ try{ if(request.readyState == 4){ if(request.status == 200){ var resp = request.responseText; if(resp != null){ //return value is an array var objt = eval(resp); createChecks(objt); } } else { //request.status is 503 //if the application isn't available; //500 if the application has a bug alert( "A problem occurred with communicating between"+ " the XMLHttpRequest object and the server program."); } }//end outer if } catch (err) { alert("It does not appear that the server "+ "is available for this application. Please"+ " try again very soon. \\nError: "+err.message); } } function createChecks(obj){ var _div = document.getElementById("checks"); var el; //first remove all existing checkboxes while(_div.hasChildNodes( )){ for(var i = 0; i < _div.childNodes.length; i++){ _div.removeChild(_div.firstChild); } } //obj is an array of new sports names for(var i=0; i < obj.length;i++) { el = document.createElement("input"); el.setAttribute("type","checkbox"); el.setAttribute("name",sportType); el.setAttribute("value",obj[i]); _div.appendChild(el); _div.appendChild(document.createTextNode(obj[i])); _div.appendChild(document.createElement("br")); } } /* httpRequest( ) and related code omitted for the sake of brevity; see Hack #1 or #2. */The first stage in generating the checkboxes is to send the request that fetches the values for each widget. When the user clicks a radio button, the code calls getSports( ). This function formats a URL based on the value it receives from the checkbox, then sends a request to a server component for a list of related sports. Array Return ValueThe response comes back from the server in a string formatted as a JavaScript array. A response might look like: ["football","soccer","tennis", etc.] You get the response from the request object's responseText property and then convert the response to a JavaScript array using the eval( ) global function. Phew, that was a mouthful!
Once the code has this array of values from the server, it passes the array along to createChecks( ). This function uses the DOM API to create the checkboxes. It creates one checkbox for each value in the array (a checkbox for tennis, another for soccer, and so on). Here is the code for this function: function createChecks(obj){ var _div = document.getElementById("checks"); var el; //first remove all existing checkboxes while(_div.hasChildNodes( )){ for(var i = 0; i < _div.childNodes.length; i++){ _div.removeChild(_div.firstChild); } } //obj is an array of new sports names for(var i=0; i < obj.length;i++) { el = document.createElement("input"); el.setAttribute("type","checkbox"); el.setAttribute("name",sportType); el.setAttribute("value",obj[i]); _div.appendChild(el); _div.appendChild(document.createTextNode(obj[i])); _div.appendChild(document.createElement("br")); }The function gets a reference to the div element on the HTML page that will enclose the checkboxes. The code then removes any existing checkboxes, because if it didn't, the user could keep clicking the radio buttons and generate several duplicate checkboxes appended on the end of the web page (an outcome you want to avoid). Finally, the code creates a new input element for each sport, so that each of these widgets looks like: <input type="checkbox" name= "team_sports" value="baseball" /> baseball<br /> As soon as this function finishes executing, the checkboxes appear on the web page without any visible refresh. Like magic! Hacking the HackNaturally, you want the user to select one or more of these generated checkboxes for some purpose. Maybe to generate another subset of widgets or checkboxes? Or to send the values from the new checkboxes, when the user clicks them, to a server component? You can adapt the code from "Submit Checkbox Values to the Server Without a Round Trip" [Hack #17] to accomplish the latter task, as well as create onclick event handlers for the new checkboxes (as in this hack) to give them some behavior. |


EAN: 2147483647
Pages: 138