7.9. Using Resources
| < Day Day Up > |
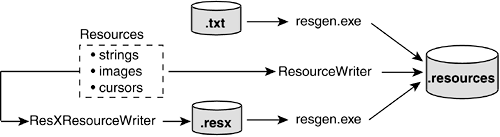
| Figure 7-7, shown earlier in the chapter, illustrates the use of PictureBox controls to enlarge and display a selected thumbnail image. Each thumbnail image is loaded into the application from a local file: tn1 = new PictureBox(); tn1.Image = Image.FromFile("c:\\schiele1.jpg"); This code works fine as long as the file schiele1.jpg exists in the root directory of the user's computer. However, relying on the directory path to locate this file has two obvious disadvantages: The file could be deleted or renamed by the user, and it's an external resource that has to be handled separately from the code during installation. Both problems can be solved by embedding the image in the assembly rather than treating it as an external resource. Consider a GUI application that is to be used in multiple countries with different languages. The challenge is to adapt the screens to each country. At a minimum, this requires including text in the native language, and may also require changing images and the location of controls on the form. The ideal solution separates the logic of the program from the user interface. Such a solution treats the GUI for each country as an interchangeable resource that is loaded based on the culture settings (the country and language) of the computer. The common denominator in these two examples is the need to bind an external resource to an application. .NET provides special resource files that can be used to hold just about any nonexecutable data such as strings, images, and persisted data. These resource files can be included in an assembly obviating the need for external files or compiled into satellite assemblies that can be accessed on demand by an application's main assembly. Let's now look at the basics of working with resource files and how to embed them in assemblies; then, we will look at the role of satellite assemblies in localized applications. Working with Resource FilesResource files come in three formats: *.txt files in name/value format, *.resx files in an XML format, and *.resources files in a binary format. Why three? The text format provides an easy way to add string resources, the XML version supports both strings and other objects such as images, and the binary version is the binary equivalent of the XML file. It is the only format that can be embedded in an assembly the other formats must be converted into a .resources file before they can be linked to an assembly. Figure 7-20 illustrates the approaches that can be used to create a .resources file. Figure 7-20. A .resources file can be created from a text file, resources, or a .resx file
The System.Resources namespace contains the types required to manipulate resource files. It includes classes to read from and write to both resource file formats, as well as load resources from an assembly into a program. Creating Resource Strings from a Text FileResource files containing string values are useful when it is necessary for a single application to present an interface that must be customized for the environment in which it runs. A resource file eliminates the need to code multiple versions of an application; instead, a developer creates a single application and multiple resource files that contain the interface captions, text, messages, and titles. For example, an English version of an application would have the English resource file embedded in its assembly; a German version would embed the German resource file. Creating resource strings and accessing them in an application requires four steps:
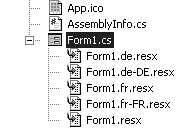
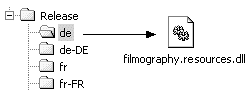
Using the ResourceWriter Class to Create a .resources FileThe preceding solution works well for adding strings to a resource file. However, a resource file can also contain other objects such as images and cursor shapes. To place these in a .resources file, .NET offers the System.Resources.ResourceWriter class. The following code, which would be placed in a utility or helper file, shows how to create a ResourceWriter object and use its AddResource method to store a string and image in a resource file: IResourceWriter writer = new ResourceWriter( "myResources.resources"); // .Resources output file Image img = Image.FromFile(@"c:\schiele1.jpg"); rw.AddResource("Page","Seite"); // Add string rw.AddResource("artistwife",img); // Add image rw.Close(); // Flush resources to the file Using the ResourceManager Class to Access ResourcesAs we did with string resources, we use the ResourceManager class to access object resources from within the application. To illustrate, let's return to the code presented at the beginning of this section: tn1.Image = Image.FromFile("C:\\schiele1.jpg"); The ResourceManager allows us to replace the reference to an external file, with a reference to this same image that is now part of the assembly. The GetString method from the earlier example is replaced by the GetObject method: ResourceManager rm = new ResourceManager("myresources", Assembly.GetExecutingAssembly()); // Extract image from resources in assembly tn1.Image = (Bitmap) rm.GetObject("artistwife"); Using the ResXResourceWriter Class to Create a .resx FileThe ResXResourceWriter class is similar to the ResourceWriter class except that it is used to add resources to a .resx file, which represents resources in an intermediate XML format. This format is useful when creating utility programs to read, manage, and edit resources a difficult task to perform with the binary .resources file. ResXResourceWriter rwx = new ResXResourceWriter(@"c:\myresources.resx"); Image img = Image.FromFile(@"c:\schiele1.jpg"); rwx.AddResource("artistwife",img); // Add image rwx.Generate(); // Flush all added resources to the file The resultant file contains XML header information followed by name/value tags for each resource entry. The actual data an image in this case is stored between the value tags. Here is a section of the file myresources.resx when viewed in a text editor: <data name="face" type="System.Drawing.Bitmap, System.Drawing, Version=1.0.3300.0,Culture=neutral, PublicKeyToken=b03f5f7f11d50a3a" mimetype="application/x- microsoft.net.object.bytearray.base64"> <value> ---- Actual Image bytes go here ---- </value> Note that although this example stores only one image in the file, a .resx file can contain multiple resource types. Using the ResXResourceReader Class to Read a .resx fileThe ResXResourceReader class provides an IDictionaryEnumerator (see Chapter 4) that is used to iterate through the tag(s) in a .resx file. This code segment lists the contents of a resource file: ResXResourceReader rrx = new ResXResourceReader("c:\\myresources.resx"); // Enumerate the collection of tags foreach (DictionaryEntry de in rrx) { MessageBox.Show("Name: "+de.Key.ToString()+"\nValue: " + de.Value.ToString()); // Output --> Name: artistwife // --> Value: System.Drawing.Bitmap } rrx.Close(); Converting a .resx File to a .resources FileThe .resx file is converted to a .resources file using resgen.exe: resgen myresources.resx myresources.resources If the second parameter is not included, the output file will have the same base name as the source file. Also, note that this utility can be used to create a .resources file from a .resx file. The syntax is the same as in the preceding example just reverse the parameters. VS.NET and ResourcesVisual Studio.NET automatically creates a .resx file for each form in a project and updates them as more resources are added to the project. You can see the resource file(s) by selecting the Show All Files icon in the Solution Explorer. When a build occurs, .resources files are created from the .resx files. In the code itself, a ResourceManager object is created to provide runtime access to the resources: ResourceManager resources = new ResourceManager(typeof(Form1)); Using Resource Files to Create Localized FormsIn .NET vernacular, a localized application is one that provides multi-language support. This typically means providing user interfaces that display text and images customized for individual countries or cultures. The .NET resource files are designed to support such applications. In a nutshell, resource files can be set up for each culture being supported. For example, one file may have all the control labels and text on its interface in German; another may have the same controls with French text. When the application runs, it looks at the culture settings of the computer it is running on and pulls in the appropriate resources. This little bit of magic is accomplished by associating resource files with the CultureInfo class that designates a language, or language and culture. The resource files are packaged as satellite assemblies, which are resource files stored as DLLs. Resource Localization Using Visual Studio.NETTo make a form localized, you must set its Localizable property to TRue. This has the effect of turning each control on a form into a resource that has its properties stored in the form's .resx file. This sets the stage for creating separate .resx files for each culture a form supports. Recall from Chapter 5, "C# Text Manipulation and File I/O," that a culture is specified by a two-character language code followed by an optional two-character country code. For example, the code for English in the United States is en-US. The terms neutral culture and specific culture are terms to describe a culture. A specific culture has both the language and country specified; a neutral culture has only the language. Consult the MSDN documentation on the CultureInfo class for a complete list of culture names. To associate other cultures with a form, set the form's Language property to another locale from the drop-down list in the Properties window. This causes a .resx file to be created for the new culture. You can now customize the form for this culture by changing text, resizing controls, or moving controls around. This new property information is stored in the .resx file for this culture only leaving the .resx files for other cultures unaffected. The resource files are stored in folders, as shown in Figure 7-21. When the project is built, a satellite assembly is created to contain the resources for each culture, as shown in Figure 7-22. This DLL file has the same name in each folder. Figure 7-21. VS.NET resource files for multiple cultures
Figure 7-22. Satellite assembly
Determining Localization Resources at RuntimeBy default, an application's thread has its CurrentThread.CurrentUICulture property set to the culture setting of the machine it is running on. Instances of the ResourceManager, in turn, use this value to determine which resources to load. They do this by searching for the satellite assembly in the folder associated with the culture a reason why the naming and location of resource folders and files is important. If no culture-specific resources are found, the resources in the main assembly are used. Core Note
Creating a Satellite Assembly Without VS.NETOne of the advantages of using satellite assemblies is that they can be added to an application, or modified, without recompiling the application. The only requirements are that a folder be set up along the proper path, and that the folder and satellite assembly have the proper name. Suppose you have a .resx file that has been converted by your translator to French Canadian. You can manually create and add a satellite assembly to the application in three steps:
Placing the satellite assembly in the proper folder makes it immediately available to the executable and does not require compiling the application. |
| < Day Day Up > |