Flylib.com

Books Software


49 Create a Range

 <  Day Day Up  >  

49 Create a Range

To name a range, you only need to select a range and assign a name to it. Calc supports the naming, renaming, and deleting of range names . Once you've named a range of cells, you no longer have to refer to that group of cells by their cell addresses.

Before You Begin

48 About Calc Ranges


See Also

50 Fill Cells with Data


Calc keeps track of your ranges and changes them as needed. If you insert a cell in the middle of a range, or even entire rows and columns somewhere inside a range, Calc reassigns the range name to the new cell range. This holds true if you delete cells from a range as well. (If you delete only cell contents, the range is unaffected.)

TIP

graphics/tipbw_icon.gif

Give your ranges meaningful names. The name Payroll05 is obviously a better name than XYZ for payroll data in the year 2005. The better you name ranges, the fewer errors you'll type in your sheets because you'll more accurately refer to cells.


  1. Select a Range

    Click the anchor cell in a range you want to define. While holding down your mouse button, drag your mouse to the last cell in the range. Calc highlights the cells within the range as you drag the mouse.

    graphics/07inf03.jpg

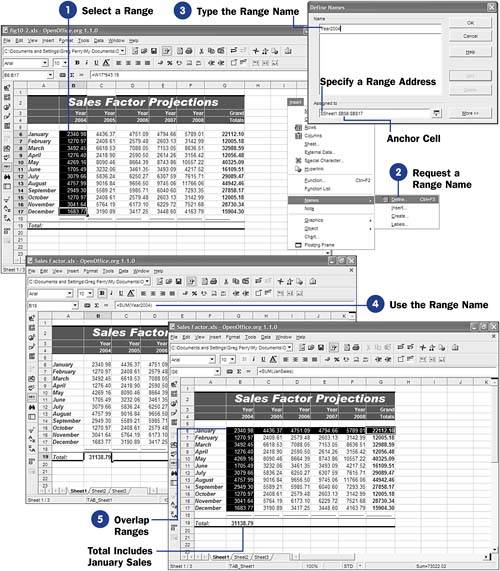
  2. Request a Range Name

    Select Insert, Names, Define from the menu. (You can also press the shortcut Ctrl+F3 .) The Define Names dialog box appears. This is where you name ranges and manage them.

    TIP

    graphics/tipbw_icon.gif

    51 About Calc Functions explains how to use functions such as the Sum() function.

  3. Type the Range Name

    Type a name for your selected range in the Name text box. Click Add to add the name to your sheet. A spreadsheet can contain as many names as you need. Click OK to close the Define Names dialog box. You can now use your range name in formulas.

  4. Use the Range Name

    Where you would otherwise use the cell addresses, such as in a Sum() function, use the range name instead. The Formula bar always displays the range name inside formulas.

  5. Overlap Ranges

    Two or more cells can appear in different ranges. Depending on the kind of sheet you're creating, overlapping range names can be common. Multiple rows might comprise one range, whereas columns within some of those rows might define a different range. You can name any range you wish, regardless of whether part or all of that range appears in other range names.

    Name as many ranges as you can because the more range names you create, the less error-prone your sheets will be. By referring to ranges by name, you are less likely to make a mistake than if you reference the cells within that range by their addresses.

 <  Day Day Up  >  
 <  Day Day Up  >  

50 Fill Cells with Data

Calc often predicts what data you want to enter into a sheet. By spotting trends in your data, Calc uses educated guesses to fill in cell data for you. Calc uses data fills to copy and extend data from one cell to several additional cells.

Before You Begin

39 Create a New Spreadsheet

45 Edit Cell Data


See Also

52 Enter Calc Functions


graphics/07inf04.jpg graphics/07inf05.jpg

KEY TERM

graphics/newtermbw_icon.gif

Fills ” The automatic placement of values in sheet cells based on a pattern in other cells.


One of the most common data fills you perform is to use Calc's capability to copy one cell's data to several other cells. You might want to create a pro forma balance sheet for the previous five-year period, for example. You can insert a two-line label across the top of each year's data. The first line would contain five occurrences of the label Year , and the second line would hold the numbers 2004 through 2008 . After entering all the data in year 2004's column, you only need to select that column and drag to fill in the remaining columns .

TIP

graphics/tipbw_icon.gif

Calc fills in not only numbers in sequences but can also determine sequential years and other sequences (such as extending cells containing 3, 6, and 9 to new cells that hold 12, 15, 18, and so on). Calc also extends days of the week and month names . Type Monday in one cell and drag the fill handle to let Calc finish the days of the week in every cell you drag to.


Even if the only fill Calc performed was this copying of data across rows and columns, the data fill would still be beneficial. Calc goes an extra step, however: It performs smart fills, too. Calc actually examines and completes data you have entered.

Using Calc's fill capability to enter the years 2004 through 2008 across the top of the sheet requires only that you type 2004 under the first Year title and type 2005 under the second title. Select both cells and then drag the fill handle right three more cells. When you release the mouse button, Calc fills in the remaining years.

  1. Type the Initial Label

    Type your first label, such as Year . This will be the value you will fill succeeding cells with. Although you could copy the value to the Clipboard with Ctrl+C and then paste the value to other cells with Ctrl+V , the fill handle is quicker to use.

    KEY TERM

    graphics/newtermbw_icon.gif

    Fill handle ” A small black box, at the bottom-right corner of a selected cell or range, that you drag to the right (or down or up) to fill the range of data with values related to the selected range.

  2. Drag to Other Cells

    Click and drag the cell's fill handle to the rest of the cells in which you want the label to appear. As you drag the fill handle to the right, Calc highlights each cell that will receive the filled data.

    NOTE

    graphics/notebw_icon.gif

    Combine text and numbers for more advanced fills. For example, if you extend Qtr 1 with the fill handle, Calc continues with Qtr 2 , Qtr 3 , and so on.

  3. Calc Automatically Fills Cells

    When you release your mouse button, Calc fills the remaining cells in the range with your label. Calc fills with numeric data, too, not just text inside cells. When you drag integers , Calc extends the range by increasing the integer by one.

  4. Start Months

    To see Calc's smarter fill capability, you can type a month name and drag that month's fill handle across or down the sheet to fill in the rest of the months.

    KEY TERM

    graphics/newtermbw_icon.gif

    Integers ” Numbers without decimal points such as 0, “52,164, and 435 (also called whole numbers ).

  5. Calc Fills in Month Names

    When you release your mouse, Calc fills in the remaining month names for you.

    NOTE

    graphics/notebw_icon.gif

    If you drag the fill handle fewer than 11 additional months, Calc only fills in those months. Therefore, you would drag the January cell's fill handle down only five more cells if you wanted to show the months January through June only.

  6. Start Year

    Type the initial year. Any single number, such as a year or any other number that does not have a decimal point, whose fill handle you drag will increment by one in each cell you drag the fill handle to.

  7. Calc Fills in Remaining Years

    When you release your mouse, Calc fills in the remaining years by incrementing the years for you throughout the range.

 <  Day Day Up  >