| The Insert, Header and Insert, Footer menu options provide you with the tools you need to add headers and footers to your document's pages. Each header and footer is saved in the page's current style. If your document has multiple page styles, your document can have multiple headers and footers, too. The Insert, Fields menu option inserts placeholder fields that Writer updates as necessary. Before You Begin  33 About Headers and Footers 33 About Headers and Footers
See Also  35 Add a Footnote or Endnote 35 Add a Footnote or Endnote
Here are the fields you'll find helpful for headers and footers: TIP  | Sometimes you won't want a header or footer to appear on a page. Simply define a new page style for that page and don't add the header or footer. |
The total document's page count is nice to use when you want to add a header or footer that reads, for example, Page 4 of 17 . -
Request a Header Select Insert, Header, Default . Writer inserts a header block at the top of every page in your document of the current page style. If you want to insert a footer instead of a header, you would instead select Insert, Footer, Default . You can insert both a header and footer on the same page. 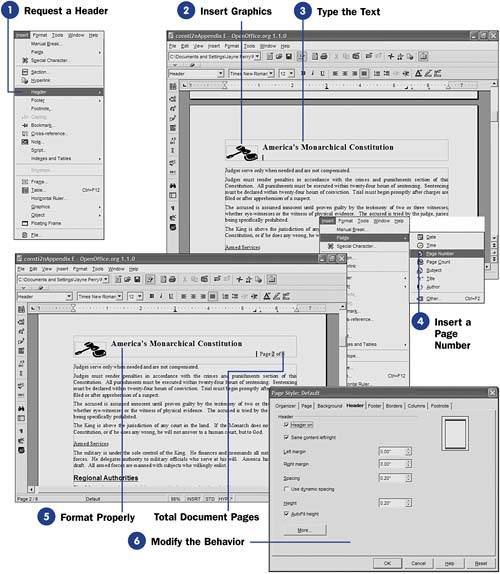 -
Insert Graphics Feel free to insert a graphic image in your header or footer. You can insert from the galley, from a graphics file, or you can scan an image into the header or footer (see 27 Insert Graphics in a Document ). TIP | | If you don't want any text in the same header or footer that contains a graphic image, but the single line for the header or footer isn't large enough to display the graphic, insert a blank space before or after the image and set the font size for the space to 36 points or another setting that gives the graphic enough room to display. | If the header or footer is not wide enough to display the graphic image, you can change the text's point size or use multiple header or footer text lines to give the graphic image a large enough block in which to appear. Even then, you may want to adjust the size of the image some, so click the image and drag the sizing handles inward or outward as needed. -
Type the Text Type the text that goes in the header or footer. If you want to end the first line early and start a second line of text, press Enter while typing within the header or footer block. TIP | | Set a right tab if you want the page number to align with the right edge of the page. | -
Insert a Page Number
Select Insert, Fields, Page Number to insert a page number placeholder in your header or footer. You can set up a page number by typing Page followed by a space before you insert the page number field. You can also insert a total document pages field that updates as your document grows and shrinks.
-
Format Properly
All the regular character formatting options work on header and footer text, so you can format the text any way you prefer. You can also use the ruler to set tabs if needed.
-
Modify the Behavior
Select Format, Page and click the Header tab to display the Header page. (There's an identical Footer page in the same dialog box.) The Header page enables you to control left and right headers for facing pages, margin spacing, and height. By adjusting the Height value, you can set the height of a header or footer to be large enough for a graphic image without having to format surrounding text large enough to show the image. As you adjust the header settings, the preview area updates to show you visually what your header or footer will look like.
|