| By its very nature, the inclusion of advanced mathematical formulas isn't the simplest to explain. Math experts will understand, and those who cloud up at long division may want to skip the whole thing. Probably, if you have the need to include mathematical formulas, then you understand the math behind what you're including in your document. Before You Begin  27 Insert Graphics in a Document 27 Insert Graphics in a Document 29 Add a Chart or Spreadsheet to a Document
This task shows you how to include such an advanced mathematical expression in your document. Writer provides many options for many types of formulas. An entire chapter, written for experts in math, is justified for this feature due to its power. Yet, such time simply cannot be given here to this math feature of Writer. Therefore, you'll see some fundamental ways to include such expressions in your document in this task but not an exhaustive demonstration. Far too many combinations of far too many expressions exist to cover it all in a task. KEY TERM  | Formula editor ” A tool included in the OpenOffice.org programs with which you can compose complex math equations. |
Having said that, you may be amazed at how simple Writer makes it for you to enter such formulas. With Writer's formula editor , you can build an extremely complex expression. 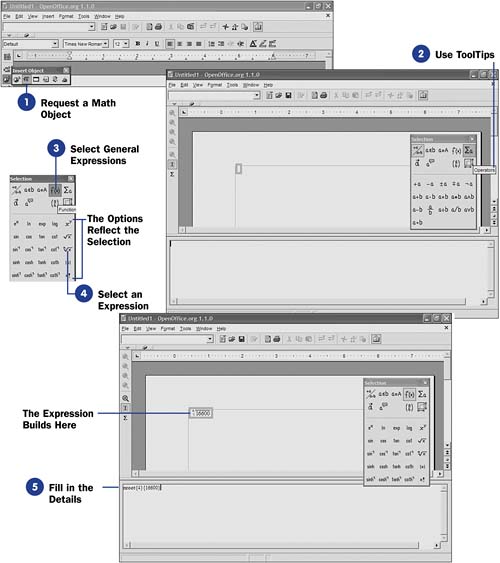 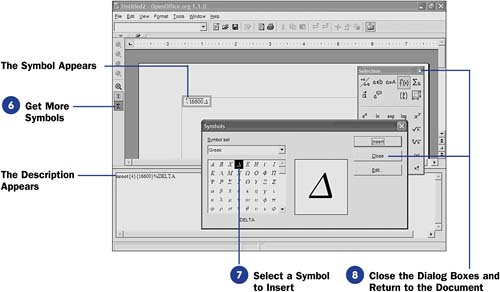 -
Request a Math Object When you need a mathematical formula, long-click the Main toolbar's Insert Object button to display a floating toolbar that contains the Math object. Select the Math object. When you do, a new window pane will open in the lower half of your screen to provide a place to build your mathematical formula. The formula editor is always at work in this lower window pane to build mathematical formulas you request. The Selection dialog box appears also. From the Selection dialog box, you select the kind of formulas you want to build, such as sums, relations, and functions. TIP  | If the Selection dialog box doesn't appear, select View, Selection from the menu to display it. | -
Use ToolTips
Hover your mouse pointer over any of the Selection dialog box's items to view more information on that item. The ToolTip that appears provides an explanation of what the symbol stands for.
-
Select General Expressions
When you click a button in the top half of the Selection dialog box, the available expressions in the lower half change. Click the Functions button (the one that looks like f(x) ), and the lower half of the dialog box changes to reflect all the functions you can build inside the formula editor.
-
Select an Expression Click to select the nth Root button in the lower half of the Selection dialog box. As soon as you do, the formula editor displays an expression that represents an nth root. NOTE  | You won't see math symbols in the formula editor, but as you build formulas, the symbols will appear above in your document. | -
Fill in the Details
You now must fill in the details, replacing the placeholder symbols with actual values. To write a formula that represents the 4th root of the number 16,600, for example, you would replace the first placeholder, <?> , with 4 and the second placeholder with 16600 . Have patience, because the formula editor takes its time parsing your expression before producing the formula with all the proper symbols in the document at the top of your screen.
The OpenOffice.org programs all support a symbolic mathematical language. When you type the language in the formula editor, the formula editor interprets what you type and builds the formula above in your document. As you work with the formula editor over time, you will get accustomed to the language used there. Once you learn some of the language, you can type the language dir-ectly instead of selecting from the Selection dialog box if you find that typing the language is easier. For example, instead of selecting the nth Root button, you could have typed nroot{4} {16600} , and the formula editor would have known what you wanted to build.
-
Get More Symbols
To add more symbols, such as a delta symbol, to your formula, click the Symbols button on your Main toolbar. The Symbols dialog box appears.
-
Select a Symbol to Insert
When you click to select a symbol, a description of that symbol, in the formula editor's math language, appears in the lower window pane, and the symbol itself appears above next to the first part of your formula. You can continue adding symbols (in this case, adding more symbols would represent multiplication of them).
-
Close the Dialog Boxes and Return to the Document
Click the Close button to close the Symbols dialog box when you're done inserting symbols. You can jump back and forth between the Symbols dialog box and the Selection dialog box as you build more complicated expressions.
Click to close the Selection dialog box when you're through building your formula.
Click anywhere in your document to hide the formula editor's window pane and to return to your document.
|