| When you write for others, a table of contents provides easy access for your readers. They can quickly go to whatever subject, or chapter, they want to go to. Making a table of contents used to be tedious , but with Writer, such a task is virtually work free. If you make changes to your document, such as adding new chapters, you can easily regenerate the table of contents to keep it fresh. Before You Begin  5 Edit Text 5 Edit Text 17 Use a Style
See Also  22 Create an Index 22 Create an Index
KEY TERM  | Table of contents ” A table in the front of many books that typically tells on which page number a book's chapters and other elements appear. |
Generally , paragraphs that you apply the Heading 1 style to will end up in your table of contents. With 10 heading styles, Heading 1 through Heading 10 , you have plenty of title, heading, and subheading styles with which to format your text. If any or all of these styles do not format paragraphs exactly the way you want them to, you can modify the styles. The important thing to note here is, if you do use the Heading 1 style, whether or not you've modified the style, Writer considers each of those paragraphs to be part of the table of contents. All the contents should appear in the currently open document; otherwise , Writer won't be able to locate the entries. The only exception would be for a Master Document (see 129 About Master Documents ). NOTE  | Writer doesn't continually update a table of contents even when you use the Heading 1 style. When you're ready for a table of contents, you'll request the Insert Index/Table dialog box, and at that point Writer generates the table. |
You may request that Writer use paragraph styles other than the Heading 1 style by clicking the Additional Styles option and selecting more styles by clicking the button. -
Find Text for the Table Select one or more paragraphs that you want to include in your table of contents. If you're writing a book, generally such a paragraph will consist of the introduction, chapter titles, and appendixes (if any). NOTE | | If you formatted your introduction, chapter titles, and appendixes with the Heading 1 style, you don't need to reapply the style. | -
Request the Heading 1 Style If you've selected paragraphs to apply the Heading 1 style to, select Format, Styles, Catalog from the menu to display the Style Catalog . You'll see a list of styles from which you can choose. (Click Paragraph Styles from the drop-down box if it's not already selected.) TIP  | Add chapter numbers in front of chapter titles so the chapter numbers automatically appear in the table of contents. | -
Select Heading 1
Select Heading 1 from the style list and click OK . Continue applying the Heading 1 style to all paragraphs in your document that you want to include in the table of contents. As you apply the Heading 1 style, the format of those paragraphs typically change to become boldface.
-
Determine the Style Once you've applied the Heading 1 style to all the paragraphs you want to include in your table of contents, you now can generate the table of contents. Move the text cursor to the beginning of your document ( assuming you want the table of contents to appear there). 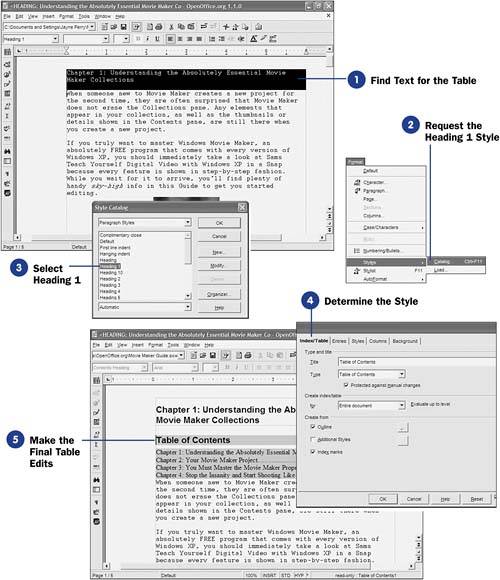 Select Insert, Indexes and Tables, Indexes and Tables to display the Insert Index/Table dialog box. You can change various aspects of your table of contents, such as the title. As you change various options, the preview image of your table will update to the left of the dialog box. Deselect the option labeled Protected against manual changes if you want the ability to modify the actual table of contents after Writer generates it. Once you're ready to generate the table of contents, click OK . Writer generates the table from your selected styles. -
Make the Final Table Edits
You now must make final edits to the table of contents. You can format the table, put page breaks around it (using Shift+Enter ), and add spacing between the lines if you wish. If you find that Writer doesn't let you change the table, you didn't uncheck Protected against manual changes when you generated the table in the Insert Index/Table dialog box. You can regenerate the table with the option unchecked so you then can make any edits you wish.
|