| OpenOffice.org supports 10 levels of bulleted lists. Therefore, as you might do in an outline, you can indent portions of a bulleted list to create sublists. Before You Begin  13 Apply Paragraph Formatting 13 Apply Paragraph Formatting
Writer makes bulleted lists easy to produce. You only need to type an asterisk or a hyphen before your list's first item, and when you press Enter at the end of the line, Writer recognizes the start of the list, converts the asterisk or hyphen to a bullet character, and automatically indents the next line and adds its bullet so you can quickly continue the list. See Also  20 Add a Numbered List 20 Add a Numbered List
TIP  | Writer supports several bullet styles, such as check marks and arrows. |
-
Type the First Item Anytime you want to begin a new bulleted list, simply type an asterisk ( * ) or a hyphen ( - ), followed by a space, and then the first line of your list. Do this on a new line. So, to start your list, type an asterisk, a space, and then the text for the first item in your list. NOTE  | If you type a hyphen instead of an asterisk, Writer uses a hyphenated bullet instead of a rounded bullet. | Writer will recognize that you've begun a list when you press Enter . -
Continue the List You won't have to continue typing the asterisk once Writer recognizes that you're typing a list. Writer converts your asterisk to the bullet item on the first line and puts a bullet at the start of your next line so you can continue typing. You only need to worry about your list items, and Writer takes care of the bullets and the indention. 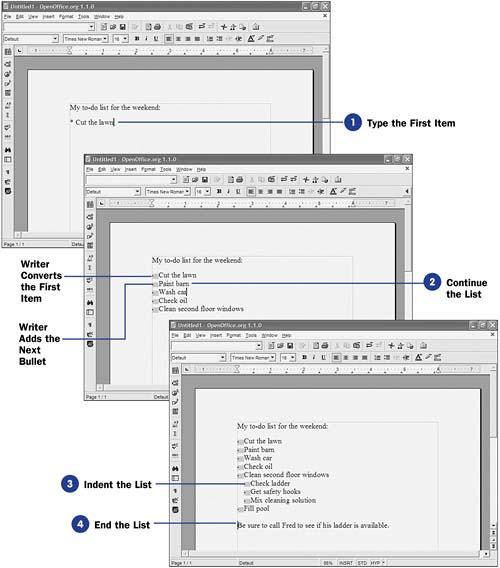  -
Indent the List When you want to create a sublist of bulleted items, press Tab after the bullet. Writer indents the item to create the indented list. Keep typing the list, and Writer keeps indenting the list, creating the sublist. NOTE | | Typically, a sublist should have more than one item. Writer supports up to 10 levels of indented lists, but three or four levels deep is often as far as you'll need to go. | When you want to return to the original indention to continue your primary list items, press Shift+Tab to move back to the left column. -
End the List
To end your list, after the final item press Enter twice. The first Enter keypress tells Writer that you don't want to indent anymore. The second Enter keypress moves the cursor to the next line, adding a blank line between the list's final item and your next regular line of text.
-
Change the Bullet Format You don't have to settle for the default bullet symbol that Writer uses. Highlight your bulleted list if you want to change the bullet symbol used in the list. Select Numbering/Bullets from the Format menu to show the Numbering/Bullets dialog box. Click the Bullets tab to show the Bullets page. TIP | | If you only want to change some of a list's bulleted symbols, such as the indented sublists, select only those portions of the list before opening the Numbering/Bullets dialog box. | -
Select a New Bullet
Click any of the bullet formats to select a new bullet symbol. When you click OK , Writer converts your bulleted list so that the symbol you selected appears in your document.
|