| When you want to make a point, you can format your text to modify the way it looks. Common character formatting styles are underline, boldface, and italicized text. Writer offers several additional character formats you can apply to your document's text. Before You Begin  4 Type Text into a Document 4 Type Text into a Document 5 Edit Text
One of the most common character formats you can apply is to change the typeface (loosely called a font in general discussions) in your document. The typeface determines the way your characters look, whether artsy or elegant. Fonts have names , such as Courier and Times New Roman . The size of a font is measured in points . As a standard rule of thumb, a 10- or 12-point size is standard and readable for most word- processed documents. See Also  13 Apply Paragraph Formatting 13 Apply Paragraph Formatting
NOTE  | Although they're called character formats, you can easily apply them to multiple characters, paragraphs, and even complete documents as easily as to single characters. Writer applies character formats to any text you select. |
As you type and move the insertion point, Writer displays the current font name and size on the Object bar, as well as whether the current character is boldfaced, italicized, or underlined . Writer also enables you to change the color of your text. When using character formatting, express but don't impress. Too many different kinds of characters make your documents look busy and distract the reader from your message. -
Select Text When you want to format characters, select the characters first. You can select a single character, an entire word, a sentence , a paragraph, or multiple paragraphs. However much text you select before applying a format is the text that will take on the character formatting you apply. KEY TERMS  | Typeface ” A character design that determines the size and style of how your characters look. Font ” Loosely used as another name for typeface. Point ” Approximately 1/72nd of an inch. | You can also apply a character format to text before you type it. Instead of selecting text first, pick a character format and then type the text. The text you type will have those character format attributes. -
Choose a Format Click either the Boldface, Italics , or Underline button on the Function toolbar to apply that format. You can click two or all three to combine the character styles. TIP  | Ctrl+B, Ctrl+I , and Ctrl+U are all shortcut keys to apply boldface, italics, and underlining. | 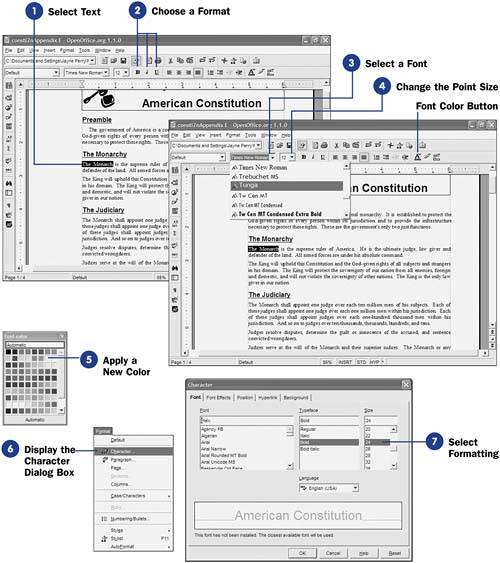 -
Select a Font
To change a selected text's font (or text that you're about to type), click the drop-down arrow to the right of the Font Name box and select a new font. Each font name appears in its own font, so you'll know what your text will look like before you apply the format. After you select a new font, your selected text will change to that font.
-
Change the Point Size
To choose a new point size for the selected text, click the drop-down arrow to the right of the Point Size list. When you click to select a size, your selected font will change to that size.
-
Apply a New Color To change the color of selected text (or text you're about the type), long-click the Font Color button on the Function toolbar. A Font Color palette appears. Click a color on the palette to change your selected text to that color. KEY TERM | | Palette ” A collection of colors from which you can choose. | -
Display the Character Dialog Box
Instead of using the Function toolbar to apply character formats, you can set such formats in the Character dialog box. Display the Character dialog box by selecting Format, Character from the menu bar.
-
Select Formatting The Character dialog box's Font page enables you to select common character formats such as the font name, bold, italics, and the size. The Font Effects page offers more options, including underlining, color selection, and special effects such as a shadow and blinking text. The Position page enables you to select a subscript or superscript version of your font as well as rotate your text so it travels up and down the page instead of across it. TIP | | Text rotated 90 degrees in the Character dialog box's Position page works well in some letterheads, for titles, or as a sidebar that travels down the length of your page. | The Hyperlink page enables you to add a link to a Web page or a filename to your text. Web pages often use such hyperlinks . The Background page enables you to set a background color for your text. |