| Not everybody works the same way, so not every Writer user wants to use Writer the same way. By setting some of Writer's many options, you will make Writer conform to the way you like to do things. For example, you may want Writer to hide its horizontal scrollbar so you get more space on your screen for text. If so, Writer has an option to display or hide the horizontal scrollbar. See Also  2 Create a New Document 2 Create a New Document 4 Type Text into a Document 5 Edit Text
NOTE  | All options are available for all OpenOffice.org programs at all times. For example, you can control the display of a grid in Impress from Writer, and you can request that Draw print all drawings in black and white from within Calc. |
As a matter of fact, Writer has an option for just about anything! Table 2.1 describes Writer's options. You'll learn a lot about what Writer can do just by looking through the options available to you. Table 2.1. Writer's Text Document Options | Writer Option Category | Explanation | | General | Describes general Writer settings such as the default unit of measurements and the width of tab stops (see 11 About Paragraph Breaks and Tabs ). | | View | Describes how Writer appears on the screen and which Writer special elements, such as graphics and rulers, appear by default. | | Formatting Aids | Describes how Writer displays formatting elements such as line breaks and paragraph alignment. | | Grid | Describes how Writer's grid appears on the screen so you can align charts and other graphic elements with text in your documents. | | Basic Fonts (Western) | Describes the default fonts you want Writer to begin with for regular text, headings (see 33 About Headers and Footers ), lists (see 19 Add a Bulleted List ), captions (see 27 Insert Graphics in a Document ), and the index (see 22 Create an Index ). | | Print | Describes how Writer prints documents and enables you to determine which installed printer you want to print to (see 9 Print a Document ). | | Table | Describes how Writer formats tables and data within cells (see 23 About Writer Tables ). | | Changes | Describes how Writer displays revisions made in documents when multiple people perform group editing. |
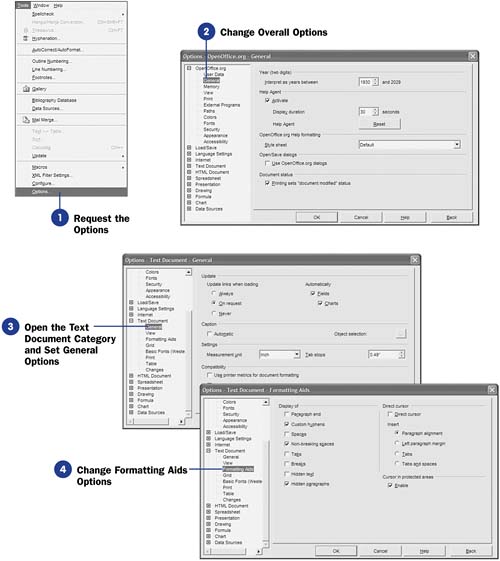  -
Request the Options Select Options from Writer's Tools menu. The Options dialog box appears. From the Options dialog box, you can change any of Writer's options as well as the options from the other OpenOffice.org programs. TIP | | Often you'll work in one OpenOffice.org program and realize that you need to change an overall option. For example, if you want to print several kinds of OpenOffice.org documents to a file (instead of to your printer) to send to others via email, you can change the OpenOffice.org option labeled Print , from within Writer, to apply that setting to all OpenOffice.org programs. | -
Change Overall Options
Select any option in the OpenOffice.org category to modify OpenOffice.org-wide settings such as pathnames. For example, if you don't like the pathname you see when you open or save a file, click the Paths option and change it to a different default file path .
If you're new to OpenOffice.org, consider leaving all the OpenOffice.org options "as is" until you familiarize yourself with how the OpenOffice.org programs work.
-
Open the Text Document Category and Set General Options
Click the plus sign next to the Text Document option to display the eight Writer-specific options listed in the table at the beginning of this task.
Click the General options category; the dialog box changes to show options you can select to make changes to the general Writer options. The Update section enables you to determine when Writer updates, or refreshes, linked data in a document such as an external worksheet that you link to your current document to use as a table.
The Caption section enables you to determine how a caption is to appear beneath graphics or charts you may want to include in a document. The Settings section enables you to determine how you want Writer to measure items. For example, you can click to open the Measurement unit drop-down list to change the default measurement from inches to centimeters if you work in, or travel to, a country that uses the metric system. Finally, the Compatibility section determines how Writer is to handle aspects of the current document's formatting, such as blank lines between paragraphs.
-
Change Formatting Aids Options Click the Formatting Aids options category under the Text Document category; the dialog box changes to show options that modify the display of various Writer formatting characters such as spaces and line breaks. TIP  | Some users prefer to see all formatting characters, such as the space format character and the end-of-paragraph mark ( ). Such characters can make some editing chores easier. For example, you'll know you pressed the spacebar seven times if you see seven space formatting characters, whereas it's far more difficult to know how many spaces appear if there are no characters to "mark" the spaces. | Enable the check box for any formatting options you want to see in documents onscreen. For example, if you want to see the space format character (a horizontally centered dot in place of a space) every time you press the spacebar in a document, enable the Spaces check box. -
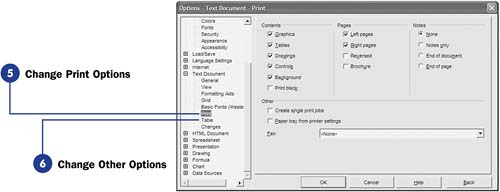
Change Print Options Click to select the Print category under the Text Document option category. View or set any print- related options you want to adjust. For example, if you want to print a draft of your current document's text, you could uncheck the Graphics and Drawings options so they don't print until you select them again. NOTE | | The more formatting characters you display, the more cluttered your screen will look; when you print the document that's onscreen, none of the formatting characters will be printed; the formatting characters are there to help you edit your document. | -
Change Other Options
Continue viewing and changing the remaining options in the Text Document options category by first selecting the category and then looking at the individual options. You might find, for example, that you want to eliminate the scrollbars to give yourself more screen real estate to see the document. You could uncheck the scrollbar options on the View page of the Text Document options set.
When you're done specifying Writer options, click the OK button to close the Options dialog box.
|