| To take full advantage of styles, you need to create your own. This way, you can include the exact formatting you need for the different elements in your documents. For example, if you have to type a weekly calendar of events, you might want to create one style for the names of the events, one for their descriptions, one for the date and time information, and so on. You can create new styles in two ways, as described in the next two sections. Using the Style List in the Formatting Toolbar The fastest way to create a style is to use the Style list in the Formatting toolbar (this technique is sometimes called style by example ). However, using the Style list has a major limitation: Any styles you create this way will be stored only in the document, not in the underlying template, so they won't be available outside of the document. In addition, this method works to create only paragraph styles, not character styles. To create a style by using the Style list, follow these steps: -
Format a paragraph with all the options that you want to include in the style. For example, if you are creating a style for your body text, you might format the paragraph with a Verdana 11-point font, left alignment, and 12 points of paragraph spacing after the paragraph (so that you won't have to press Enter to create blank lines between the paragraphs). -
Make sure your insertion point is in the paragraph, and click whatever style is currently showing in the Style list to select it. -
Type over the selected style name with the name of your new style (it can include spaces). Figure 7.2 shows the insertion point in the formatted paragraph, and the name Body entered in the Style list. Figure 7.2. Type a name for your new style in the Style list. 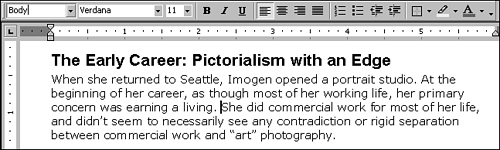 -
Press Enter. Word creates a style that includes all the font and paragraph formatting in the paragraph. Using the Style Dialog Box The most flexible way to create styles (either character or paragraph) is to use the Style dialog box. When you use this method, you can instruct Word to save the style in the template so that it will be available to other documents. To create a style by using the Style dialog box, follow these steps: -
Choose Format, Style to display the Style dialog box (see Figure 7.3). It doesn't matter where your insertion point is when you issue the command. Figure 7.3. The Style dialog box lets you create and modify styles. 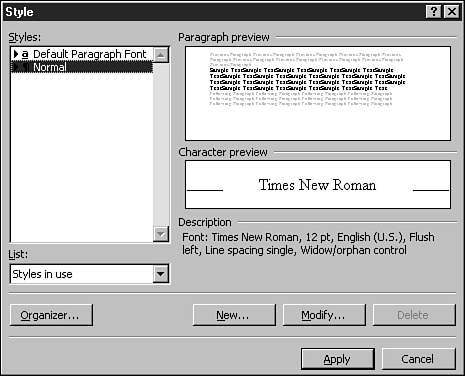 -
In the Styles list on the left side of the Style dialog box, click Normal if it isn't already selected. (Doing this ensures that your new style is based on the "plain- vanilla " Normal style.)  | The option that's selected in the List drop-down list (located in the lower-left corner of the dialog box) controls what's displayed in the Styles list. The All Styles option displays all the styles in all your Word templates. The Styles in Use option displays only the styles that are being used (or were used at some point) in the current document. The User-Defined Styles option displays only the styles you've created yourself. |
-
Click the New button to display the New Style dialog box (see Figure 7.4). Figure 7.4. Use the New Style dialog box to create a new style. 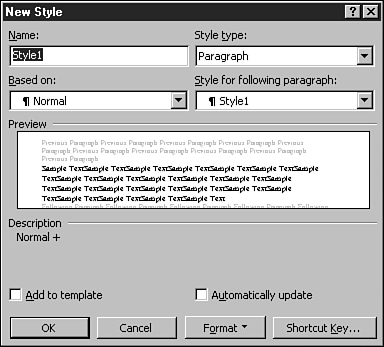 -
Type a name for your style in the Name text box (type over the default name Style1 ). Leave the Style Type option set to Paragraph, unless you want to create a character style. -
Mark the Add to Template check box if you want to add the style to the template underlying the current document. If you do this, the style will be available to other documents based on the template. -
Click the Format button to display a list of commands that lead to all the dialog boxes in which you can select font and paragraph formatting. -
Click the command that leads to the dialog box that contains the formatting you want to add. For example, click Font to display the Font dialog box so that you can specify the font formatting for the style. Make your selections in the dialog box, and click OK to return to the New Style dialog box. -
Repeat steps 6 and 7 to add all the formatting that you want to the style. -
Click OK to close the New Style dialog box, and then click the Close button to close the Style dialog box. (Don't use the Apply button to close the Style dialog box. This would apply the new style to whatever paragraph happens to contain the insertion point.) Your new style now appears in the Style list in the Formatting toolbar. |