Working with Rows and Columns Working with rows and columns is very much like working with cells on a larger scale. When you insert a row, the new row spans all the columns in the worksheets. New columns and rows don't contain data and are unformatted. Insert a new row or column by clicking the spot where you want the new row or column to appear. If you want to insert more than one row or column, select the number of rows and columns you want. (For example, select three rows if you want to insert three new ones.) Click the Insert menu, as shown in Figure 43.15, and choose either Rows or Columns. Excel inserts new rows above the current row and inserts new columns to the left of the selected columns. Figure 43.15. Add rows and columns from the Insert menu. 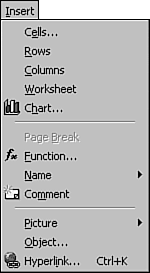 The following steps comprise an exercise in which you make some changes to the My Budget worksheet you started earlier, giving you a chance to put some of this knowledge to work. Don't worry if some of the changes don't make much sense; you're fine-tuning your skills right now. -
Highlight cells B6 through E6 on the My Budget worksheet and click the right mouse button. -
Choose Clear Contents from the shortcut menu that appears. As you see, you can clear the contents of one cell or a block of cells. -
Let's add a few rows. From any column, highlight a rectangular block of cells in rows 9, 10, and 11, as shown in Figure 43.16. Because you're going to insert three rows, you do not have to position the mouse pointer in a particular column. Figure 43.16. Your mouse pointer can be located in any column when you're inserting rows. 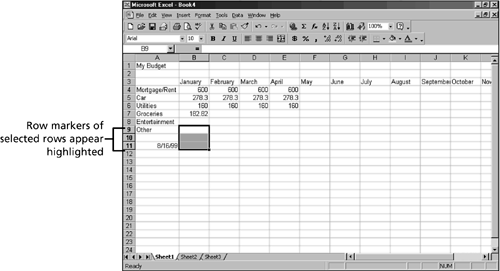 -
When the three rows are highlighted, click the Insert menu and choose Rows. Three blank rows are inserted above the first row you selected. -
Click in cell A9, type Tuition , and press the down arrow to move down. Enter Insurance and Savings in the cells A10 and A11. -
Select cell B5, the cell that contains the car expense and click Edit, Delete. The Delete dialog box, shown in Figure 43.17, appears. Make sure the option button next to Shift Cells Up is selected and click OK. Notice that the entry you'd made in the Groceries category for January was shifted upward. Figure 43.17. You need to choose the behavior of the remaining cells whenever you delete a cell. 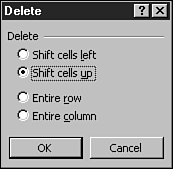 -
Stop now and save the worksheet so you can work with it later. Click the Save button on the Standard toolbar or click File, Save. When the Save As dialog box appears, type My Budget in the filename box and click Save. -
If you're planning to go right on to the next hour , click File, Close. If you need a break before you continue, close Excel now by clicking File, Exit. |