Creating a Table
| There are two basic ways to create a table in PowerPoint. You can either use the AutoLayout feature, which has a predesignated placeholder for a table, or you can insert a table into any slide when and where you need one. Using the Table AutoLayoutWhen you want to create a slide that contains only a table for your presentation, use the AutoLayout feature. This is the easiest method available. Using the table AutoLayout feature provides you with a predesignated placeholder for a table object. To create a table slide using the table AutoLayout, use the following steps:
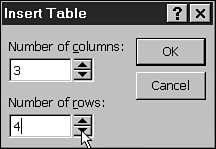
Inserting a Table in a SlideWhen you already have a slide created and want to display a table in addition to other objects, you can use the Insert menu to create the table. To insert a table into any slide, use the following steps:
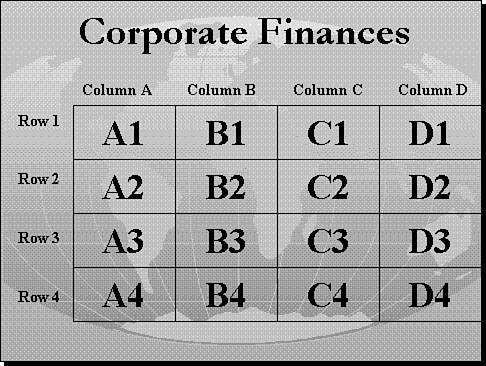
After you have inserted a table, PowerPoint should be ready for you to insert text and edit the table. This is referred to as table edit mode . The mouse pointer will look like a little pencil, and you should see the Tables and Borders toolbar. To exit quickly from table edit mode, click anywhere outside the table. Parts of a TableBefore you jump right in and start entering data into your table, let's take just a minute to understand the parts of a table. A table is made up of rows and columns. The rows are drawn using horizontal lines, and the columns are drawn using vertical lines. At every intersection of a row and column is a cell . Although PowerPoint does not label the rows and columns, it is sometimes helpful to do so. Some people reference cells by indicating the row and column the particular cell is in, such as "The information in row 3, column 3 demonstrates the need for more education in vaccination." Another method used is to designate each row by a number and each column by a letter. This is the method used in the PowerPoint chart program and in many spreadsheet programs, such as Excel. This naming process makes it easy to reference the individual cells. Although PowerPoint does not reference cells in this manner, Figure 28.2 shows a table with the cell references typed in. Figure 28.2. The columns, rows, and cells can be easily referenced by letters and numbers . Navigating a TableBefore you can enter text in a specific cell, you must first position the blinking cursor in that cell. You have several options available to you:
|
EAN: 2147483647
Pages: 474