Viewing the Presentation
| Viewing your presentation is the easy part, but deciding which option to use can be a bit more difficult. Although there are several ways to view a presentation, you'll learn just two options in this chapter:
Starting the Slide Show in PowerPointDuring the initial presentation design, you need to start and view your presentation in PowerPoint. Doing so gives you the opportunity to fine-tune your presentation and add timings, transitions, and any other finishing touches to your show. To start a slide show in PowerPoint, you have four main options:
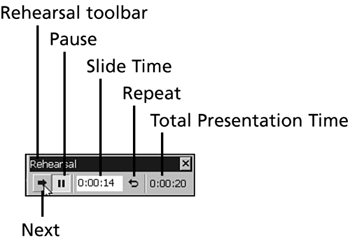
Each option gives you basically the same result, with a few minor differences. You can view the entire presentation from start to finish, clicking the mouse to advance to the next slide. The Rehearse Timings option gives you the opportunity to rehearse your presentation. While you are rehearsing, PowerPoint will keep track of the amount of time spent on each slide, and the total amount of time for the entire presentation. Figure 26.1 demonstrates PowerPoint Rehearsal toolbar during such a rehearsal. Figure 26.1. Use the Rehearsal toolbar option to view and rehearse your slide show while recording timings for each slide. The Rehearsal toolbar displays to show you the time spent on each slide. You can click the Next button to advance to the next slide. There is even a Repeat button if you want to start over on a particular slide. The Pause button enables you to pause the presentation, say to take an important phone call, and then you can resume the rehearsal without having to start all over again.
To create a shortcut on your desktop, follow these steps:
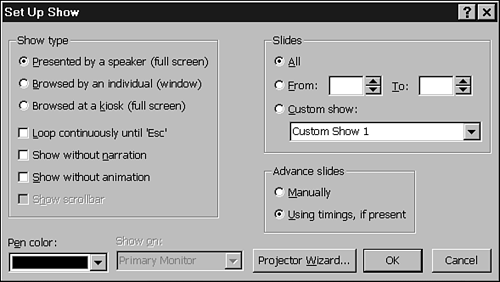
Setting and Using the Slide Show SettingsWhen you view a slide show, you have several options for its display, most of which are available in the Set Up Show dialog box (see Figure 26.2). From this dialog box, you can choose whether the show is going to be presented by a speaker, browsed by an individual, or run at a kiosk. You can also determine which slides or custom shows to display, how the slides should advance, and the default pen color (explained in the following section, "Using the Pen"). Figure 26.2. The Set Up Show dialog box determines how the slide show will be displayed. To change any show settings, follow these steps:
Using the PenWhen you're viewing a presentation, you have the capability to temporarily annotate each slide by turning your mouse pointer into a pen. This is a great feature when you have audience participation. To display the pen during a slide show, select one of the following options:
To change the pen back to the pointer arrow, use one of these methods :
|
EAN: 2147483647
Pages: 474
- Integration Strategies and Tactics for Information Technology Governance
- Linking the IT Balanced Scorecard to the Business Objectives at a Major Canadian Financial Group
- Measuring and Managing E-Business Initiatives Through the Balanced Scorecard
- Technical Issues Related to IT Governance Tactics: Product Metrics, Measurements and Process Control
- Governance Structures for IT in the Health Care Industry

