Flylib.com

Books Software


Using Existing Templates


Using Existing Templates

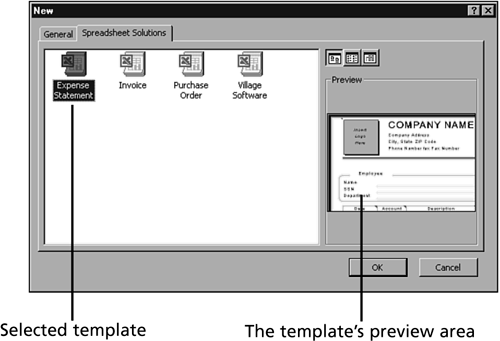
Office supplies several common templates, and each Office product contains templates of its own. For example, when you want to create a new Excel electronic worksheet, you can select from a blank worksheet or you can click the Spreadsheet Solutions tab to see four icons that represent templates. When you click a template icon, Office shows you a preview of that template (as shown in Figure 1.10).

Figure 1.10. Office provides several templates that you can preview.

graphics/01fig10.gif

After you select a template, the Office program opens it and presents the file. Edit the template and save the details in a new file. The new file becomes your template file that you use for subsequent documents.


Wizards

One reason so many users have switched to Microsoft-based Office products is Microsoft's wizard technology. Wizards are step-by-step guides that walk you through the development of a document or through a complicated process such as creating an Internet Web page from scratch. (You learn more about Office's Internet integration throughout this book.)

Although each wizard differs in its goal, all follow a similar pattern. Wizards display a series of dialog boxes, and each dialog box asks for a set of values. As you fill in the dialog boxes, you answer questions to help the program perform a specific job.

Generally, each dialog box within a wizard contains Next and Back buttons , which you can click to move back and forth through the wizard. If you change your mind after leaving one dialog box, you can back up to that dialog box and change its values.

Microsoft supplies you with several wizards you can use to create Office documents. For example, if you use Word to create a r sum , you can select the R sum Wizard. Figure 1.11 shows the R sum Wizard's opening dialog box.

Figure 1.11. The opening R sum Wizard box.

graphics/01fig11.gif

graphics/bookpencil_icon.gif

When you select File, New, each Office product offers a list of template and wizard icons. You'll know the difference between them because the wizard icons include a magic wand waving across the icon.


Many wizards contain opening dialog boxes that display information about the wizard. Figure 1.12 informs you that you selected the R sum Wizard. If you click the Next button, the wizard asks which of the following kinds of r sum s you want to create:

  • Entry-level r sum

  • Chronological r sum

  • Functional r sum

  • Professional r sum

Clicking Next again displays a dialog box that requests your name and address information for the top of the r sum . Office is smart enough to automatically pull your name from the Office registration information, but you can change the name if you create r sum s for other people. Often, wizard dialog boxes present you with a selection of styles, formats, graphic elements, and colors.

Every wizard's final dialog box includes a Finish button that you will click to complete the wizard and generate the document based on the wizard. Generally, wizards create shells of documents, such as Word template documents or Excel worksheets that contain no data. It's your job to enter the details.

After a wizard designs a document, you are free to make whatever additional edits you need.


Summary

This chapter introduced the Office programs to you by showing you a little of what each program can accomplish. Before learning specifics, you need to get the big picture. This hour provided that big picture and now you're ready to launch into each program and learn the nuances of each.