Customizing Calendar
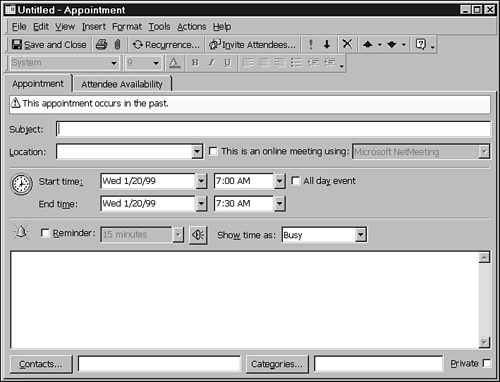
| Outlook defaults to a workday of 8:00 a.m. to 5:00 p.m., Monday through Friday. But what do you do if your workday is 7:00 a.m. to 4:00 p.m.? Or third shift, Sunday through Thursday from 11:00 p.m. to 7:00 a.m.? You can customize Calendar to define when your workday and workweek begin and end. To change the specific workday parameters, choose Tools, Options, click the Preferences tab, and click the Calendar Options button. In the Calendar workweek section, click the appropriate days' check boxes to match your workweek. You can enter the first day of the week from the drop-down list or directly type the day. You can also designate the first week of the year, just in case you work a fiscal year rather than a calendar year. Enter the start times and end times of your day either by using the drop-down lists or by directly entering the times into each field. Creating a New AppointmentNaturally, there's more than one way to begin the process of setting an appointment. However, all roads lead to the same place: the Appointment window. The easiest way to begin is to click the New Appointment button on the far-left side of the standard Calendar toolbar. The menu command is Actions, New Appointment. If you like to use shortcut keys, you can press Ctrl+N to activate the New Appointment window. If you are in Outlook but not in Calendar, and you need to set an appointment, select the Appointment command in the Standard toolbar's New Items drop-down box. This list also displays Ctrl+Shift+A as the shortcut key for activating the New Appointment window. You can always start a new appointment from anywhere within Outlook by pressing Ctrl+Shift+A. A Quick Look at the Appointment WindowAs shown in Figure 18.2, the Appointment window offers menu commands and toolbar functions to help you set appointments as easily as possible. Figure 18.2. The Appointment window displays as Untitled until you complete the Subject field. Time and Date ErrorsWhen you first create a new appointment, you might see a warning (located just above the Subject line) which states that the appointment occurs in the past, as shown in Figure 18.2. This is because, by default, Outlook assumes that the appointment you want to schedule is for the time and date highlighted in the current appointment window. If the current time is after the highlighted time, the appointment occurs in the past. Don't worry about this error message; you'll learn to fix it shortly. Actually, although this might seem like an extra step, it keeps you from accidentally scheduling appointments in the past. Defining the Appointment SubjectKeep the subject short and to the point. Save detailed explanations for the Note box near the bottom of the Appointment window. After you type a subject and leave the Subject field, the window title changes from Untitled to whatever subject you typed. Entering the LocationUnless your appointments are always at the same place, it's wise to note where meetings and events will be held. This field is especially helpful for offsite events. The nice thing about the Location field is that it is actually a drop-down list box that remembers the last 10 locations you entered into this field. This is great for office appointments, because these tend to occur in the same places. After a short while, the drop-down list should contain a customized list of most of the places your appointments are likely to occur. Entering DatesTo save you from typing dates and times, Calendar's drop-down boxes in date fields enable you to use the mouse to set up the appointment's date and time. Click the drop-down arrow next to the date field in the Start Time line to see a calendar of the current month. Click any day in the displayed month to choose the day for your appointment. The current date always appears enclosed in a red box. If you want to move to a different month, click the back (left) or forward (right) arrows in the top corners of the calendar. Also, anytime you want to move quickly back to your present position in the space-time continuum, simply click the Today button on the bottom of the calendar. You can also type dates in the normal format, for example:
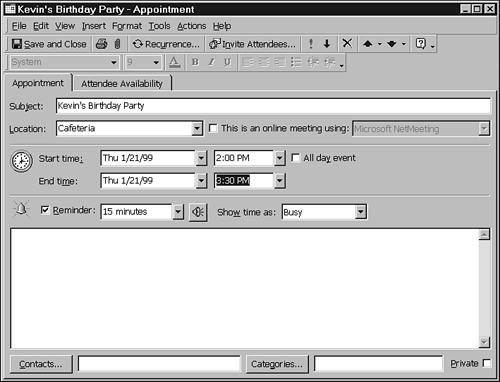
Setting TimesThe Start Time drop-down box displays times in half-hour intervals starting at 12 a.m. By default, Outlook assumes that the appointment duration is one-half hour . Set the appropriate date and start time for the appointment. Generally, you can skip the End Time date field (appointments generally last less than one day) and click the drop-down arrow for the End Time field. A list of half-hour intervals is displayed, now with duration notations next to them. If you know the specific time your appointment will end, you can click that time, or if you just know the duration of the appointment, you can search for the correct duration time without doing the mental calculations to determine the actual end time. In the next few steps, you set an appointment to surprise one of your office workers, Kevin, with a 40th birthday party tomorrow. The party is at 2:00 p.m. in the cafeteria. You are the person responsible for getting Kevin there.
More Ways to Set AppointmentsYou can set your times and create a new appointment in other ways as well. Instead of using the Appointment window to set the dates and times, you can use Calendar itself:
|
EAN: 2147483647
Pages: 474