| In this second phase, you tell Word which document you want to use as your data source. You can either create a new one or open an existing one. The key step in creating a data source is telling Word which fields you want to use. Typical fields are first name, last name , company, address, city, state, ZIP code, and so on. Include a field for any piece of information that you might want to include in your main document. For example, if you want to refer to the recipient's job title in your form letters , be sure to include a job title field. (When you are entering your records, as described in the next section, you can always leave a field blank if you don't have that piece of data for a particular recipient.) Follow these steps to create and save the data source: -
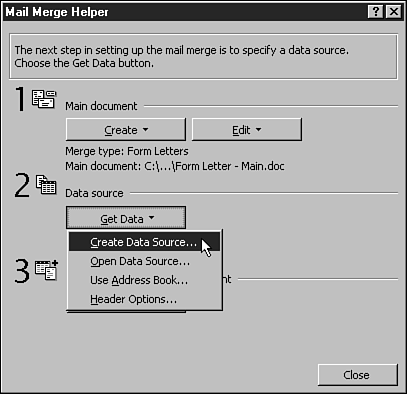
Click the Get Data button in the Mail Merge Helper dialog box, left open from the previous section, and choose Create Data Source in the drop-down list (see Figure 10.2). Figure 10.2. Choose Create Data Source to create a new data source.  -
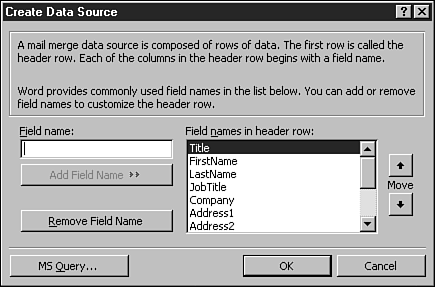
The Create Data Source dialog box appears (see Figure 10.3). To remove a field that you don't want, click it in the Field Names in Header Row list, and then click the Remove Field Name button. Figure 10.3. Use the Create Data Source dialog box to define the fields you want to use in your data source.  -
To add a field, first replace the contents of the Field Name text box with the name of the field you want to add. Then click the Add Field Name button to add the name to the Field Names in Header Row list. (This button becomes active as soon as you type text in the Field Name text box.) No spaces are allowed in field names.  | The order of the fields in the Field Names in Header Row list determines the order in which they will appear when you enter the data later on. If you want to adjust the position of a field in the list, click it and then use the Move arrows to the right of the list to move it up or down. |
-
When your list of fields is the way you want it, click OK.  | If your mailing list contains a lot of addresses with building or department names, suite numbers , and so on, keep the Address2 field to use for this information. The Salutation field is a good one to add to a data source. Use it to store the name that will appear after Dear in the letter. This lets you adjust the way you address a letter depending on the recipient. For example, if a person's FirstName field contains Elizabeth and the LastName field contains Larson, you can enter Liz in the Salutation field if you know the recipient well, or Ms. Larson if you want to be more formal. |
-
Word displays the Save As dialog box to let you save your data source. Save it with a name that will remind you that it's a data source, such as Mailing List and Data Source . -
When Word asks what you want to do next, click the Edit Data Source button. The Data Form appears to let you enter data in your new data source. Continue with the next section.  | If you already have a table of names and addresses in a database program such as Access, you may be able to use that table as your data source. In step 1 in the previous list, click Open Data Source instead of Create Data Source, display the Files of Type list in the Open Data Source dialog box, and click the appropriate file format. Locate and select your database, and then click the Open button. |
 |

