101 Add DME Transitions to Your Movies

 <  Day Day Up  >  

Before You Begin

100 Install Microsoft Plus! Digital Media Edition (DME)


See Also

102 Add DME Special Effects to Your Movies


The Microsoft Plus! Digital Media Edition adds 25 new transitions to Movie Maker. The transitions are rather more creative than the ones supplied with Movie Maker. Some have fizzle, organic , and rip in their names , if that tells you anything about how wild they can get.

Unlike the Movie Maker Creativity Fun Pack's titles and end credits ( see 95 Use the Fun Pack's Titles and 96 Use the Fun Pack's End Credits ), when you install the DME, the new transitions go right into Movie Maker and are ready to use the next time you start Movie Maker. You do not have to import them to use them.

TIP

graphics/tipbw_icon.gif

Unless your movie is a parody or trying to be over-the-top with transitions and effects, don't overdo your transitions between clips. Most of the DME transitions are extravagant, and you should use caution when considering them so you don't make the effect more important than the message. Having said that, the DME transitions certainly have their place, and you will find many uses for these eclectic set of wipes.


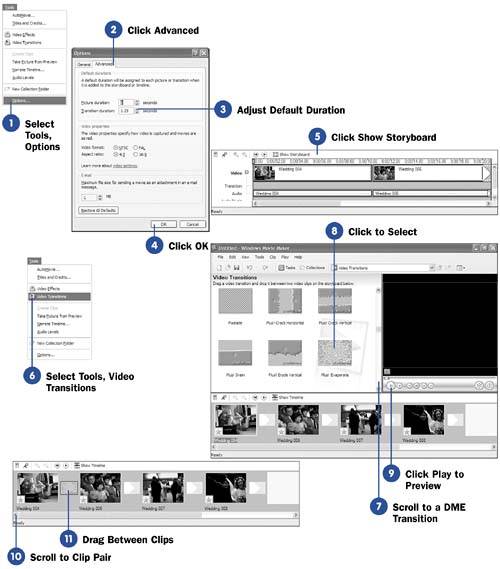
  1. Select Tools, Options

    Adjust the default video transition duration if you want by selecting Options from the Tools menu.

  2. Click Advanced

    Click the Advanced tab to display the Default durations page.

  3. Adjust Default Duration

    Click the up or down arrows next to the Transition duration value to increase or decrease the default time value of the transition effect.

  4. Click OK

    Click OK to close the Options dialog box.

  5. Click Show Storyboard

    You can more easily see DME transitions from the storyboard even though the timeline has its own Transition track. The timeline's tracks can get squeezed if you have zoomed out too far. To add a transition, you might see its effect better by working from the storyboard. Therefore, click the Show Storyboard button to change from the timeline to the storyboard if your movie's timeline is showing.

    graphics/13inf02.jpg
  6. Select Tools, Video Transitions

    Display the video transitions by selecting Video Transitions from the Tools menu.

  7. Scroll to a DME Transition

    Click the Contents pane's scrollbar to review all the available transitions. Scroll down until you see the Plus! transitions. From cracks and drains to stars, you'll find a gamut of transitions that greatly accent the transitions you had before installing the DME.

  8. Click to Select

    Click one of the DME transitions to select it. Its thumbnail appears in the Monitor pane.

  9. Click Play to Preview

    Click the Monitor pane's Play button to see a preview of the transition.

    TIP

    graphics/tipbw_icon.gif

    Double-click any transition in your Contents pane to see a preview of that transition effect in the Monitor pane.

  10. Scroll to Clip Pair

    Scroll to the pair of clips between which you want to insert the DME transition.

  11. Drag Between Clips

    Drag the transition to the space between two clips on the storyboard.

 <  Day Day Up  >  


Digital Video with Windows XP in a Snap
ISBN: 0672325691
EAN: 2147483647
Year: 2004
Pages: 169
Authors: Greg Perry

flylib.com © 2008-2017.
If you may any questions please contact us: flylib@qtcs.net