Creating a Telnet Protocol Class
| [ LiB ] |
At last, I can show you how to implement a class that interprets Telnet input. In this case, you're going to be accepting input from a client and processing it so that you can use it within your game. This class is located in the files \Libraries\SocketLib\Telnet.h and \Libraries\SocketLib\Telnet.cpp.
It may seem like a cool feature to be able to accept command codes from the client, but I usually advise against it. There are many possible exploits if you allow that kind of stuff. Whenever I make a Telnet server, I strip out all nonprintable characters from the stream, and process the basic command codes: CR/LF/BS. This usually makes things much easier in the long run.
NOTE
An exploit is the common term used to describe a part of a network program that can be used to per form behaviors (usually devious ) that it wasn't meant to perform. Some people may call this being hacked , even though true geeks don't really use that term.
For example, imagine a new player logging into the game and deciding to be "cool" by using colors in his name, so that it looks like "<ESC>[31mJohnSmith". What a mess! Whenever your program searches for user "JohnSmith", it won't match the real name , since it's got a huge, ugly command code structure in front.
So the best bet is to strip out all nonprinting characters. It makes your life much easier. Officially, Telnet doesn't support the 8-bit ASCII set, but it does support the 7-bit version. Therefore, you should generally strip out characters above 127 as well. If you know your clients will support the extended ASCII codes, by all means, use them, but it's generally not a good idea.
Data
Remember that Chapter 5 explained that each Connection maintains its own protocol object. Since you cannot be assured that you will get complete commands in one receive call, you need someplace to buffer the data. The Connection class doesn't do this for you; it just sends off the raw data stream to the protocol and assumes the protocol object handles it.
In our case, the Telnet protocol object accepts the raw data, strips out bad characters and process command codes, and then stores the results in its own buffer. For now, I've decided to use a static buffer of 1 kilobyte. (I use the same BUFFERSIZE constant integer defined in the Connection.h file from Chapter 5.)
class Telnet { public: typedef ConnectionHandler<Telnet, string> handler; protected: char m_buffer[BUFFERSIZE]; int m_buffersize; }; Note the typedef at the beginning of the class. This is essentially saying that the Telnet class uses the ConnectionHandler class as its base handler class. Remember: the ConnectionHandler is abstract and declares functions for you to define later on. Declaring it with the template parameters Telnet and string means that it works on Telnet connections, and sends complete messages in the form of a string . (Telnet is naturally just text commands.)
NOTE
If you were defining your own custom protocol, you might decide to create a structure that represents your com mands instead of using just a string.
So, whenever you use Telnet::handler , you're actually referring to the ConnectionHandler<Telnet, string> class, which declares all of the functions for you. Now, whenever you want to implement a real handler for your program, all you need to do is inherit from Telnet::handler , and define the functions.
The m_buffer is the array that holds the processed data, and m_buffersize remembers the amount of data in the buffer.
Functions
There are four functions in the Telnet class: the constructor, the Handle function, the SendString function, and the Buffered function.
The first just clears the size of the buffer to zero:
inline Telnet() { m_buffersize = 0; } The next function accepts a buffer of raw data and translates the data into its own buffer until a full command can be found:
void Translate( Connection<Telnet>& p_conn, char* p_buffer, int p_size ) { for( int i = 0; i < p_size; i++ ) { char c = p_buffer[i]; // pick out a character if( c >= 32 && c != 127 && m_buffersize < BUFFERSIZE ) { m_buffer[m_buffersize] = c; // insert it into buffer if good m_buffersize++; // increase buffer size } The previous code segment starts a loop through every character in the raw data buffer. The character is added to the buffer and the buffersize is incremented if the following conditions are met: The character is greater than or equal to 32 (meaning it's a printable character); the character is not 127 (for some reason, 127 is the only oddball character above 32 that isn't printable); and the buffer isn't full.
else if( c == 8 && m_buffersize > 0 ) { m_buffersize--; } If the character is value 8 ( backspace ), and the buffer isn't empty, the size of the buffer is decreased by 1, meaning that the last character is erased.
else if( c == '\n' c == '\r' ) { if( m_buffersize > 0 ) { p_conn.Handler()->Handle( string( m_buffer, m_buffersize ) ); m_buffersize = 0; } } } } And finally, if the character is either a CR or an LF, and the buffer isn't empty, the current handler of the connection is notified about the new command, and the buffer size is reset to 0.
The third function is the SendString function. I have not discussed this function before for a good reason: Not all protocols support sending strings of text to a client, but Telnet does. You should give whatever protocol you're using functions that allow you to send data back to the connection. For example, if you have a protocol that supports three different kinds of responses, you can give your protocol class three different functionsone to send each kind of response. The protocol object would then assemble the raw data and ship it off to the connection. Figure 6.2 shows this system.
Figure 6.2. This shows the interaction between a connection and a connection handler being mediated by a protocol object. There can be many types of commands inside the program, and it's the protocol object's job to translate to and from raw byte data.
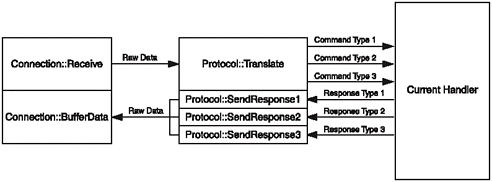
As you'll notice, the protocol stands as a mediator between connections and their handlers. Whenever data is received from a connection, it is sent to the protocol and translated into something that a handler understands.
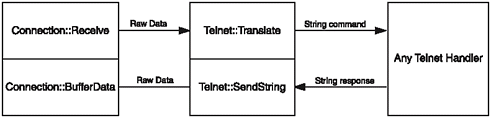
I've refined the figure and made it apply to only the Telnet protocol class, which you can see in Figure 6.3. This figure is a specialized version of Figure 6.2, applied to the Telnet protocol class. As you can see, the class has only one type of command: string. Connections send raw data to Telnet , which then performs the calculations you saw earlier to extract one full command. Then it shoots that command off to the current handler on the connection. The handler can do whatever it wants; then it shoots a string back to the Telnet class, and then back to the connection.
Figure 6.3. The class has only one type of command: string
When you are sending data from a handler to a connection using SendString , you have the option to just buffer raw Telnet data on the connection. I don't find that method to be very good, however.
For example: VT100 only supports 8 colors, or 16 if you count both the bold and dim versions of each color . This is obviously very limited for modern day computing, in which computers can support millions of colors. So, what if, later on, you decide to make your own protocolone that supports all kinds of new features, such as font control?
Even more ambitious: What if you decide to make your server handle both Telnet and your extended protocol, so that users can log in using regular Telnet clients, or your own custom client if they want to? You certainly don't want every one of your handlers to make a distinction every place you send data to a connection, right?
So, instead, you can make your protocol object able to tell what kind of connection the client is using, and then translate the data.
NOTE
It's generally a bad idea to tie your game code in with a specific protocol. For example, if you want to send the string "Hello" in red text over ANSI Telnet, you'd send "\x1B[31mHello" . ( \x is a control code in C++ that inserts a character into a string using the two hexadecimal numbers following the character. So \x1B means you're inserting ASCII character 0x1B, or 27, the escape character.) Down the road, you might decide to use a different protocol, but you've limited yourself to VT100 codes within your game engine. Now you'll have to search out and change every occurrence of those codes. Believe methat's a pointless waste of time. Instead, you can have your own control code format that is independent of the protocol. In that case, you can send something such as "<red>Hello!" to the protocol, and the protocol finds the "<red>", strips it out, and puts whatever the current protocol uses in its place. This is an incredibly flexible way of programming.
For now, I don't do any translation, because I'm leaving it for later chapter (Chapter 16, "The Networking System"). So the function just passes the string straight to the connection's buffer:
void Telnet::SendString( Connection<Telnet>& p_conn, std::string& p_string ) { p_conn.BufferData( p_string.data(), p_string.size() ); } Codes
Also included within the Telnet.h file are static std::string s that represent some of the more popular VT100 codes. Here they are:
const std::string reset = "\x1B[0m"; const std::string bold = "\x1B[1m"; const std::string dim = "\x1B[2m"; const std::string under = "\x1B[4m"; const std::string reverse = "\x1B[7m"; const std::string hide = "\x1B[8m"; const std::string clearscreen = "\x1B[2J"; const std::string clearline = "\x1B[2K"; const std::string black = "\x1B[30m"; const std::string red = "\x1B[31m"; const std::string green = "\x1B[32m"; const std::string yellow = "\x1B[33m"; const std::string blue = "\x1B[34m"; const std::string magenta = "\x1B[35m"; const std::string cyan = "\x1B[36m"; const std::string white = "\x1B[37m"; const std::string bblack = "\x1B[40m"; const std::string bred = "\x1B[41m"; const std::string bgreen = "\x1B[42m"; const std::string byellow = "\x1B[43m"; const std::string bblue = "\x1B[44m"; const std::string bmagenta = "\x1B[45m"; const std::string bcyan = "\x1B[46m"; const std::string bwhite = "\x1B[47m"; const std::string newline = "\r\n\x1B[0m";
The only thing to note is newline , which is a combination of a CRLF and a reset command. It's almost always a good idea to reset the colors to normal on every line; you don't want to accidentally leave the color codes the same on each new line.
| [ LiB ] |
EAN: 2147483647
Pages: 147