Flylib.com

Books Software


Section 83. Creating a Web Photo Gallery in Photoshop


#83. Creating a Web Photo Gallery in Photoshop

Photoshop can automatically generate a completely interactive Web photo gallery from your images that you can then share with others via your Web site. Photoshop offers a variety of gallery styles to choose from; a couple are even Flash-based.

Adobe Stock Photos and Web Gallery

If you've found photos through the new Adobe Stock Photos service in Bridge (see #8) that you would like your client to evaluate, you can create a temporary Web photo gallery for your client to review. From the Adobe Stock Photos tab in Bridge, select all your photos and click the Download Comps button in the header. Once they're downloaded, switch to the Downloaded Comps tab, select your comps , and then create your Web photo gallery. Consider using the "feedback" gallery styles to make it easy for your client to comment on specific images. Also, make sure your gallery is temporary (meaning up for less than 30 days), private, and only for evaluation purposes.


You can create a Web photo gallery either from Photoshop or Bridge. But by choosing Bridge to select your images, you can preview the images you're selecting as well as decide on the order in which they will appear in your gallery. Drag your images around in the Bridge window to change their order in the gallery.

With your images selected (and ordered) in Bridge, continue with the following steps:

1.

Choose Tools > Photoshop > Web Photo Gallery. Photoshop opens and the Web Photo Gallery dialog appears ( Figure 83a ).

Figure 83a. The Web Photo Gallery dialog is where you choose the gallery style along with other details, such as thumbnail size and gallery title.


2.

Decide on a style for your gallery using the Styles pop-up menu. The thumbnail preview will update with the style you've selected. You can optionally add your email address, but keep in mind that doing so can result in unwelcome emails from spammers.

3.

Since you selected your images from Bridge, you can skip the Use pop-up menu and go right to the destination for your gallery. Click the Destination button and select a location for the gallery to be saved.

4.

Cycle through all the formatting options for your selected gallery style on the Options pop-up menu. With these options you can customize your gallery by adding a site name for your gallery, adjusting the size of the large images and thumbnails, and choosing any additional information about your photos that you want displayed.

5.

Once you've selected the formatting options, click OK and Photoshop commences with the construction of your Web photo gallery. When Photoshop is done creating the gallery, the home page of the gallery will load into your browser so you can preview the results ( Figure 83b ).

Figure 83b. When Photoshop is done generating your new gallery, the gallery will open in your browser so you can preview it.
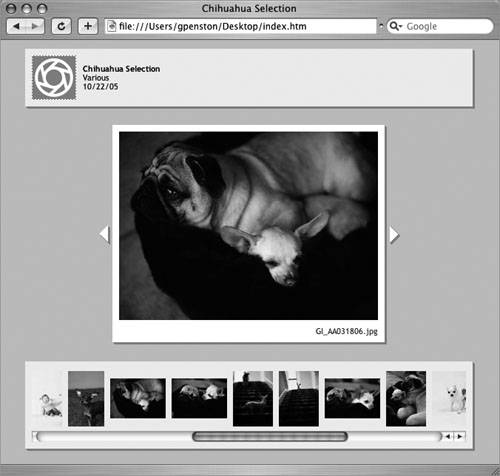

6.

You may want to repeat the creation of the gallery a few times to try different gallery styles and see them in action. The thumbnail preview is a bit too small and isn't as helpful as viewing the galleries in your browser. When you're happy with the gallery style you've selected, you can post your gallery to your Web site using GoLive or your favorite FTP application.


#84. Using Actions in Photoshop and Illustrator

If you find yourself performing the same task over and over again in Photoshop or Illustrator, it's probably high time you take a couple of minutes and create an action to handle the task for you. Actions are a sequence of commands that you can record and repeatedly play back on a file or a batch of files.

Conditionals in ImageReady

I would be remiss if I didn't mention that ImageReady shares the same Actions features found in Photoshop. In fact, ImageReady goes one better than Photoshop by offering conditionals. Look for the Insert Conditional option on the Actions palette menu in ImageReady. You can use conditionals to test a condition and assign the steps to take if the condition is met. You can even nest actions by using conditionals. Let's hope Photoshop includes these soon.


To start working with actions, open the Actions palette (Window > Actions) ( Figure 84a ). A set of default actions is available in both Photoshop and Illustrator for you to start experimenting with. If the Default Actions folder set is collapsed , click the triangle to expand it and reveal the actions it contains. You can expand each action to expose its steps. You can load other sample actions from the Actions palette menu. Deconstructing the sample actions is a great way to learn just what's possible with actions.

Figure 84a. The Actions palette houses just about everything you need to create and manage actions.


To play an action, select it and click the Play Selection button at the bottom of the Actions palette. If any of the steps in the action has a dialog icon next to it, you'll be greeted with a dialog. This allows you to enter custom values each time the action is run. You can click a dialog icon to toggle it off. A red dialog icon indicates one or more of the steps in the action have dialogs enabled, whereas a dark gray dialog means all the steps have dialogs turned on. You can also omit steps of an action by drilling into them and unchecking the check mark icon beside the step you want to skip. Actions can be represented in the palette by buttons by choosing Button Mode in the palette's menu. You can then click the button of the action to play it.

Inserting the Nonrecordable

Some menu commands may not be recorded when creating an action, for instance, the Effects commands in Illustrator. Keep an eye on the Actions palette to see if the menu command you selected appears. If it doesn't, you may still be able to add it to your action. From the Actions palette menu, choose Insert Menu Item and then try selecting the menu command again.


{% if main.adsdop %}{% include 'adsenceinline.tpl' %}{% endif %}

To create an action:

1.

Click the New Action button at the bottom of the palette.

2.

In the New Action dialog box ( Figure 84b ), name your action and optionally specify a keyboard shortcut and color highlight for it. Then click OK. Notice that the Record button is now active, letting you know that the application is watching. In this recording state, all the steps you perform (that are recordable) will be recorded and will start appearing under your new action in the palette.

Figure 84b. When creating a new action, you can choose an action set for it to be saved in, assign a function key combination, and select a highlight color for the action when it's in Button mode.


3.

When you're finished adding steps to your action, click the Stop button at the bottom of the palette. With your action created, you can now run it on any open file or a batch of files (see #85).