Understand Key JavaScript Concepts
|
When you know how to put a script on a page, you are almost ready to begin having some serious fun with JavaScript. However, before you start, it’s good to nail down some of the key concepts that make this language work. With HTML you learn to work with elements, attributes, and values. In CSS you use selectors, properties, and values. With JavaScript, your primary tools are objects, properties, and methods. Understanding these concepts will take you a long way toward being able to use JavaScript. Consider the following explanations of the key JavaScript concepts:
-
Objects JavaScript is an object-oriented language, which means that when you work with JavaScript, you must think in concrete rather than abstract terms. For example, the browser is an object. The HTML page you are creating is the document object. If you want a new window to open, you are going to work with a window object. If you create a form, you will have made a form object. Although the hierarchy of objects is very complex, it’s important to be object-oriented in your thinking so you know how to construct the commands that make your script work.
-
Properties A property is a characteristic of an object. For instance, in the preceding example, you set the background color of a page to yellow with the following line: document.bgcolor = "yellow";. What you did, in JavaScript terms, was modify the background color property of the document object.
-
Methods A method is an action that is taken with respect to an object. In previous examples, the line document.write("text"); used the method write to cause text to be written to the document object.
Now, if all this seems a bit fuzzy, perhaps a practical illustration would help. You might tell your son or daughter to wash the car. In this case, the car is the object, and wash is the method. What if you have three cars—one red, one white, and one teal—but you want only the red car washed? You throw in a property to clarify things. You tell your child to wash the red car. If you wrote the command in JavaScript, it might look like this: car.red.wash("Now!");. This might be an oversimplification, but it should help you better grasp the idea of objects, properties, and methods.
Avoid Common Errors in Coding
Writing any kind of computer code is tricky because programming languages are not at all forgiving. Be prepared to have to “debug” your JavaScript, because no matter how careful you are, errors will slip in. However, if you keep in mind some of the more common errors, you should be able to catch most of them:
-
JavaScript is case-sensitive. Always make sure you are consistent in how you write and capitalize.
-
Every JavaScript line should end with a semicolon (;).
-
You shouldn’t break up a single line of code into multiple lines. You can do this with HTML, but JavaScript will treat it as an error.
-
Many parts of your code will have to be contained in quotation marks. You can use either single or double quotation marks, but if you put one set inside another, you must alternate them.
"This 'is an' acceptable construction." "This construction "is not" acceptable."
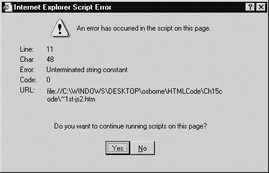
If you plan to use JavaScript in your Web design, you will find it helpful to test your pages on a Netscape browser. Although both Internet Explorer and Netscape let you know when you’ve got an error in your code, IE merely gives you an error message in an alert box, as in the following illustration:
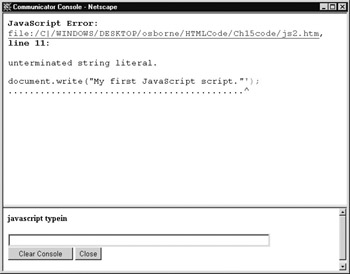
On the other hand, Netscape helps you debug the code. If you run a page that has a JavaScript error, a message on the status bar at the bottom of the browser instructs you to type "javascript:" in the location bar (where you normally type the Web addresses). This brings up a JavaScript console that actually shows you where the error(s) occurred.
You've already learned how to add “hidden” or invisible comments with the XHTML comment tags: <!-- comment -->. But what if you want to add a comment to your JavaScript? You'll find that XHTML comment tags will not work for this purpose. Instead the browser will misinterpret them as code, and your script will not work. There are two ways to add comments to JavaScript. If your comment will be on a single line, then just add two slashes (//) and then your comment. If your comment will cover more than one line, then open it with a slash followed by an asterisk (/*). Close the comment by using an asterisk followed by a slash (*/). Thus your JavaScript comments will look like this: // single line comment /* multiple line comment */.
Of course, you still need to know enough about JavaScript to know how to correct the errors in your code, but at least you won’t waste a lot of time trying to find them.
Project 24: Experiment with JavaScript
A good way to begin working with JavaScript is with some easy but practical applications. These will not only get you used to writing JavaScript, they will give you some useful tools for your Web pages as well. You will also gain a better understanding of objects, methods, and properties as you apply them in the following exercises.
Write a “Last Modified” Script
You have undoubtedly seen a line at the bottom of many Web pages that reads, “This page was last modified on,” and then the page included the date on which the Webmaster made changes to it. You might have wondered if the Webmaster had to go in and adjust that line every time the page was changed. Actually, there is a way to have the date line correct itself automatically, and it takes only a few lines of JavaScript to do it. Open template.htm and save it as lasmod.htm; then add the <script> element and comment tags (<!-- -->) to the <body> portion of the page. When your code looks like the following listing, you’ll be ready to add your script:
To write a one-line JavaScript that will add a “last modified” line to your page, follow these steps:
-
Because you are going to be writing to your HTML document, you will be using the document object and the write method to instruct the browser to write a line of text. Insert it in your code like this:
<script type="text/javascript" language="javascript"> document.write( ); </script>
-
Inside the parentheses you will put a property that causes the browser to display the date and time the document was last modified. In this case, use the document object with the lastModified property. If you save the page and view it in your browser, you will see a line at the top left of the screen that displays the date and time (of the last modification).
<script type="text/javascript" language="javascript"> document.write(document.lastModified); </script>
Caution Don’t forget to write lastModified exactly as you see it. In JavaScript, when two words are put together, a capital letter is often used to distinguish where one ends and the other begins. Because JavaScript is case sensitive, your browser will not understand what you are asking for if you write lastmodified, LastModified, or Lastmodified.
-
Because your visitors will not necessarily understand what that date and time refer to, you will want to add an explanatory note, such as “Date last changed:”. To add your text, enclose it in quotation marks and put it inside the parentheses, along with your document.lastModified.
<script type="text/javascript" language="Javascript"> document.write("Date last changed:" = document.lastModified); </script>
Save the page and display it in your browser. As shown in the following illustration, you should see a line displaying the time you saved the document (down to the very second). It might not be attractive, but you can change that by adding a little HTML.
![]()
By putting your script inside a table cell and adding a little HTML to the command, you can dress up the display. The HTML for creating such a design is in the following listing. Modify your page to include the changes, then save it as lastmod2.htm. As in the illustration that follows the code, your “last modified” display will look a little more pleasing.
| Note | The line of JavaScript in the following listing has been broken into two lines because of this book’s layout. However, it’s important to remember that it should be written on a single line. Otherwise, the browser will think it is two separate statements and will return an error. |
<head> <title>Last Modified</title></head> <body style="background-color: white"> <div align="center"> <table border"1"> <tr><td> <script type="text/javascript" language="javascript"> <!-- Comment tags to hide script from older browsers document.write("<h5>Date last changed: " + document.lastModified + "</h5>"); --> </script> </td></tr></table> </div> </body> ![]()
Write a Script that Identifies Browsers
In JavaScript the browser is considered an object. Identified as a navigator (remember, JavaScript was developed by Netscape), the browser object allows you to design a page that gathers information about the browser that is viewing it. After you get comfortable with JavaScript, you can even design your code to load different pages depending on which browser your visitor is using. To see the capabilities of the navigator object, open template.htm and save it as navigator.htm. After you’ve added a set of script and comment tags, add the following lines of JavaScript:
-
Add a line that identifies the browser that is displaying the page.
document.write("Your browser is: " + document.appName + "<br />"); -
Add a line that displays the browser’s version number.
document.write("The version is: " document.appVersion + "<br />"); -
Write an instruction that displays the type of platform (computer) on which the browser is running.
document.write("Your platform is: " + document.platform + "<br />"); -
Your finished code should look like the following code listing:
<script language="javascript" type="text/javascript"> <!-- document.write("Your browser is: " + navigator.appName + "<br />"); document.write("The version is: " + navigator.appVersion + "<br />"); document.write("Your platform is: " + navigator.platform + "<br />"); --> </script>
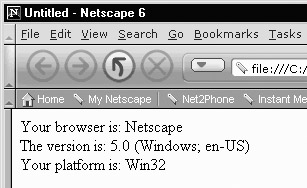
To see this script in action, you should try it on different browsers. Your results will be different for each different browser, version, or system on which the page is displayed. For example, if you view this page with Netscape, your results will look like this:
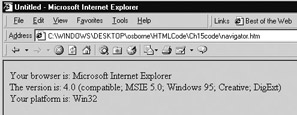
However, if you use Internet Explorer to display the page, your results will be different. As in the following illustration, the application name and version number will change to reflect the browser with which the page is being displayed:
Because most people already know which browser they are using to surf the Net, you might be wondering what possible use that little bit of JavaScript can be. Granted, as just an informational tool it’s not all that exciting. However, you also can use the navigator object to analyze the kind of browser a visitor is using and then display an appropriate page.
For example, say you want to use some aspects of CSS that were supported in Netscape but not in Internet Explorer. You don’t want to exclude your faithful visitors who might not be using Netscape. So to alert your viewers that they will gain the most benefit from the page if they use Netscape, you can write a code that tests the browser and returns a special prompt if it is not Netscape. Open template.htm and save it as navtest.htm; then add the following script to the page:
<script language="javascript" type="text/javascript"> <!-- Comments hide script from older browsers document.write('<p style="font-size: 1.5em">You are using ') if(navigator.appName == "Netscape") {document.write("Netscape. Proceed</p>")} else{(document.write( "a non-Netscape browser.</br> This page is best viewed with Netscape.</p>"))}; // You can stop hiding the script, now. --> </script> Don’t get too confused by some of the unfamiliar parts of the script; the best way to understand the script is to examine it line by line.
-
The first line should look somewhat familiar. In it you use the write method and the document object to have the browser write the phrase “You are using.” Note the addition of the <p> element inside the quotes, along with the style attribute and font-size property. Be sure to observe that the document.write statement is enclosed in single quotes. This is because you will need to use double quotes for the style information.
Tip Remember that in JavaScript, single and double quotes are interchangeable. You just can’t overlap them, and you must use them in pairs.
document.write('<p style="font-size: 1.5em">You are using ') -
Next you set up a condition that the browser should look for with an "if, else" statement. The idea is that the browser should look for a certain condition. "If" it is true, the browser is instructed to take one action. If the condition is not true ("else"), it is to take a different action. This line sets up the condition the browser is to look for. Notice the use of a double equal sign. In JavaScript, a single equal sign is used to assign a value to something. To convey the idea of one thing being equal to another, you must use two equal signs, as shown here:
if(navigator.appName == "Netscape")
-
The next line tells the browser what to do if it is a Netscape browser. In this case it uses the document.write command to write a line that says “Netscape. Proceed.” Note that the entire statement is contained in curly braces:
{document.write("Netscape. Proceed</p>")} -
The final line of the script gives the "else" condition. This statement tells the browser what to display if it is not a Netscape browser. Notice again that, after the else command, the entire statement is enclosed in curly braces:
else{document.write("a non-Netscape browser.<br />This page is best viewed with Netscape.</p>")}
| Caution | Remember that the preceding statement must be written on a single line. |
When you have typed the script, save it and display it in Netscape. Your results should look something like the following illustration:
![]()
If you try viewing the page in Internet Explorer, you should see a different display, as is reflected here:

Write a Script that Displays the Current Date
Have you ever visited a site that displayed the current date and time? This is easy to do with JavaScript. It also gives you the opportunity to work with the date object. To see how easy it is to use JavaScript to display a date, open template.htm and save it as datetime.htm; then follow these steps:
-
Add your script and comment tags.
<script language="javascript" type="text/javascript"> <!-- Hide your code from older browsers // Stop hiding -->> </script>
-
Create a date with the date object. You will assign the name “Today” to the date. You can name it whatever you want to, but “Today” seems appropriate.
Today = new Date( );
-
Tell the browser to display the date by using the document.write command. Notice that you use the name (Today) that you assigned to the date object. The phrase "Today’s date is:" is enclosed in quotation marks because it is a text string. The two are connected with a plus sign (known as a concatenating operator).
document.write("Today's date is: " + Today); -
Your completed script should look like this:
<script language="javascript" type="text/javascript"> <!-- Hide your code from older browsers Today = new Date( ); document.write("Today's date is: " + Today); // Stop hiding your code --> </script>
If you save this page and display it in your browser, you will see the current date and time displayed in the upper-left corner of the page. The following illustration shows what you should see:
![]()
Realistically, you would want to display the date in a slightly more conventional manner. It’s not much more difficult to do that; you just need to instruct the browser to display only certain parts of the date. Using the getMonth, getDay, and getYear methods, you can make your display more specific. Each method is connected with a period to the date (Today) you already defined. Your line of JavaScript would be modified to read like the following listing:
Today = newDate(); document.write("Today's date is: " + Today.getMonth() + "/" + Today.getDay() + "/" + Today.getYear()); The three methods mentioned above are connected with the plus sign (+), and a slash is added between the parts of the date by enclosing it in a set of quotation marks ("/").
Also, using style sheets, you can enhance the appearance of the JavaScript display. Consider the difference it makes when you add some CSS style rules to improve the look of your page. Modify your code to match the following listing. As the illustration after shows, your date display can be made to look quite attractive.
<!DOCTYPE html PUBLIC "-//W3C//DTD XHTML 1.0 Strict//EN" "http://www.w3.org/TR/xhtml1/DTD/xhtml1-strict.dtd"> <html xmlns="http://www.w3.org/1999/xhtml"> <head> <title>JavaScript Date Display</title> <meta http-equiv="Content-Type" content="text/html; charset=iso-8859-7" /> <style type="text/css"> body {background-color: tan;} table {background-color: peach; border-style:outset; border-color: yellow;} td {font-family: arial; font-size: 12pt; font-weight: bold; color: brown;} </style> </head> <body> <table> <tr> <td><script type="text/javascript"> <!-- Hide your code from older browsers Today = new Date( ); document.write("Today's date is: " + Today.getMonth() + "/" + Today.getDate() + "/" + Today.getYear()); // Stop hiding your code --> </script> </td> </tr> </table> </body> </html> | Note | The preceding code validated against the XHTML 1.0 Strict DTD. |
|
EAN: 2147483647
Pages: 126