Create and Use GIF Animation
|
For many years, the animation workhorse of the Web has been GIF animation. If you’ve ever made a “flip-book” animation by drawing several sequential pictures (say, of a horse galloping), and then flipped through them quickly, you have a pretty good idea of how GIF animations work. GIF animations are simply a collection of GIF images organized in successive frames and combined into a single, animated image file.
Understand GIF Animation Tools
If you read Chapter 6, you already know that GIF stands for Graphics Interchange Format, a graphics format developed by CompuServe. GIF animations are easy to create and, if properly optimized, can be fairly small files. However, to create GIF animations, you do need graphics software capable of creating GIF images and animation software to assemble the animation. For suggestions on graphics software, see Chapter 6. Table 12-1 provides a list of a few of the possible software choices for creating animations. As you can see, most of these programs are in the $30–$40 range and can be downloaded as free demos.
| Program | Publisher's Web Site | Approximate Cost |
|---|---|---|
| CoffeeCup GIF Animator | www.coffeecup.com | $30 |
| Ulead GIF Animator | www.ulead.com | $40 |
| Animagic GIF Animator | www.rtlsoft.com | $30 |
| GIF Movie Gear | www.gamani.com | $40 |
| Jasc Animation Shop (also comes bundled with PaintShop Pro) | www.jasc.com | $50 |
There are three basic steps to making your own GIF animations. First, you must use a graphics editor to create the individual pictures’ frames that will make up your animation. Second, use animation software to assemble the animation. Finally, you must optimize the animation. By optimizing, you reduce the file size as much as possible so it doesn’t take too long for the animation to load onto your visitor’s computer. After the animation has been created, you insert it in your Web page just as you would any other image.
Create Frames for an Animated Banner
The types of animations you could create are limited only by your imagination. However, on the Web GIF, animations are used most frequently for banners, buttons, icons, animated links, and so on. Although it is beyond the scope of this book to explore the details of how each of these might be created, it will be helpful for you to work through the steps of creating an animated GIF. For this exercise, you will create an animated banner. You will need to use a graphics editor capable of saving in the GIF format. If you want to create the banner as you work through the chapter, you should download a GIF program (see Table 12-1). The images that follow were created with Paint Shop Pro 6. CoffeeCup GIF Animator is used later in this chapter to animate the images.
To create an animated banner, follow these steps:
-
Start with a banner-sized blank frame. Open your graphics program and create a blank document that is 468 pixels long 60 pixels high. Save the blank banner as banneranim.gif. It should look like this:
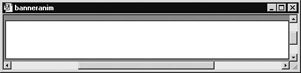
| Tip | The standard banner size for use on the Web is 468 60 pixels. If you plan to create banners for exchanges and advertising, always use these dimensions unless instructed otherwise. |
-
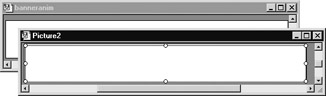
Select File | New and create another image with properties and dimensions identical to the first. (Or choose Edit | Copy, then paste a new picture.) A second blank frame identical to the first should appear on the screen.
-
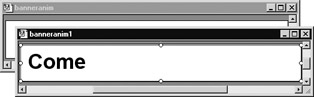
Use a text tool (generally represented as a capital letter on the image editor’s toolbar) to add some text to your second frame. Click the Text tool for a Text Entry window to come up. Choose a font and color, set it at 26 points, and type Come. Your text should appear inside the banner (with some programs you might have to position the text). Save the image as banneranim1.gif. The following illustration shows what your second frame might look like:
-
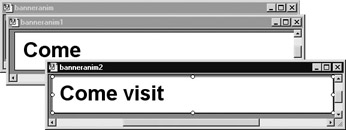
Repeat the preceding process, this time copying your second banner and pasting it as a new image. You now should have three banner frames in your window.
-
Using the text tool, add the word visit to your third banner frame. Position it and save this frame as banneranim2.gif. You’ve created three frames so far.
-
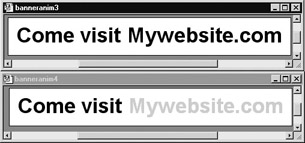
Create another frame by copying and pasting banneranim2.gif as a new image. Use the Text tool to add these words: Mywebsite.com. When you have positioned the text, save the image as banneranim3.gif. You now should have four frames, each adding to the previous one.

-
Now, to add a little color, copy and paste banneranim2.gif (the next to the last) as a new image. Select the text tool and click inside the banner. When the text entry box appears, change the color of Mywebsite.com. Depending on your graphics program, you might not have to retype the text. Be careful to position the text in exactly the same place as in banneranim3.gif. Remember to use the Zoom and Grid features of your image editor to help you position the letters accurately. If you don’t, the letters will appear to move when the animation runs. While you may want that for some animations, for this one you simply want the text to appear to be changing color.
You have created the frames that will become your animation. Although this is a fairly simple animation, you can make it more complex by adding more frames. For example, you could have it spell the message out letter by letter, or you could use a series of pictures. Keep in mind, though, that the more frames you add, the larger your final file size will be, which in turn makes your animation take longer to load and slows the overall process of page loading. As you’ll see later, there are steps you can take to optimize your file, but first you must create the animation.
Create a GIF Animation
You have created the raw materials for your animation, but now you need a way to combine and play them. A low-cost GIF animator does the job nicely and requires very little expertise on your part. The animation in the following illustrations was created with CoffeeCup Software’s GIF Animator, but you can just as easily use a program listed in Table 12-1.
| Tip | Most graphics software, such as PhotoShop Elements and Paint Shop Pro, include GIF animation programs as part of their total package. |
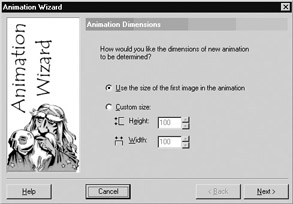
CoffeeCup’s GIF Animator gets you up and running quickly with an Animation Wizard. Select File | New to bring up the wizard, then follow these steps:
-
Check the box that instructs the software to use the size of the first image for the entire animation. This automatically sets the frame size of all the images to match the first one.
-
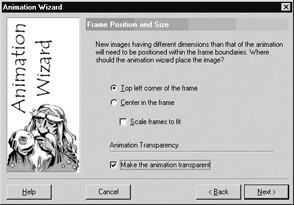
The second dialog box offers a choice of either a Transparent or Opaque background. Select Make The Animation Transparent.
-
This box also deals with options that are necessary if you are using frames of different sizes and dimensions. Because all the frames in this animation have the same dimensions and are identical in size, you don’t need to make any adjustments. Accept the default options by clicking Next.
-
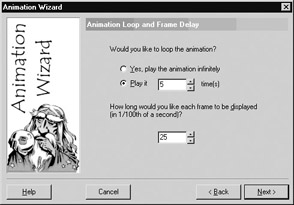
The next dialog box contains two very important options. First, you can either allow the animation to loop indefinitely or set it to run for a certain number of loops. As with the <blink> element, an endlessly looping animation can become very distracting, particularly if the person who is visiting your site plans to stay there a while. Set the animation to loop about five times and stop. Its purpose is to draw attention to the banner; several cycles should do it. Of course, there might be times when a continuous animation is warranted—but be sure it’s necessary before you do it. The second option is for determining the amount of time between frames. The number you choose here should depend largely on the kind of animation you are trying to achieve. If you are doing a cartoon-type animation and you want to create the illusion of movement, you must use more frames and rotate them fairly quickly. For the kind of animation you are doing here, slower is better. Set the animation for 25 ( of a second). Click Next to move to the next dialog box.
Tip A motion picture runs at 24 frames per second (fps). Video moves at about 30 frames per second. For the Web, 15 fps is plenty fast.
-
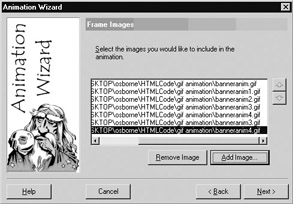
Now you can add the files for your animation. Click Add Image in the dialog box and open the directory where you saved the frames you created earlier. Click the files you created in the order you want them to appear. You can insert the files as many times as you want. For example, banneranim3 and banneranim4 are repeated at the end, followed by the original blank frame. This will cause the color to change back and forth on the “Mywebsite” letters a few times; then the frame will blank out before the animation begins again. Click Next to move to the next dialog box.
-
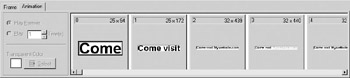
After the files are added, click Finish; the program will assemble the animation for you. It will display in a small window in which you can view your animation frame by frame. There also is a button on the toolbar that enables you to play the animation.
When you push the Play Animation button on the toolbar, the program plays back your animation. You can make adjustments, add new frames, and so on, working with the animation until it is exactly what you want.
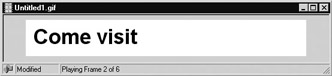
Select the Preview in Browser option in the GIF Animation dialog box, and you will see a sample of your animation displayed. For the animation created with CoffeeCup’s GIF Animator, you can preview it in the software itself. The following illustration shows the animated banner “running” in CoffeeCup’s GIF Animator:
After you have viewed your animation and are satisfied with it, you are ready to optimize and save it.
Optimize Your GIF Animation
Animations can quickly become very large. Consider the sample animation you just built. Although you created only five frames, you added some of them more than once. What if you wanted to create a sophisticated animation that displayed 15 different frames per second? For a five-second animation, your final count would then be a whopping 75 frames. That might not sound like much until you remember that that means there are 75 GIF images making up that single animation. Can you imagine adding almost seventy separate pictures on one Web page? That’s basically what you are doing. Those pictures take time to download before they ever display. If you plan to use detailed animations, and you want your visitors to hang around long enough to watch them, your animations better be pretty breathtaking. However, you can speed things up by taking the time to optimize your animation.
Understand Optimization
Many of the techniques used to optimize GIF animations are the same as what you would use to reduce the size of a single GIF image. Of course, there are some others that are unique to GIF animations. When optimizing your animation, you might consider some of the following adjustments:
-
Reduce the number of frames. This perhaps is the simplest solution for reducing file size.
-
Reduce the size of the animation frames. For something with a specified size, such as a banner, this isn’t always an option. However, if you can make the actual frames smaller, they will load faster.
-
Reduce the number of different colors. The greater the color depth in your images, the bigger the file. Use as few colors as possible without degrading the quality of your image. For more information on colors, read Chapter 4.
-
Turn off antialiasing when you create the images. Antialiasing is the way graphics programs smooth out the choppy look that occurs when pixels are used to display letters and other curved lines. It results in a better look but takes up more space. If you can get away with it and still have a good-looking image, turn this option off.
Use an Optimization Wizard
In addition to the previous steps, you can further optimize your animations by taking advantage of your animation software’s optimization wizard. The software can further reduce your file sizes by using some advanced compression options. For example, to optimize the animation created earlier with CoffeeCup’s GIF Animator, follow these steps:
-
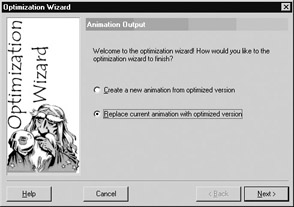
With the animation file still open, select Tools | Optimize Animation. In the opening dialog box, select the Replace Current Animation With Optimized Version check box. These check boxes allow you to choose whether to create an entirely new animation or merely optimize the one you just created. Unless you have a particular reason for saving your original animation, go ahead and replace it. Then click Next.
-
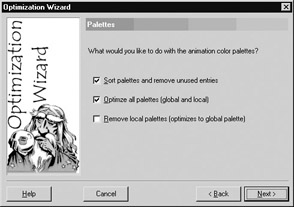
You see another dialog box that asks you what you want to do with the color palettes for the animation. Choose the first two options: Sort Palettes And Remove Unused Entries and Optimize All Palettes (Global And Local). This will optimize your colors. (See Chapter 6 for more about color depth in images.) Click Next to continue.
-
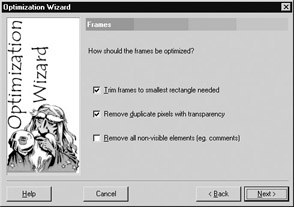
This box prompts you to optimize the frames by removing any unnecessary parts. Select at least the first two options, and then click Next.
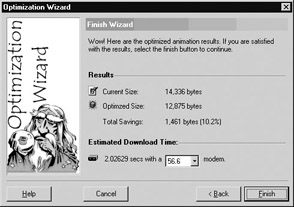
The final box shows you how much your file has “shrunk” since you began optimizing, plus an estimate of how long it will take to download. If you think the download time is too long, you can run the Optimization Wizard again and try to further reduce the size of the file. Otherwise, click Finish and save the file as animation1.gif.
When your animated banner is complete, you are ready to try it out on a Web page to see how it works.
| Tip | If you want to save time creating banners, Jasc’s Animation Shop (bundled with Paint Shop Pro) has a banner wizard that enables you to create simple banners with nice effects very quickly. |
Display Your Animation on a Web Page
Although creating an animation can be a time-consuming process, adding one to your Web page is simple. You treat it just as you would any other image. In fact, it is even saved with the same .GIF extension as a static image. To display your animation on a Web page, follow these steps:
-
Open template.htm and save it as animation.htm.
-
In between the <body> tags, add these lines:
<div align="center"> <img src="/books/4/238/1/html/2/animation1.gif" width="468" height="60" alt="banner"/> </div>
-
Use an embedded style sheet to change the background color to white:
<style type="text/css"> body {background-color: rgb(100%,100%,100%) <style>
Your finished code should resemble the following:
<!DOCTYPE html PUBLIC "-//W3C//DTD XHTML 1.0 Transitional//EN" "http://www.w3.org/TR/xhtml1/DTD/xhtml1-transitional.dtd"> <html xmlns="http://www.w3.org/1999/xhtml"> <head> <title>Gif Animation</title> <style type="text/css"> body {background-color: rgb(100%,100%,100%)} </style> </head> <body> <div align="center"> <img src="/books/4/238/1/html/2/animation1.gif" width="468" height="60" alt="banner" /> </div> </body> </html> Save the page and open it in your browser. It should look like the following Web page illustration:

| Note | Because you chose white as the background color for both the page and the banner, the banner disappears and the text appears to be part of the Web page. This is a nice trick for giving text a dynamic feel. |
|
EAN: 2147483647
Pages: 126