AirSnort
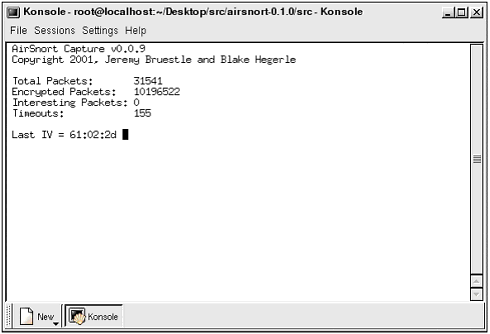
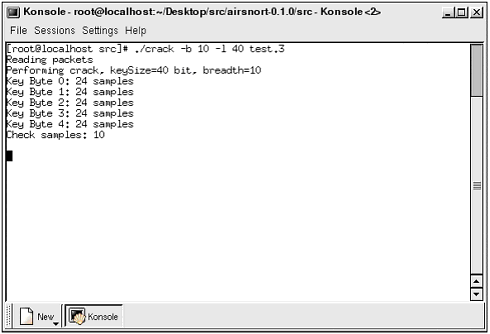
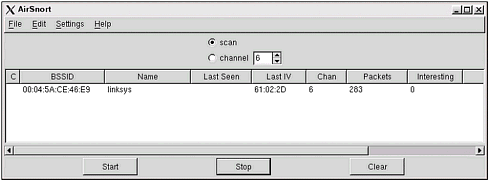
| URL: http://airsnort.shmoo.com DescriptionAirSnort is an encryption-cracking program. By exploiting the weaknesses discussed in Chapter 5, "Cracking WEP," AirSnort is able to capture encrypted radio data and extract the secret key, byte by byte. After capturing roughly 3,000,000 “5,000,000 packets, AirSnort can crack the password used by client and host in a few seconds. Although this program was not the first available to demonstrate the weaknesses of WEP, it quickly became the one of the most popular, because it can both capture and crack encrypted data. (Its forefather, WEPCrack, was the first publicly released code to crack archived data.) In addition, the newer releases of AirSnort provide a GUI, which is more appealing to most users than the previously used command-line interface. FeaturesThis program, although solely *nix-based, is simple to use. It ties right into the installed WNIC, places it in promiscuous mode, and starts to capture data. Every version of AirSnort includes some form of visual monitoring. The command-line version uses a simple text screen, while the GUI version lists summary information in its window. Each version supports the capability to crack the captured data on the fly while it is also capturing information. Version 2 performs the cracking function automatically, while version 1 and prerelease versions require manual execution of the cracking script. Both versions also support the capability to increase the speed factor of the cracker. These decrease capture time, but increase the chance of a faulty key. There is one major advantage to using AirSnort over other capture/crack tools: AirSnort supports both ORiNOCO (firmware 7.52) and Prism II cards. Because of the AirSnort authors' preference for ORiNOCO cards, they have imported the code required to make this program function for almost any WNIC. This extra feature can be a bit buggy , and requires additional steps and troubleshooting to become operational. However, the authors are constantly updating their software and posting patches and new editions to make AirSnort more stable and functional. InstallationInstalling AirSnort can be difficult for the Linux newbie. Because of the many system configurations possible, getting this program running might require the installation of drivers, patches, updates, and more. Because this is Linux, be prepared for anything, but do not be surprised if everything works the first time. The first step is to get all the required files. This will vary depending on the current system status, installed WNIC, and operational preference. The following is the list of packages and programs you should download. If you have all the code on hand, you will at least be prepared if you need something. You will note that there are two modes of operation available in AirSnort: PF_NETLINK and PF_PACKET. The original capture programs used PF_NETLINK, which required conversion if the data was to be used in another program. PF_PACKET is the preferred method of data capture because it can be dumped right into another program, such as Ethereal. Although PF_PACKET is the optimal capture type, it is only possible through the use of the most current version of AirSnort in conjunction with an ORiNOCO WNIC. Using the ORiNOCO CardOnce you have collected the necessary files, it is time to install them. Please note that this tool is constantly being updated; thus, the following instructions may not be 100% accurate for the version of AirSnort that you download. Please verify the correct procedure before attempting to install AirSnort. Kernel SourceUsing PCMCIA-cs -3.1.31 drivers (PF_NETLINK): pcmcia-cs-3.1.31 orinoco_cs-0.08 orinoco-08-1.diff orinocoSniff.diff linux-wlan-ng-0.1.13 + package airsnort-0.2.0.tar.gz or airsnort-0.1.0.tar.gz Using PCMCIA-cs-3.1.33 drivers: pcmcia-cs-3.1.33 orinoco_cs-0.09b orinoco-09b-2.diff (PF_NETLINK) orinoco-09b-packet-1.diff (PF_PACKET) airsnort-0.2.0.tar.gz or airsnort-0.1.0.tar.gz Using a Prism II card: Kernel Source pcmcia-cs-3.1.31 or pcmcia-cs-3.1.33 drivers linux-wlan-ng-0.1.13 + package airsnort-0.2.0.tar.gz or airsnort-0.1.0.tar.gz After you have all these parts , it is time to start installing. The first step is to install an updated version of the PCMCIA-cs drivers. Depending on your preferences and hardware, you will either be installing 3.1.31 or 3.1.33+. These drivers are required for the AirSnort program to interface correctly with the WNIC. The drivers are available from http://pcmcia-cs/ sourceforge .net in the file pcmcia-cs-3.1.33(31).tar.gz. We recommend you download this file to your /usr/src directory. This is the source tree for your operating system, and is where you will find other source code directories. Once downloaded, untar the file ( tar -zxvf pcmcia-cs-3.1.33(31).tar.gz ). If you plan on using an ORiNOCO card with these drivers, you will then need to apply the orinoco_cs-0.09b patch to the source tree using the following command: patch -p0 < orinoco-cs-0.09b This will insert and update some required code into the driver files that allow the ORiNOCO card to enter promiscuous mode. Next you will need to configure, make, and install the drivers. Before you do this, be sure you have your kernel source code installed. Typically, this will also be under the /usr/src directory. You will need to tell the configure script where to find the source code. In addition, you will need to be sure where your modules are located. We suggest using the /mlib/modules/2.4.x-x directory for the configuration script. Once the configure script is set up, simply make the files by using the ./make all command, and finally, install the new drivers using the ./make install script. NOTE You must be sure you do not have two copies of the same file located in the lib directory. If you do, remove both sets and re-install the new pcmcia-cs drivers. Otherwise, the operating system will use the wrong set of drivers, thus ensuring AirSnort will not work. The next step is to install the wlan-ng drivers. This is required unless you are using the PCMCIA-cs-3.1.33 drivers with an ORiNOCO card. To install this package, simply download the file to your chosen download directory, unzip/untar it and perform the same configure, make, and install commands used to install the PCMCIA drivers. This should install several new files to your system, and set it up to use the wlan-ng package to control your WNIC. In addition, it will install several scripts that enable you to quickly put your card in promiscuous mode, so AirSnort can use it. If you choose, you can avoid the whole wlan-ng installation with an ORiNOCO card by using the orinocoSniff.c program instead. However, you must first compile this program before you can execute it. To do this, you can use any c compiler, such as gcc. You compile the program using a command, such as gcc orinocoSniff.c , which will create an a.out file you can execute by typing ./a.out . If this doesn't result in a success, you might need to use the wlan-ng package, or perform some troubleshooting to figure out why it did not work. The final step, without getting into every possible patch or scenario that might arise, is to install the AirSnort program. Again, you will need to download and unzip/untar the program to your chosen location. Once complete, you will need to enter the airsnort directory and run the autogen .sh script. This will configure the program, after which you will need to run the ./make all command to compile the program. OperationOnce the program is properly installed with no errors and a full reboot for the fun of it, you are ready to use the program. We will cover the two main versions of AirSnort. We prefer version 1's simplicity, but also like version 2's added features. You might want to play with both of the programs to see which you like. Version 1If you are using version 1, you will find two folders ” scripts and src . The scripts folder holds a script file with the command wlanctl-ng wlan0 lnxreq_wlansniff channel=6 enable=true . This command is used to place the card into promiscuous mode so AirSnort can detect and monitor the packets. This command can be entered manually. Once the WNIC is in promiscuous mode, you will find the capture script in the src directory. To start this program, type ./capture -c captureFile1.txt . This will start the capture, show you the results, and dump the data into a file named captureFile1.txt . Once you have the program running, you will see a screen similar to Figure 9.21. Figure 9.21. AirSnort capture. Note that although this is only text, you can still see several things. For example, you can see the number of total packets. Because the typical WLAN sends data in 1500-byte packets, this number will get quite high. You will need several million packets to crack WEP, so be prepared to see this number climb. In addition, AirSnort shows the last IV. As you learned in Chapter 5, this is the key to cracking WEP. If you see a key in the form B+3, 255, x (33-47, ff, xx) , you should also see the Interesting Packets field increase. Another valuable indicator is the Timeout field. If this field continues to increase and the packets stay the same, you might have lost your connection. This is very useful if you are moving around while capturing data. When you have a sufficient amount of data, you can start cracking the password. Using the "crack" script, you can test the capture file periodically to see whether you have enough keys to extract the password. In addition, you can adjust the crack program to test a wider range of possible passwords using the -b switch; however, this might result in false positives. It is recommended that you not adjust the breadth to greater than 4. However, in testing we successfully cracked a password in a shorter time using the maximum of 10. In addition, you can shorten the crack time by specifying the key length. This is done using the -l switch, but obviously this is only useful if cracking a known secret key for educational purposes. If used in a real situation, limiting yourself to one length or another might result in missed keys. The following is the command used to crack our capture file, and Figure 9.22 is a screenshot of what it looks like. Figure 9.22. Capture file. "./crack -b 10 -l 40 test.3" As you can see, AirSnort version 1 is not a difficult program to use. Setting it up might be challenging, but once that hurdle is overcome , you can capture and crack quite easily. Now, let's move on to AirSnort version 2, which includes extra features. Version 2+AirSnort 2 is a more comprehensive WEP-cracking tool. It not only incorporates the cracking tools of the previous version, but also includes SSID detection and access point MAC listing, and provides the user with the capability to sniff either PF_NETLINK or PF_PACKET. However, as version 2 is further developed, the capability to sniff using PF_NETLINK will cease to exist. As of version 2.1, this feature is no longer used. To use version 2, you only need to download and install the necessary patches. Once this is accomplished, you need to place the WNIC in promiscuous mode, which is accomplished using the following command, with alternative options. iwpriv eth0 monitor <m> <c> mone of the following 0disable monitor mode 1enable monitor mode with Prism2 header info prepended to packet (ARPHRD_IEEE80211_PRISM) 2enable monitor mode with no Prism2 info (ARPHRD_IEEE80211) cchannel to monitor After you successfully place the card in promiscuous mode, you are ready to execute AirSnort. Figure 9.23 illustrates AirSnort 2 in action. Figure 9.23. AirSnort version 2. As you can see, this version will scan for channels, monitor the last IV, and keep a numerical listing of the packets captured and interesting IVs captured, as well as the Name and ID of the access point. In addition, this program will perform the cracking routine while sniffing. Once enough data has been collected, you will be shown the password in ASCII and hex by scrolling right in the program. There are several options that need to be set up under the Settings menu. You will need to designate the name of the WNIC. Typically this will either be wlan0 or eth0 , depending on the WNIC you are using. Depending on the version, you will also need to select the type of packet capture you are attempting (PF_NETLINK or PF_PACKET). Finally, you will need to check a box that determines whether the WNIC is in promiscuous mode, which it should be at this point. This program will even allow a user to pause the sniffing operation, take out the existing WNIC, and swap it with the other flavor of WNIC, and then resume sniffing. In addition, you can pause and resume sniffing any number of times during the cracking process. Although these are the current options, this program is picking up momentum and is undergoing semi-major updates every few weeks. Therefore, be prepared for a more user-friendly tool with more options. NOTE AirSnort's patches include code that allows Kismet to use ORiNOCO cards. This facilitates the capability of Kismet to capture and store data in the AirSnort format, with Prism- or Hermes-based cards. From this segment, you should realize that AirSnort is your best WEP-cracking tool. Although it is a bit skimpy on additional features that can be found in other sniffing tools, AirSnort is the best sniffer/cracker tool online. If you want to get to cracking, AirSnort will get you there the fastest . |
EAN: 2147483647
Pages: 171
- Structures, Processes and Relational Mechanisms for IT Governance
- Technical Issues Related to IT Governance Tactics: Product Metrics, Measurements and Process Control
- Governance in IT Outsourcing Partnerships
- The Evolution of IT Governance at NB Power
- Governance Structures for IT in the Health Care Industry