Exporting Reports to Office Applications
Exporting Reports to Office Applications
You ll often wish to convert or export a report you ve designed to a popular office file format, such as Excel, Word, WordPerfect, or Acrobat Reader. With Crystal Reports, this is as simple as choosing an option from the File menu. You can also export the file to a temporary location and immediately launch the application you want to use to view the file, provided it s installed on your PC.
Exporting to Different File Formats
To export a file, first open the report you wish to export. Refresh and preview the report, if necessary, to ensure that it contains the most up-to-date data from the database. Then, click the Export button on the Standard toolbar or choose File Export from the pull-down menus . The Export dialog box will appear.
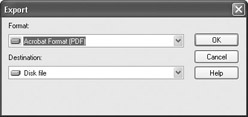
You have two simple choices to make for your export: the file format of the export, and the destination of the export. The Format drop-down list lets you choose from the large number of file formats to which Crystal Reports will export. You can choose from several different ASCII or straight-text formats, several Microsoft Excel formats, Microsoft Word, Acrobat Reader, and others.
The Destination drop-down list lets you choose how you want the report exported: to a disk file, attached to an e-mail message, placed in a Microsoft Exchange public folder, added to a Lotus Domino database, or launched in an application on your workstation. If you choose Disk File, the Choose Export File dialog box will prompt you for the folder and filename to export to. Choose a folder and type a filename, if the default folder and filename aren t sufficient.
| Caution | If your report contains several drill-down tabs or subreport Preview tabs, ensure that the tab you want exported is selected before you begin exporting. Whatever appears in the current tab (and all pages you specify that are generated by that tab) is what will be exported by Crystal Reports. |
Figure 15-2 shows the sample report from Figure 15-1 after it has been exported to a Microsoft Word document. Notice that it, for the most part, accurately depicts the source report ”the sole exception being the much subtler drop shadow on the report title. Both the web and e-mail hyperlinks are accurately exported.
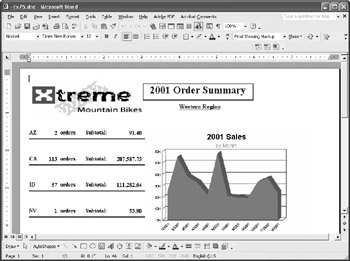
Figure 15-2: Exporting to a Word document
| Note | Most Crystal Reports 10 export formats exhibit accurate reproduction of original report formatting. However, you ll still find that some of the Crystal Reports formatting doesn t always translate to other file formats. You should export to your ultimate destination format throughout your report design process to make sure everything you want to include will be exported correctly. |
If you drill down on a report, a different report view will appear inside the drill-down tab. Only the material inside the open drill-down tab will be exported. The main Preview tab won t be included. Exporting the Idaho (ID) drill-down tab will result in a Microsoft Excel file, shown in Figure 15-3.
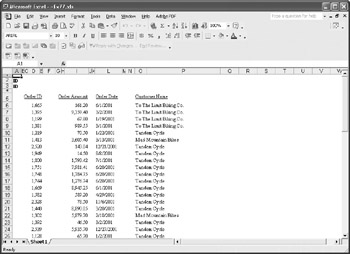
Figure 15-3: Drill-down tab exported to Excel
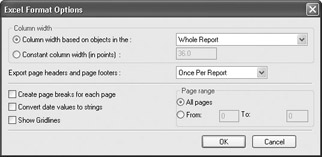
Depending on the file format you choose, you may receive an additional dialog box prompting you for the page range to be exported, as well as other extended information about the export. If, for example, you choose one of the Excel formats, a dialog box will allow you to choose more customized information when exporting to Excel.
Exporting to various text file formats, such as Character Separated Values, will present additional dialog boxes prompting you for, among other things, the characters to surround and separate fields.
Exporting to an Adobe Portable Document Format, or PDF, file may be the most effective way to export a report that contains complex formatting and graphics, including underlain sections, as shown in Figure 15-4. As PDF files are generally accepted formats for Windows, the Web, and other cross-platform applications, you ll find that its accurate formatting representation of the original report will often benefit a wide audience. In this example, both hyperlinks are accurately passed on to the PDF file as well.
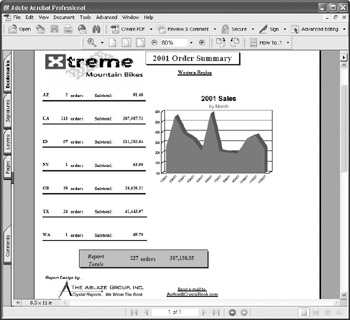
Figure 15-4: Exporting to an Acrobat PDF format
| Note | You may notice that some file formats and export destinations display a small number 1 beside them in the Export dialog box. This indicates that these formats and destinations were given an Install on first use attribute when Crystal Reports was initially installed. When you choose these formats or destinations for the first time, you ll be prompted to insert the original Crystal Reports program CD to install the necessary export drivers. |
Exporting and Launching an Application
If you choose Application in the Destination drop-down list, Crystal Reports will export the file to a temporary folder and immediately open the file in the corresponding Windows application. If you choose a file format for an application that isn t installed on your computer, you may be presented with a dialog box asking you to choose an application to open the file with. If there is an alternative application that will open that file type, choose it from the list.
| Note | The temporary files that Crystal Reports creates will be located in the Windows temporary folder (typically, \Windows\Temp) and may not automatically be deleted when you close the application. If you wish to periodically clean out your Windows temporary folder, use Disk Cleanup or another appropriate utility or measure to remove temporary files. |
Exporting to an ODBC Data Source
You can export a Crystal Report to an ODBC data source, such as a Microsoft SQL Server or Oracle database. Typically, you ll want to do this with a simple columnar details report that you might be using to transport data from one database to another database.
To export to an ODBC data source, choose the data source you want to export to in the Format drop-down list. You ll then be asked to supply a table name, which Crystal Reports will create in the database referred to by the data source. If the data source refers to a secure database, you will be asked to supply a database logon user ID and password before the export starts. And if the data source does not contain a specific database reference, you may be asked to choose a database in addition to the table name .
Crystal Reports will create a new table in the ODBC database and define fields to hold data from the exported report. If you want to change field names or the layout of the table, you need to use a utility specific to the ODBC database that you exported to. You may also notice that the fields and data that are exported to your ODBC database may not be what you initially expect. You may need to modify the original Crystal Report to accurately export data via ODBC.
| |
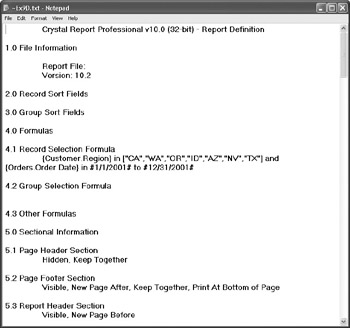
When you create reports, you may want to keep documentation that details the report design, such as the tables that are included, what formulas you've created, and what objects are contained in the report sections.
The Export dialog box in Crystal Reports provides a Report Definition format in the Format drop-down list. When you choose this format, Crystal Reports will save a text file containing a great deal of helpful information about the makeup of the report. You may wish to create and keep these text files in a central location to document the design of your reports. You may also open the text files in a word processor and reformat them to look more appealing.
| |
Exporting to XML
Crystal Reports provides the capability of exporting to Extensible Markup Language, or XML . XML, which is an extension of Hypertext Markup Language (HTML ”the original language of the World Wide Web), is gaining more acceptance as a method of data exchange among disparate organizations and companies. XML describes the data that it encompasses with a set of descriptors, or tags, similar to HTML. These tags format the report content according to standardized language rules established (and still under development) by a consortium of technology and business organizations. XML files can vary in content from very simplified data output to formatted definitions of hierarchically organized data. Each element in an XML file is identified by tags, which define the name of the element, the type of element, and additional optional attributes.
Crystal Reports provides two basic XML output format options: the Crystal ML Schema, which provides a standard set of tags and structure that includes extensive formatting content, and the Custom Format, which allows you to suppress elements, change the names of elements, and add attributes to elements.
The Crystal ML Schema is the default XML output when you select the Export to XML format. The resulting XML file can be viewed by a web browser, but will not be interpreted or formatted by the browser the way an HTML file will be, as XML does not, by its nature, include any font, color , or formatting attributes. Figure 15-5 shows the XML file output from a simple columnar Orders report (similar to the one in Figure 15-3), using Crystal ML Schema. This schema is published at http://www.businessobjects.com/xml/schema.xsd.
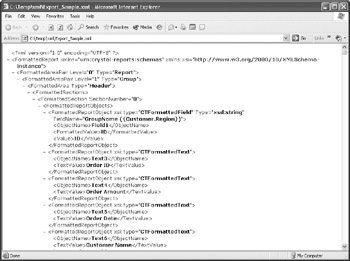
Figure 15-5: XML export, viewed in web browser
If you wish to add to the default Crystal ML schema, or customize the XML output format entirely, not using the standard format, use the XML Expert before exporting your report. The XML Expert is actually a flexible dialog box that allows you to customize the attributes and XML tags Crystal Reports will use when exporting to XML. Choose Report XML Expert from the Crystal Reports pull-down menus. When the XML Format dialog box is displayed, click the Options tab.
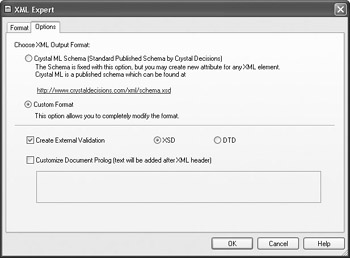
On the Options tab, initially choose whether to use the standard Crystal ML Schema or a custom format. You may also choose whether to create an external validation file, consisting of either an XSD (XML Schema Definition) or DTD (Document Type Definition). You may also enter any custom text you want to insert after the header in the XML file to further define the output. This custom text might, for example, reference an external DTD file or a standard HTML style sheet.
| Note | Using the default Crystal ML Schema will only allow creation of an external XSD document ”the DTD option will be dimmed. |
Once you ve made schema, external validation, and custom text choices, click the Format tab to concisely control individual elements and tags used when exporting to XML. The Format tab is shown in Figure 15-6.
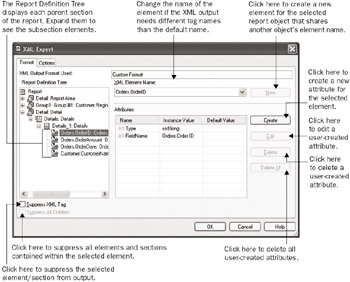
Figure 15-6: XML Format dialog box
To limit the XML file to just data elements, rather than report/formatting elements, you ll want to suppress some or all of the report section parent elements, such as ReportArea:Report Area and Detail:Detail. To do this, select the desired parent element or section and click the Suppress XML Tag check box beneath the tree. You can use the Suppress All Children check box when you don t want to produce XML tags for any subsets of a section/element. However, don t use the Suppress All Children check box for any of the Details area elements, as it will also suppress tags for the data layer of the Details section. When an element is suppressed, the element can no longer be customized.
To customize attributes or element names, select the element you wish to customize. The element name and the attributes of the element are displayed on the right side of the dialog box. In the example illustrated in Figure 15-6, the selected element is the data field containing the order ID. If desired, the name of the element (Orders.OrderID) can be changed for output purposes by simply entering the modified name in the XML Element Name field. By default, Crystal has assigned two attributes to each data field element: Type and FieldName. The gray ab designation beside the attribute name indicates that these cannot be changed or deleted. However, additional attributes can be created, changed, and deleted as needed according to the XML output required. For example, if you need to add a use attribute to this field, you can click the Create button to produce the XML Attribute Dialog box seen in Figure 15-7.
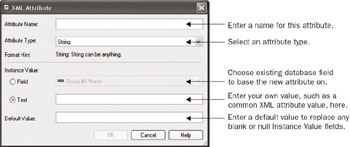
Figure 15-7: XML Attribute dialog box
For this example, supplying an attribute name of use and text of required will result in the standard XML field use attribute being inserted into the OrderID data element tag:
<Orders.OrderID FieldName="{Orders.Order ID}"
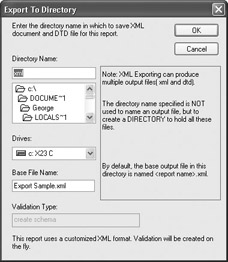
use="required"> 1128.00 </Orders.OrderID> Once you ve made any desired customizations, close the XML Expert. Then, export using XML as the desired format with the File Export toolbar button or File menu option. When you choose XML as the format, you ll be prompted to choose a file directory, rather than just a filename. As XML exports can result in more than one file actually being created (for example, if you choose to create an external XSD or DTD), you ll need to choose a specific directory in which to place all exported files. You can also replace the default filename for the main XML file ”the name of the source report will be used by default.
EAN: N/A
Pages: 223