Using Multiple Sections
To be precise, the five default sections that first appear in a new report, and any additional group headers and footers that are added later, are referred to as areas. This is in contrast to the term section, which really refers to subareas. Because Crystal Reports lets you create multiple occurrences of the same area, such as multiple details or multiple group headers, each of the individual occurrences is called a section. Creating multiple sections can be accomplished from the Section Expert or by using the pop-up menu that appears when you right-click in the gray area on the left side of the screen.
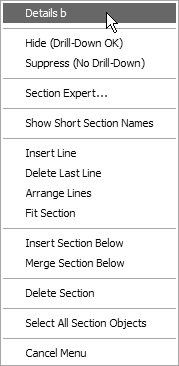
To insert an additional details section, for example, right-click in the details gray area on the left side of the Design tab and choose Insert Section Below from the pop-up menu. Or, from the Section Expert, select the area that you wish to duplicate and click the Insert button. You ll see the details area split into two sections: Details a and Details b. Once you ve created multiple sections in an area, the pop-up menu (shown here) and Section Expert (shown in Figure 10-9) take on a great deal of additional capability.
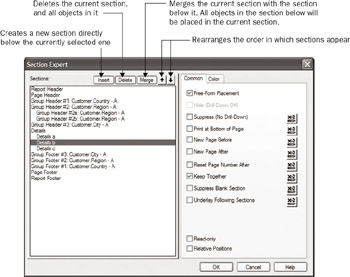
Figure 10-9: Manipulating multiple sections in the Section Expert
| Tip | You can also rearrange the order in which sections appear right in the Design tab. Simply point to the gray section name on the left of the screen, hold down the mouse button, and drag the section you wish to move ”the mouse cursor will change to a hand. Drop the section in its new location in the same area. Although the section contents will swap, the consecutive lettering will not change ”the first section will still be lettered a; the second, b; and so on. |
You can insert as many sections in an area as you wish ”there can be Details a, b, c, d, and on and on (when Crystal Reports runs out of letters , it starts doubling them up, as in Details ab ). Any area can consist of multiple sections. Nothing prevents you from having three report headers, five details sections, two group footer #1s, or any other combination.
Once you ve created the multiple sections, you can add objects to any of the sections. You can even add the same object to some, or all, of them. When the report prints, the sections will simply print one right after the other, with the objects showing up one below the other. Probably the biggest question you have right now is, What s the benefit of multiple sections anyway? Everything just prints as though it were in one bigger section!
Figure 10-10 is a great example of the benefit of multiple sections. This shows the beginnings of a form letter based on the Customer table from the sample XTREME Mountain Bike database included with Crystal Reports. Notice that the letter consists of three different details sections. Details a contains the Print Date, Customer Name, and Address 1; Details b contains Address 2; and Details c contains the city-state-zip and salutation. When you preview the report, it just shows the details sections one on top of the other, as though everything were in one big details section.
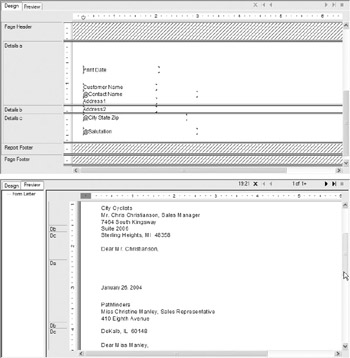
Figure 10-10: Multiple details sections
But look at the letter for Pathfinders. Notice the empty line that appears when there is no Address 2 database field. This behavior, again, is identical to what you d expect if you had put all the objects in one tall details section.
Here s the benefit: you may conditionally suppress individual sections ”in this case, Details b ”so that they appear or disappear according to your specifications. To eliminate the blank line that appears when there s nothing in Address 2, format Details b with Suppress Blank Section. If the objects contained in it all contain empty values (as is the case with Pathfinders), the section will not appear at all. You can also use the Conditional Formula button next to the Suppress property to suppress according to any condition you need.
These techniques, and others that make good use of multiple sections and conditional formatting for form letters, are illustrated in the sample Form Letter.rpt report. Find it on this book s companion web site at www.CrystalBook.com.
| Tip | The more you work with areas and sections, the more you may notice the large amount of space the area and section names take up on the left side of the Design tab. If you wish to have more space for actual report objects, you can change the way Crystal Reports shows section names. Choose File Options and check Short Section Names in the Design View section of the Layout tab. You can also right-click in a gray section name in the Design tab and choose Show Short Section Names from the pop-up menu. Report Header will now be abbreviated RH, Page Header a will become PHa, and so on. You ll now have more room to work with actual report objects. |
EAN: N/A
Pages: 223
- Step 1.1 Install OpenSSH to Replace the Remote Access Protocols with Encrypted Versions
- Step 3.2 Use PuTTY / plink as a Command Line Replacement for telnet / rlogin
- Step 3.4 Use PuTTYs Tools to Transfer Files from the Windows Command Line
- Step 4.6 How to use PuTTY Passphrase Agents
- Appendix - Sample sshd_config File