Chapter 10: Using Sections and Areas
In previous chapters, you learned how to change the appearance of individual objects on the report, such as by changing the color of a field or adding a drop shadow to a text object. However, you also have the ability to format entire sections of your report. Just a few of the section formatting options available to you are to
-
Add a gray background to every other details section
-
Format a group header so that every group starts anew on its own page
-
Create multiple columns in your details section for labels
-
Add a light-colored watermark graphic in its own page header section that appears behind the rest of your report
Formatting Sections with the Section Expert
There are several ways to change the appearance of an entire report section. You ll often just want to change the size of a section. Consider this single- spaced report:
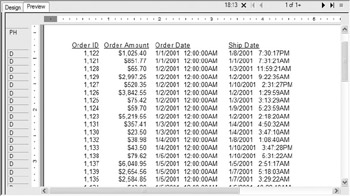
Notice the details sections appearing very close to each other. Maybe you ll just want to double-space the report. However, there is no double-space, space-and-a-half, or any similar function available in Crystal Reports . Instead, you choose how tall you want a section to be by using one of several techniques.
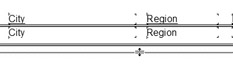
The simplest technique is simply to drag the bottom border of a section down to make the section taller. Point to the line at the bottom of the section you want to resize ”the mouse cursor will turn into two lines with up and down arrows. This section-sizing cursor indicates that you can drag the section border down to make a section taller, or drag the border up to make the section shorter.
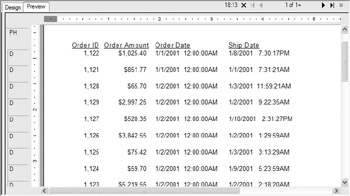
When you simply make the details section taller, the white space that s exposed becomes the double-space when you re-preview the report, as shown here:
Although this is the most straightforward way to resize a section, you have other options available. By right-clicking in the gray section name on the left side of the Design tab, you display the section pop-up menu. For example, right-clicking the details section brings up this menu:
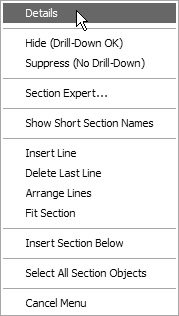
This pop-up menu contains four additional features for resizing sections, as listed here:
| Insert Line | Adds an additional horizontal guideline to the section ruler on the left side of the section. If the section isn t tall enough to show the additional guideline, the section grows taller. |
| Delete Last Line | Removes the bottom guideline in the section and shrinks the size of the section proportionally. If you choose this option and a report object is attached to the guideline that you would remove, you ll receive an error message. |
| Arrange Lines | Rearranges any horizontal guidelines in an even fashion. If there aren t enough horizontal guidelines to fill the section, additional guidelines will be added. |
| Fit Section | Automatically shrinks the size of the section to the bottommost object in the section. If there are any horizontal guidelines below the bottom object, they are removed before the section is resized. |
Although you may sometimes use the Insert Line, Delete Last Line, or Arrange Lines option from the section pop-up menu, you ll most likely find Fit Section the only useful option. It s particularly useful if the section is very tall (perhaps you ve deleted a large map, chart, or picture from the section and all the white space it took up is still there), and you want to shrink it without having to scroll down to find the bottom section border.
The Section Expert
Whereas the Format Editor is used to format individual objects, you use the Section Expert, shown in Figure 10-1, to format entire sections of your report. The Section Expert has a large number of options for formatting individual report sections. Using these options provides a high level of flexibility for your reports.
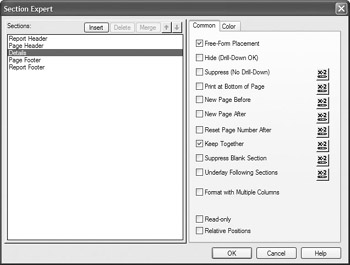
Figure 10-1: The Section Expert
The Section Expert can be displayed in several ways. You can click the Section Expert button on the Standard toolbar, choose Report Section Expert from the pull-down menus , or right-click in the gray area of the section you wish to format and choose Section Expert from the pop-up menu. If you choose the toolbar button or menu option, the first section will be highlighted in the Section Expert. If you right-click in the gray area of a section and use the pop-up menu, that particular section will be highlighted.
By selecting different sections of the report in the Section Expert, you can view and set formatting properties for the section. Note that the properties will vary slightly, some new properties may appear, and some won t be available, depending on which section you select. For example, the New Page Before property doesn t make much sense for a page header section, so it will be grayed out when a page header is selected. And if you select the Page Footer section, an additional Reserve Minimum Page Footer option will appear. Table 10-1 explains the different section formatting properties available in the Section Expert s Common tab.
| Property | Function |
|---|---|
| Free-Form Placement | Allows objects to be moved freely throughout the section without snapping to horizontal guidelines. If this is turned off, horizontal guidelines are added to the left of the section and objects snap to them when moved. |
| Hide (Drill-Down OK) | Hides a section and all objects in it. However, if the section is within a higher-level group and that group is drilled into, this section will appear in the drill-down tab. |
| Suppress (No Drill-Down) | Suppresses a section and all objects in it. If the section is within a higher-level group and that group is drilled into, this section will not appear in the drill-down tab, even though a drill-down tab will appear. |
| Print at Bottom of Page | Prints the section at the bottom of the page. This is typically used for invoices, statements, or other, similar reports that require a group footer with a total to print at the bottom of the page, regardless of how many details sections print above it. |
| New Page Before | Starts a new page before printing this section. This is useful in a group header if you want each group to start on its own page. |
| New Page After | Starts a new page after printing this section. This is useful in a group footer if you want the next group to start on its own page. |
| Reset Page Number After | Resets the page number back to 1 after printing this section. This is useful in a group footer if you want each group to have its own set of page numbers , regardless of the total number of pages on the report. This also resets the Total Page Count field. |
| Keep Together | Prevents Crystal Reports from putting a page break in the middle of this section. For example, this would avoid having the first few lines of a multiple-line details section appear on the bottom of one page and the last few lines appear on the next page. |
| Suppress Blank Section | Suppresses the entire section if all the objects inside it are blank. This is useful in situations where you want to avoid white gaps appearing in your report if all the objects in a section have been conditionally suppressed or suppressed if duplicated . |
| Underlay Following Sections | Prints the section, and then all following sections print right on top of the section. This is useful for printing maps, charts , or pictures alongside data or underneath the following sections. |
| Format with Multiple Columns | Creates multiple newspaper- or phonebook-style columns. The Layout tab will appear when this property is checked. This is only available when the details section is chosen . |
| Reserve Minimum Page Footer | Reserves only enough vertical space to show the largest page footer section (if you have added multiple page footers, such as Page Footer a, Pager Footer b, and so on, and have conditionally suppressed them). If you have multiple conditionally suppressed page footers and don't check this option, Crystal Reports will leave enough vertical space for all the combined page footers, even if they are not all displayed. |
| Read Only | Prevents formatting, moving, or sizing of all objects in the report section. This is, in essence, the same as selecting all objects in the section and using the Lock Format and Lock Size and Position options from the Formatting Toolbar or Format Editor. |
| Relative Positions | When selected, this will automatically move any objects that are placed to the right of a cross-tab or OLAP grid in the section, based on the size of the cross-tab or OLAP grid. For example, if you place report fields or text objects to the right of a cross-tab, the cross-tab may very well print right over the top of the other object, as it grows horizontally to match the data it shows. By checking this option, you assure that any objects to the right of the cross-tab or OLAP grid will automatically move right to avoid being overprinted. |
| Caution | Don t confuse the Keep Together section property and the Keep Group Together group property on the Options tab of the Change Group dialog box. Keep Together in the Section Expert just prevents the particular section from splitting over two pages; whereas Keep Group Together will attempt to keep the group header, all details sections, and the group footer for the same group from printing across multiple pages. |
You ll also notice Conditional Formula buttons for many properties on the Common tab. These properties can be set conditionally with a Boolean formula, if necessary. There are many uses for both absolute and conditional properties on the Common tab. Here are some common examples.
Starting a Group on Its Own Page
Checking New Page Before in a group header or New Page After in a group footer (but not both) will cause each group to start on a new page. There is one problem with setting this property absolutely ”you can end up with stranded pages. If you set New Page Before on a group header, you ll often encounter a stranded first page, because the report header will print and Crystal Reports will skip to the next page before printing the first group header. Conversely, if you set New Page After on a group footer, you ll often encounter a stranded last page, because the last group footer will be followed by a page break before the report footer prints.
To avoid these pitfalls, you have two choices:
-
Suppress the report header and/or report footer if you have no data in them to show.
-
Set the New Page Before or New Page After properties conditionally.
If you have material in the report header or report footer that you want to print on the same page as the first group header or last group footer, you must do some conditional formatting. To avoid a stranded first page, you can use a conditional formula to set the New Page Before property only on the second and subsequent groups ”the first group will stay on the first page with the report header. Since the first group header will print at the same time the first record is printing, you can use the following Boolean conditional formula for New Page Before:
Not OnFirstRecord
To avoid a stranded last page, you want a new page after every group footer except the last one. Since the last group footer will only occur on the last record of the report, you can use this conditional formula for New Page After:
Not OnLastRecord
Printing an Invoice Total at the Bottom of the Page
You may be creating invoices grouped by invoice number, or statements grouped by customer number. You want the invoice or statement total, located in the group footer, to print at the bottom of the page, regardless of how many detail records print. Crystal Reports normal behavior is to print the group footer immediately following the last detail record. If there are only a few invoice items or statement lines, the total will print high up the page, right after the last detail line. If you want the total to print at the bottom of the page in this situation, check the Print at Bottom of Page property for the group footer.
Starting Page Numbers Over for Each New Group
You might have a large report grouped by department that you want to burst apart and distribute to each individual department. Initially, you ll want to make sure to use the New Page Before property with the group header or the New Page After property with the group footer so that you won t ever have the end of one department appearing on the same page as the beginning of the next.
However, you also don t want to confuse those who may look at page numbers on later groups in the report. Even though a page may be the first one for the IT department, it will probably have a much larger page number than 1. Simply check the Reset Page Number After property for the department group footer. Page numbers will then start over at 1 for each department.
Changing Color for Entire Sections
The Color tab in the Section Expert, shown in Figure 10-2, lets you change the background color for an entire section, separate from any color formatting that individual objects in the section may have.
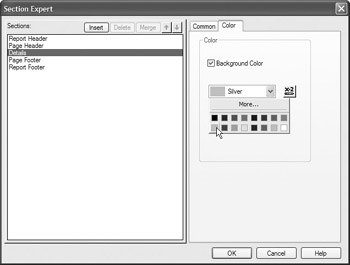
Figure 10-2: Setting the background color for a section
If you check the Background Color property, you can then choose from various colors from the color palette below it. This will set the background color for the entire section. This lets you highlight entire sections with different colors, if you choose ”for example, a report with the group footer section showing a different background color:
Creating a Banded Report
Notice the Conditional Formula button on the Color tab. This lets you set the background color conditionally, which can be helpful if you want to base a background color on some particular condition.
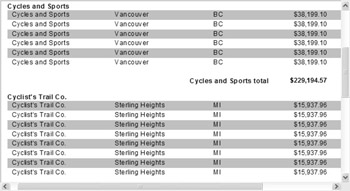
Mainframe reports often were printed on green bar or blue bar paper with alternating shades of color and white. This was designed to make columns of numbers easy to follow across the page. Now that many PC-based reports are printed by laser printers on plain paper, you must create your own banded reports if your reports would benefit from this kind of look.
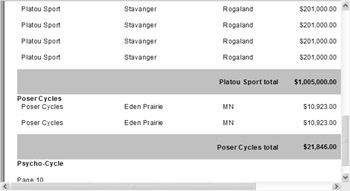
Simply giving the details section a silver background color isn t visually appealing, as shown here:
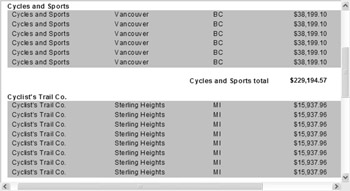
However, setting every other details section to silver provides a good way to help report readers follow columns of material across the page. You can set the background color conditionally to accomplish this. Use the following conditional formula:
If RecordNumber Mod 2 = 0 Then Silver Else NoColor
This uses several built-in Crystal Reports functions. The Mod function (which performs Modulus arithmetic) divides one number by another but returns the remainder of the division operation, not the result of the division. The RecordNumber built-in function simply counts records consecutively, starting at 1. Therefore, every other record number, when divided by 2, will return 0 as the remainder. This will alternate the details section background color for every record, as shown in the following illustration.
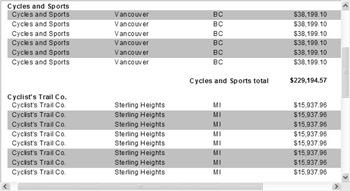
You can make modifications to this formula to shade more than just every other line. If you want every two lines shaded, you could change the formula slightly:
If RecordNumber Mod 4 In [1,2] Then Silver Else NoColor
This divides the record number by 4 and checks for remainders of 1 or 2. This will be true for every two records. The result is shown here:
You probably get the general idea of how this works. You can now modify the formula in any number of ways to change the way background shading works.
| Tip | When setting the background color of a section, as well as background colors for individual objects, you may want to use NoColor instead of White to indicate a normal color. By using White, you will have solid white colors that can sometimes look unpleasant in combination with other solid colors. If you use NoColor, you often achieve a certain amount of transparency that will look better when mixing colors on the report or when using watermarks (discussed later in the chapter). |
EAN: N/A
Pages: 223