| Your first bonus project is to build and set up a banking application that will be used online. This application will allow users to log in and check their account balances, pay bills, and so on. But for now, you're just going to use the server controls you've learned about to build the UI. Although this application will become fairly complex in the coming weeks, it relies on only a small number of pages that you'll sketch here. Your banking application should do the following: Provide users secure access to their accounts Allow users to see their transaction histories and account balances Allow users to pay bills online These bullets describe the scope of the application what it needs to be able to do. Laying out these objectives beforehand will help you as you build your application. Let's determine the pages you need. First, the users will need a login page that will serve to authenticate and direct them to their accounts. Second, you'll need an account summary page that lists transactions and balances. Finally, you'll need a page that users can utilize to pay bills online. Because you want to present a standard user interface for the site, you'll use a common header and navigation bar for every page, in the form of user controls. Login page login.aspx Account summary page account.aspx Bill paying page bills.aspx Two user controls header.ascx and nav.ascx Note Obviously, there can be more to the application than the pages listed here, but because you're just starting out, let's keep it fairly simple. However, you should feel free to play around with the application! You can add many features that you've already learned about, so don't be afraid to enhance the program.
User Controls The menu, or navigation, control can be fairly simple for now. Let's first create a table with links to other pages, as shown in Listing BP1.1. Listing BP1.1 Your User Control Based Menu 1: <table align="left" width="150" height="350" 2: bgcolor="#cccc99"> 3: <tr> 4: <td align="right" nowrap bgcolor="Black"> 5: <a href="account.aspx">Account Summary</a><p> 6: <a href="bills.aspx">Pay Bills</a><p> 7: <a href="Logout.aspx">Sign Out</a><p> 8: </td> 9: </tr> 10: </table> Save this file as nav.ascx. Let's also create a user control to display a standard header, as shown in Listing BP1.2. This control will contain only an ASP.NET Label control to display a standard header. Listing BP1.2 Your User Control Header 1: <asp:Label runat="server" 2: text="ASP.NET Banking Center" 3: Height="25px" 4: Width="100%" 5: BackColor="#cccccc" 6: ForeColor="Black" 7: Font-Size=20 8: Font-Bold="False" 9: Font-name="Arial" 10: BorderStyle="outset" /> Save this file as header.ascx, and move on to the ASP.NET pages. The Login Page The login page is fairly simple. You'll need to provide users with a few text box controls to enter their user information, and then build a method to determine whether they are valid users. The validation method can be accomplished easily using ASP.NET's security system, but because you haven't learned about that yet, you'll have to make do with another method. You'll revisit this section again after you learn about the ASP.NET security system. You also want to make sure that you start developing this application with a consistent UI, so include your header user control. The menu user control will not be used because users should not have access to the pages it lists quite yet. Let's take a look at the code in Listing BP1.3. Listing BP1.3 login.aspx Authenticating Users 1: <%@ Page Language="VB" %> 2: <%@ Register TagPrefix="ASPNETBank" TagName="Header" src="/books/4/226/1/html/2/header.ascx" %> 3: 4: <script runat="server"> 5: 6: '******************************************************* 7: ' 8: ' Login.aspx: Logs users in 9: ' 10: '****************************************************** 11: 12: '****************************************************** 13: 'When user clicks submit button, verify that they are a 14: 'valid user. If they are, log them in, and set a cookie 15: 'with their user name, and redirect to account.aspx. 16: 'Otherwise display error message 17: '****************************************************** 18: sub Submit(obj as Object, e as EventArgs) 19: if tbUsername.text = "clpayne" and _ 20: tbPassword.text = "pass" then 21: Response.Cookies("FirstName").Value = tbUsername.text 22: Response.redirect("account.aspx") 23: else 24: lblMessage.Text = "<font color=red>Sorry, " & _ 25: "invalid username or password!</font><p>" 26: end if 27: end sub 28: </script> 29: 30: <html><body> 31: <ASPNETBank:Header runat="server" /> 32: <font face="arial"> 33: <p> 34: Welcome to the ASP.NET Banking Center. Please enter 35: your username and password to gain access to your 36: account information.<p> 37: 38: <form runat="server"> 39: <asp:Label runat="server" /> 40: <table> 41: <tr> 42: <td width="75" rowspan="3"> </td> 43: <td width="50" valign="top"> 44: <font face="arial">Username:</font> 45: </td> 46: <td width="50" valign="top"> 47: <font face="arial"> 48: <asp:Textbox runat="server" /> 49: </font> 50: </td> 51: </tr> 52: <tr> 53: <td valign="top"> 54: <font face="arial">Password:</font> 55: </td> 56: <td valign="top"> 57: <font face="arial"> 58: <asp:Textbox 59: TextMode="password" runat="server" /><p> 60: </font> 61: </td> 62: </tr> 63: <tr> 64: <td align="right" colspan="2"> 65: <font face="arial"> 66: <ASP:Button runat="server" 67: onClick="Submit" 68: Text="Submit" /> 69: </font> 70: </td> 71: </tr> 72: </table> 73: </form> 74: </font> 75: </body></html>  | On line 2, you register your header user control you should remember this procedure from Day 6, "Learning More About Web Forms." You can now use your header user control in your page just as you would a normal ASP.NET server control. There is one method for this page, Submit, which is called when the user clicks the submit button on line 66. |
Because you aren't using a database here, you can be a bit sneaky and hard-code the username and password value on lines 19 and 20. Don't do this in your final application; in fact, you'll fix this next week after you learn how to use databases. For now, however, this will suffice. The if statement on line 19 then verifies whether the user supplied the correct credentials. If he did, you set a cookie value with the username for reference later. Then the user is redirected to his account page, which you'll create next. If the user is not valid, you simply display a message using the Label control on lines 24 and 25. This page serves as the gateway to your application. The user will always get this page before entering the guts of the bank center. Figure BP1.1 shows what this page should look like after a user enters the wrong credentials. Figure BP1.1. Validating user credentials.
The Account Page The account page will list a history of the user's transactions and his current balance. The transaction history will be handled through databases and data-bound server controls (also coming next week), so leave these out for now. That leaves pretty much just a few server controls for the UI, plus the standard header and menu user controls. You'll want to present the user with a customized welcome message, so access the cookie you set on the login page: Request.Cookies("FirstName").Value This command retrieves the value (as a string) of whatever is contained in the user cookie variable FirstName. This is similar to using session variables for storage. Listing BP1.4 shows the code for this page. Listing BP1.4 account.aspx The User's Account Summary Information 1: <%@ Page Language="VB" %> 2: <%@ Register TagPrefix="ASPNETBank" TagName="Header" src="/books/4/226/1/html/2/header.ascx" %> 3: <%@ Register TagPrefix="ASPNETBank" TagName="Menu" src="/books/4/226/1/html/2/nav.ascx" %> 4: 5: <script runat="server"> 6: '******************************************************* 7: ' 8: ' Account.aspx: lists account summaries and current 9: ' balances for the current user 10: ' 11: '******************************************************* 12: 13: '****************************************************** 14: ' When the page loads, display a welcome message in the 15: ' "WelcomeMsg" label 16: '****************************************************** 17: sub Page_Load(obj as object, e as eventargs) 18: If (Request.Cookies("FirstName") is Nothing) Then 19: lblWelcomeMsg.Text = "Welcome <b>" & _ 20: Request.Cookies("FirstName").Value & "!</b>" 21: End If 22: end sub 23: </script> 24: 25: <html><body> 26: <ASPNETBank:Header runat="server" /> 27: <table> 28: <tr> 29: <td valign="top" width="150"> 30: <ASPNETBank:Menu runat="server" /> 31: </td> 32: <td width="550" valign="top"> 33: <font face="arial"> 34: 35: <form runat="server"> 36: <table> 37: <tr> 38: <td width="10"> 39: 40: </td> 41: <td width="100%"> 42: <font face="arial"> 43: <p> 44: <asp:Label 45: runat="server"/><p> 46: Your account balance is <b>$945.31</b> 47: <p></font> 48: </td> 49: </tr> 50: </table> 51: </form> 52: </font> 53: </td> 54: </tr> 55: </table> 56: </font> 57: </body></html> | On lines 2 and 3, you register your two user controls. Then in the Page_Load event, you set the Text property of the label on line 44. You use the value in the cookie you set in login.aspx, which contains the user's login name. The user is then greeted with a personalized welcome message by the label. Figure BP1.2 shows the display of this page. |
Figure BP1.2. The account summary page.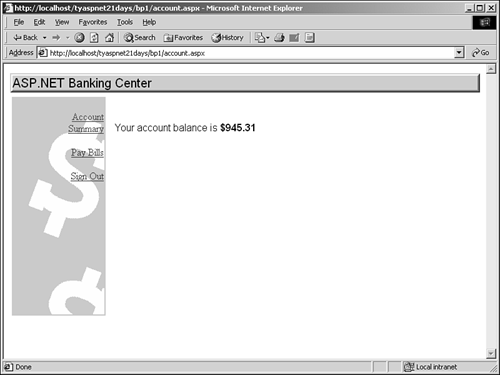
This page doesn't do much else yet. Line 46 places a temporary value, which will be replaced next time with a value from the database. The transaction history will also be displayed in this area with dynamic information. Paying Bills Your application will allow users to pay bills online (not really, of course, because this is all fake money). Users will supply appropriate information for a payee; your application will automatically transfer the funds. Eventually, you'll add functionality so that payees can post transactions from any location (in other words, debit their accounts)! But I'm getting ahead of myself. Let's take a look at the code for this page in Listing BP1.5. Listing BP1.5 bills.aspx Online Bill Payment 1: <%@ Page Language="VB" %> 2: <%@ Register TagPrefix="ASPNETBank" TagName="Header" src="/books/4/226/1/html/2/header.ascx" %> 3: <%@ Register TagPrefix="ASPNETBank" TagName="Menu" src="/books/4/226/1/html/2/nav.ascx" %> 4: 5: <script runat="server"> 6: '****************************************************** 7: ' 8: ' Bills.aspx: Allows user to pay bills online 9: ' 10: '****************************************************** 11: </script> 12: 13: <html><body> 14: <ASPNETBank:Header runat="server" /> 15: 16: <table> 17: <tr> 18: <td valign="top" width="150"> 19: <ASPNETBank:Menu runat="server" /> 20: </td> 21: <td width="550" valign="top"> 22: <font face="arial"> 23: <asp:Label runat="server"/> 24: <form runat="server"> 25: <table> 26: <tr> 27: <td width="10"> </td> 28: <td width="100%"> 29: <font face="arial"> 30: <p> 31: Welcome to the bill paying service! 32: Please fill out the information below 33: and hit "Pay that Bill!" to 34: automatically transfer funds.<p> 35: 36: <table> 37: <tr> 38: <td width="150" valign="top"> 39: <font face="arial">Payee: 40: </td> 41: <td width="100" valign="top"> 42: <font face="arial"> 43: <asp:textbox 44: runat="server"/> 45: </td> 46: </tr> 47: <tr> 48: <td valign="top"> 49: <font face="arial">Amount: 50: </td> 51: <td valign="top"> 52: <font face="arial"> 53: <asp:textbox 54: runat="server"/> 55: </td> 56: </tr> 57: <tr> 58: <td valign="top" colspan="2" align="right"> 59: <font face="arial"> 60: <asp:button 61: runat="server" 62: Text="Pay That Bill!" 63: /> 64: </td> 65: </tr> 66: </table> 67: </font> 68: </td> 69: </tr> 70: </table> 71: </form> 72: </font> 73: </td> 74: </tr> 75: </table> 76: </font> 77: </body></html> | This file is similar to account.aspx in Listing BP1.4. It has the same user controls and same basic layout. You simply added a few text boxes for the user to input data, and a Submit button to submit the data. Currently, the Submit button does nothing. This listing produces the output shown in Figure BP1.3. |
Figure BP1.3. Customers can pay bills online.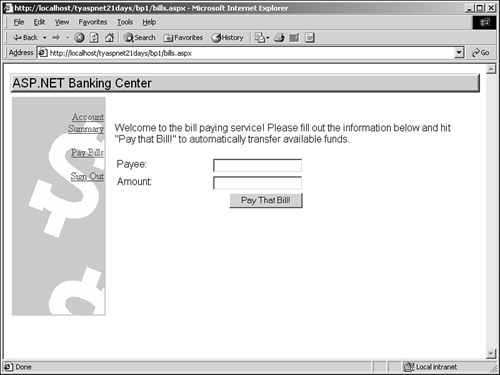
| 