| You've acted as a Web Service consumer already. By viewing the service description and HTML description pages, as you did yesterday, you performed the same methods a client would perform, except that you were interfacing directly with the service instead of through a proxy. The following sections will describe how to perform the three steps of discovery, proxy, and implementation through ASP.NET pages, using SOAP as the communication mechanism. The first two steps require command-line tools, but luckily they don't require much other work on your part. The third step, implementation, is exactly the same as using business objects in your ASP.NET pages, thanks to the proxy class. Discovery You can perform discovery for a Web site by using the Web Services Discovery tool, disco.exe. This tool examines a Web site and returns a copy of the .disco files located on the server. You can then use this local copy to help generate your proxy. Let's try an example. Open a command prompt and navigate to the c:\inetpub\wwwroot\tyaspnet21days\day17 directory. Assuming you've created a discovery file called calculator.disco (as described yesterday) and placed it in the tyaspnet21days/ day16 directory, type the following command into the command window: disco http://localhost/tyaspnet21days/day16/calculator.disco (You'll examine the syntax for this utility in greater detail later today.) The disco.exe utility prints the URLs of the .disco files available on the specified server, as shown in Figure 17.3. Figure 17.3. The results from using the disco.exe tool.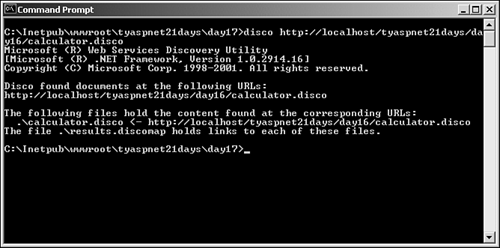
The utility also outputs a couple of files named results.discomap and calculatorcau. disco by default. results.discomap tells you the output of running disco.exe. It tells you which .disco files were found on the server, and where it saved the copies of those files. calculator.disco contains contents describing the .disco file on the server. These are both XML files, so they're easy to read. Figure 17.4 shows a typical calculator.disco file. Figure 17.4. The calculator.disco XML file displayed in the browser.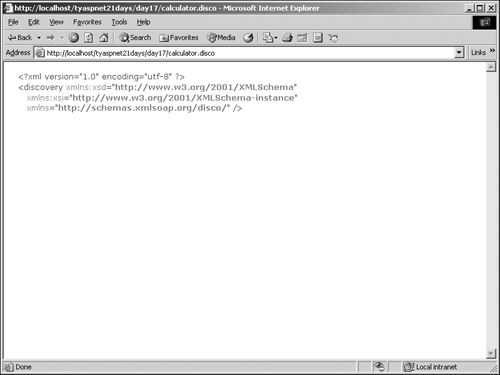
Listing 17.1 shows the contents of results.discomap, which details the results of the discovery process. Listing 17.1 The Contents of results.discomap 1: <?xml version="1.0" encoding="utf-8"?> 2: <DiscoveryClientResultsFile xmlns:xsd="http://www.w3.org/2001/XMLSchema" xmlns:  xsi="http://www.w3.org/2001/XMLSchema-instance"> 3: <Results> 4: <DiscoveryClientResult referenceType="System.Web. Services.Discovery. xsi="http://www.w3.org/2001/XMLSchema-instance"> 3: <Results> 4: <DiscoveryClientResult referenceType="System.Web. Services.Discovery.  DiscoveryDocumentReference" url="http://localhost/tyaspnet21days/day16/calculator.disco" DiscoveryDocumentReference" url="http://localhost/tyaspnet21days/day16/calculator.disco"  filename="calculator.disco" /> 5: </Results> 6: </DiscoveryClientResultsFile> filename="calculator.disco" /> 5: </Results> 6: </DiscoveryClientResultsFile>  | This file contains the result of using discovery on your server. The portion you're interested in is contained within the Results tags. On line 4, the referenceType attribute specifies what kind of file you just examined that is, a discovery document. The url attribute specifies where the .disco file was located in other words, what URL is used to access it. The filename attribute specifies the location on your computer where the copy of the .disco file was made. You can use the results.discomap file later during the proxy building process. |
The disco.exe tool has six command-line options, shown in Table 17.1. Table 17.1. The disco.exe Tool Options | Option | Description | | /nologo | Suppresses the proprietary Microsoft message displayed when using this tool. | | /nosave | Specifies that the results of the discovery process shouldn't be saved to a file. | | /out | Specifies the directory that you should save the results to. The default value is the current directory. | | /username | Specifies the username needed to access the server. | | /password | The password needed to access the server. | | /domain | The domain needed to access the server. | For example, the following command suppresses the Microsoft logo and saves the results in the c:\temp\disco folder: disco /nologo /out:c:\temp\disco http://localhost/ tyaspnet21days/services.disco Building the Proxy Class As mentioned earlier, the proxy class acts as a go-between for the Web Service and the consumer. It contains all the functionality needed to transport data over the Internet so that you don't have to build it yourself. As you'll see in a moment, this proxy looks remarkably similar to the .asmx file on the Web Service's server, but it makes a few different method calls. You build the proxy class with another utility: the Web Services Description Language tool, wsdl.exe. The tool looks at either a .discomap or .disco file or the XML service description on the server and constructs a class with identical methods and properties as the Web service. This is to make the proxy as invisible as possible. You can build your ASP.NET consumer as though you were interacting with the service directly. In addition, this tool creates methods and adds attributes that allow the proxy to send information over the Internet. You could create a proxy yourself, of course, but why bother when wsdl.exe does it for you? (If you're determined to do it yourself, you'll see all the requirements when you look at an actual proxy later today.) Note Note that the wsdl.exe tool can examine the service description of a Web Service. This means that you don't need to use the disco.exe tool first if you know the service description URL.
Let's look at an example. Execute the following command from the command line: wsdl /language:VB http://localhost/tyaspnet21days/day16/ Calculator.asmx?WSDL You'll examine the syntax further later today. Right now, all you need to know is that the first parameter, the /language attribute, sets the programming language that the proxy class should be generated in (VB.NET in this case). The second parameter specifies the URL of the service description. (You discovered that URL in yesterday's lesson, "Creating Web Services.") After running wsdl.exe with the parameters specified in the preceding code, you'll see a confirmation message like the following: c:\Inetpub\wwwroot\tyaspnet21days\day17\Calculator.vb Writing file 'c:\Inetpub\wwwroot\tyaspnet21days\day17\Calculator.vb'. Note that the wsdl.exe utility has created a VB.NET class file, calculator.vb. This is your proxy class. Take a moment to examine the contents of this file. (It should be located in the same directory that you executed the command from.) Listing 17.2 shows the output of this file. Listing 17.2 The Generated Calculator.vb File 1: '------------------------------------------------------------- 2: ' <autogenerated> 3: ' This code was generated by a tool. 4: ' Runtime Version: 1.0.3705.0 5: ' 6: ' Changes to this file may cause incorrect behavior and 7: ' will be lost if the code is regenerated. 8: ' </autogenerated> 9: '------------------------------------------------------------- 10: 11: Option Strict Off 12: Option Explicit On 13: 14: Imports System 15: Imports System.ComponentModel 16: Imports System.Diagnostics 17: Imports System.Web.Services 18: Imports System.Web.Services.Protocols 19: Imports System.Xml.Serialization 20: 21: ' 22: 'This source code was auto-generated by wsdl, Version=1.0.3705.0. 23: ' 24: 25: '<remarks/> 26: <System.Diagnostics.DebuggerStepThroughAttribute(), _ 27: System.ComponentModel.DesignerCategoryAttribute("code"), _ 28: System.Web.Services.WebServiceBindingAttribute (Name:="CalculatorSoap",  [Namespace]:="http://tempuri.org/")> _ 29: Public Class Calculator 30: Inherits System.Web.Services.Protocols.SoapHttpClientProtocol 31: 32: '<remarks/> 33: Public Sub New() 34: MyBase.New 35: Me.Url = "http://localhost/tyaspnet21days/day16/Calculator.asmx" 36: End Sub 37: 38: '<remarks/> 39: <System.Web.Services.Protocols.SoapDocumentMethodAttribute ("http://tempuri. [Namespace]:="http://tempuri.org/")> _ 29: Public Class Calculator 30: Inherits System.Web.Services.Protocols.SoapHttpClientProtocol 31: 32: '<remarks/> 33: Public Sub New() 34: MyBase.New 35: Me.Url = "http://localhost/tyaspnet21days/day16/Calculator.asmx" 36: End Sub 37: 38: '<remarks/> 39: <System.Web.Services.Protocols.SoapDocumentMethodAttribute ("http://tempuri.  org/Add", RequestNamespace:= "http://tempuri.org/", ResponseNamespace:= "http://tempuri. org/Add", RequestNamespace:= "http://tempuri.org/", ResponseNamespace:= "http://tempuri.  org/", Use:=System.Web.Services. Description.SoapBindingUse.Literal, ParameterStyle: org/", Use:=System.Web.Services. Description.SoapBindingUse.Literal, ParameterStyle:  =System.Web.Services.Protocols. SoapParameterStyle.Wrapped)> _ 40: Public Function Add(ByVal intA As Integer, ByVal intB As Integer) As Integer 41: Dim results() As Object = Me.Invoke("Add", New Object() {intA, intB}) 42: Return CType(results(0),Integer) 43: End Function 44: 45: '<remarks/> 46: Public Function BeginAdd(ByVal intA As Integer, ByVal intB As Integer, ByVal =System.Web.Services.Protocols. SoapParameterStyle.Wrapped)> _ 40: Public Function Add(ByVal intA As Integer, ByVal intB As Integer) As Integer 41: Dim results() As Object = Me.Invoke("Add", New Object() {intA, intB}) 42: Return CType(results(0),Integer) 43: End Function 44: 45: '<remarks/> 46: Public Function BeginAdd(ByVal intA As Integer, ByVal intB As Integer, ByVal  callback As System.AsyncCallback, ByVal asyncState As Object) As System.IAsyncResult 47: Return Me.BeginInvoke("Add", New Object() {intA, intB}, callback, callback As System.AsyncCallback, ByVal asyncState As Object) As System.IAsyncResult 47: Return Me.BeginInvoke("Add", New Object() {intA, intB}, callback,  asyncState) 48: End Function 49: 50: '<remarks/> 51: Public Function EndAdd(ByVal asyncResult As System.IAsyncResult) As Integer 52: Dim results() As Object = Me.EndInvoke(asyncResult) 53: Return CType(results(0),Integer) 54: End Function 55: End Class asyncState) 48: End Function 49: 50: '<remarks/> 51: Public Function EndAdd(ByVal asyncResult As System.IAsyncResult) As Integer 52: Dim results() As Object = Me.EndInvoke(asyncResult) 53: Return CType(results(0),Integer) 54: End Function 55: End Class  | This class was created by wsdl.exe to ease the process you have to go through to consume a Web Service. Note that it contains two methods in addition to the one provided by the service, as well as numerous attributes and properties that, among other things, make this code hard to read! Don't worry if you don't follow it completely. You needn't delve into the exact syntax of it. |
Line 29 declares a class named Calculator, which has a WebServiceBindingAttribute attribute from the System.Web.Services namespace. This attribute defines the interface this class must use that is, a predefined set of functions and properties. You really don't need to know much more about this attribute for the purposes of today's lesson. (See the .NET Framework SDK documentation for more information.) Note that this attribute isn't required for proxy classes, but one is generated automatically. This class also inherits the SoapHttpClientProtocol class, as shown on line 30. This class provides the methods to talk to the Calculator service remotely via Simple Object Access Protocol (SOAP). On line 33, the proxy contains a constructor, a method that's used to initialize the class (see the Q&A on Day 15, "Using Business Objects"). This constructor sets the URL for your Web Service. Starting on line 39, you see something similar to the Add method you created yesterday. This function has the attribute SoapDocumentMethodAttribute, which provides parameters for use when the service talks to it via SOAP. On line 41, this function calls the Invoke method, which places a call to the service. This method takes two parameters: the name of the method in the service to invoke, and the parameters to send to the service. The results are stored in an array named results and are then returned on line 42. The next two functions define asynchronous methods for communication with the service. See Day 13, "Reading and Writing Files on the Web Server," for more information on asynchronous method calls. Essentially, these methods allow you to perform other functions while they're executing. Regular methods, also known as synchronous methods, don't allow any other operations to be performed while they're executing. This proxy class effectively wraps up the functionality needed to place calls over the Internet using different transport protocols, such as SOAP or Http-Get. You can use this proxy to interact with the service just as you'd use a business object. Thankfully, you don't have to create this proxy yourself. The wsdl.exe utility has a few more options that you can specify to generate different types of proxies. It supports all the options in Table 17.1 (with the exception of /nosave), in addition to those shown in Table 17.2. Table 17.2. wsdl.exe Options | Option | Description | | /language | The language used to generate the proxy class. The default is C#. | | /namespace | The namespace to use for the generated proxy. The default is the global namespace. | | /protocol | The protocol to use for communication with the service. Can be SOAP, Http-Get, or Http-Post. The default is SOAP. | Tip Many of the options for wsdl.exe and disco.exe have shortcuts. For instance, instead of typing /language:, you can use /l:. For more information, type wsdl.exe /? or disco.exe /? at the command line.
The following line creates a proxy class in VB.NET, using a custom namespace and the SOAP protocol: wsdl /l:VB /namespace:MyWebServiceConsumer /protocol:SOAP http://localhost/tyaspnet21days/  day16/Calculator.asmx?WSDL day16/Calculator.asmx?WSDL Implementing the Proxy Class You're nearly ready to use the Web Service from an ASP.NET page. You now have your proxy class to interact with the service, but you can't use it just yet. First, you must compile it into an assembly (a DLL file), just as you did for business objects. This is accomplished with the VB.NET compiler (which you should be pretty familiar with by now). From the command prompt, enter the following command: vbc /t:library /out:..\..\bin\CalculatorServiceClient.dll /r:System.dll /r:System.XML.dll  /r:System.Web.Services.dll Calculator.vb /r:System.Web.Services.dll Calculator.vb Tip When you require long, multiple steps on the command line, such as using disco.exe followed by wsdl.exe and then vbc.exe, it's often helpful to use a batch file (.bat). This saves you from having to retype things over and over again. Create a text file, change the extension to .bat, and copy the necessary commands in the file, separated by line breaks. Simply run this file and all the steps will be performed automatically.
This command will compile the proxy class into the DLL file and place it in the /bin directory, your assembly cache. Then you can use the component through an ASP.NET page to call a Web service. Listing 17.3 presents a simple ASP.NET page that consumes the calculator Web Service. Listing 17.3 Invoking a Web Service from an ASP.NET Page 1: <%@ Page Language="VB" %> 2: 3: <script runat="server"> 4: sub Page_Load(Sender as Object, e as EventArgs) 5: dim objCalc as new Calculator 6: 7: lblMessage.Text = objCalc.Add(1,5) 8: end sub 9: </script> 10: 11: <html><body> 12: The answer to 1 + 5 is: 13: <asp:Label runat="server"/> 14: </body></html>  | This ASP.NET page is pretty simple. In the Page_Load event on line 5, you create an instance of the Calculator proxy you just compiled. This object represents the calculator Web service. You can use it just as if you were interacting directly with the service. In other words, if you gave this compiled proxy to another developer, she wouldn't have any idea that it interacted with a Web service. She could use the proxy just as if it contained the service's methods itself. |
On line 7, you call the Add method and store the result in the label on line 13. This method takes two integers, sums them, and returns the result. What actually happens here is that you're calling the proxy's Add method, which takes the two integers and sends them across the Internet to the service's Add method, which performs the actual calculation. The proxy then receives the answer in XML format, converts it into the proper format (an integer, in this case), and gives you the result. From the developer's point of view, the proxy simply takes the parameters, performs the calculations, and returns the result. When viewed from the browser, this page will produce the screen in Figure 17.5. Figure 17.5. The result of calling your Web Service.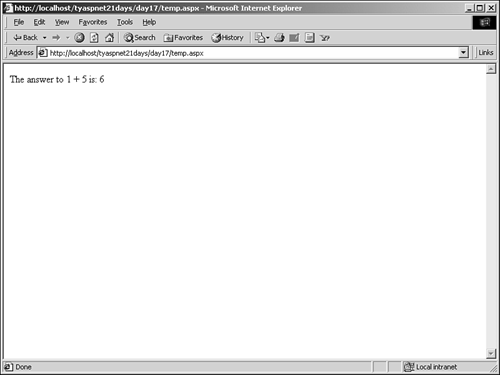
This example shows the beauty of using a proxy class you don't need to perform any special tasks to communicate with the calculator Web service. All you have to do is call the Web service's method whose functionality you're interested in. This may seem like a lot of work just to get this simple output, but all you really need to do is perform three steps: Use the wsdl.exe tool to generate the proxy, compile it and place it in the assembly cache, and build the ASP.NET page to access its methods. (And if someone does the first two steps for you, you only need to provide the implementation.) You don't need to know the output generated by the discovery and proxy generation steps it's irrelevant unless you want to create your own proxies manually. Thus, the proxy hides all the complex functionality. With just a few lines in your ASP.NET page, you're doing a lot of powerful work. Note Note that you didn't have to import any additional namespaces to use this proxy class. Recall from Day 15 that an object is automatically loaded by ASP.NET when it's placed in the assembly cache (the /bin directory). You can access it as though it were part of your page.
Another Web Service Consumption Example So far, you've accomplished quite a bit. Calling an object's methods from across the Internet is no small feat. Web Services open up a lot of possibilities for distributed computing. However, the previous example was a fairly simple exercise. It performed a calculation that could have been performed in an ASP.NET page and didn't require any complex data types. Let's go through another example. Recall that you can also send database results through Web Services, thanks to XML. Yesterday, you built a database service that could take a SQL statement and retrieve the appropriate data. Let's consume this service from an ASP.NET page. Let's skip discovery and move directly to generating the proxy. Execute the following command: wsdl /language:VB /namespace:TYASPNET.Clients http://localhost/tyaspnet21days/day16/  Database.asmx?WSDL Database.asmx?WSDL You've already used the wsdl.exe tool, so this should look familiar. This command creates a proxy class of the database service and places it in the current directory. Because of the extensive functionality of the database service, this proxy is rather large and complex. Luckily, you don't need to worry about it at all. You only need to compile and implement it. Notice that you place the generated proxy in the TYASPNET.Clients namespace. Recall that we put the database service itself in the TYASPNET namespace the new TYASPNET.Clients namespace is so we don't get confused between the database service and the proxy. This should produce a listing similar to Figure 17.6. Figure 17.6. The generated proxy from the database service.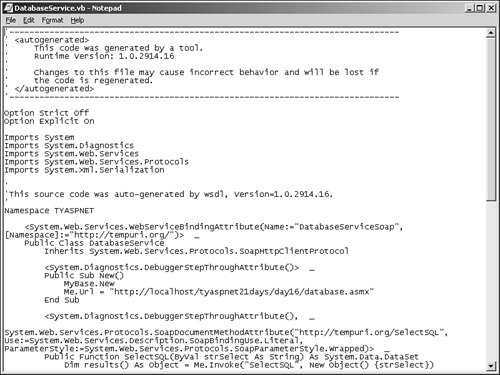
Next, you need to compile this service on the client. Use the following command: vbc /t:library /out:..\..\bin\DatabaseService.dll /r:System.dll /r:System.XML.dll /r:  System.Web.Services.dll /r:System.Data.dll DatabaseService.vb System.Web.Services.dll /r:System.Data.dll DatabaseService.vb Don't forget to reference the System.Data namespace! The proxy uses the objects in this namespace to convert the returned XML data into a DataSet that you can use in your ASP.NET page. Finally, let's build the ASP.NET page to use the Web Service, shown in Listing 17.4. Listing 17.4 Accessing Your Database Service 1: <%@ Page Language="VB" %> 2: <%@ Import Namespace="System.Data" %> 3: 4: <script runat="server"> 5: sub Submit(Sender as Object, e as EventArgs) 6: dim objService as new TYASPNET.Clients.DatabaseService 7: dim objDS as new DataSet 8: 9: objDS = objService.SelectSQL(tbQuery.Text) 10: DataGrid1.DataSource = objDS 11: DataGrid1.DataMember = "tblUsers" 12: 13: DataGrid1.Databind() 14: end sub 15: </script> 16: 17: <html><body> 18: <form runat="server"> 19: Enter a query: 20: <asp:Textbox runat="server"/> 21: <asp:Button runat="server" 22: text="Submit" 23: OnClick="Submit" /> 24: <p> 25: <asp:DataGrid 26: runat="server" BorderColor="black" 27: GridLines="Vertical" cellpadding="4" 28: cellspacing="0" width="100%" 29: Font-Name="Arial" Font-Size="8pt" 30: HeaderStyle-BackColor="#cccc99" 31: ItemStyle-BackColor="#ffffff" 32: AlternatingItemStyle-Backcolor="#cccccc" /> 33: 34: </form> 35: </body></html>  | This is a very simple page. The Submit method is its only function. When the user enters a query into the text box and clicks Submit, it creates a new instance of your newly compiled proxy class, as shown on line 6. Recall that you placed this proxy in the TYASPNET.Clients namespace, so you use its full name to declare the variable. (The calculator example earlier today wasn't placed in a specific namespace, so you didn't have to use a namespace name.) |
Line 9 calls the SelectSQL method, which should return a DataSet. You then simply bind the returned data to the DataGrid, beginning on line 25. Figure 17.7 shows the returned page. Figure 17.7. The data returned from the service.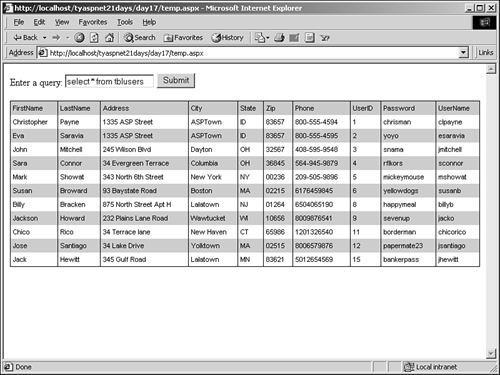
This ASP.NET page can be located anywhere in the world in relation to the Web Service, and you can still receive the same results. In other words, your ASP.NET page can be located on your home computer in New York, while the service resides on a server in Tokyo! The service can receive commands from anywhere because they're transferred via XML, which is simply plain text, and typically the security measures in place on the Internet are designed to allow transmission of plain text. Web Services allow developers to implement your custom functionality however they see fit. (This is unlike ASP.NET pages, where clients are stuck using the interface you build.) For example, using this database service and the data it returns, one developer could build an online address book application. Another developer could use the data to determine demographic information. Your service simply returns data. It doesn't care how that data is used or displayed. Note These examples show the similarities between business objects and Web services. Both require compiled objects that are implemented on an ASP.NET page. The only difference is that with Web services, the compiled object can reside anywhere on the Internet. A proxy then ties the implementation and service together.
| 


