Hack 21. Take Video in Total Darkness
| < Day Day Up > |
|
All sorts of interesting things happen in the dark, but how do you take video of them? These tips will help you take video in even the darkest places. It could be a mystery animal rustling in your garden or the phantom cookie thief who keeps sneaking into the kitchen in the dark of night. Whatever it is, you want to take some video for proof. But how do you do this without turning on the lights? Neither the mystery animal nor the cookie thief is likely to come out if you leave all the lights on and your camcorder running. It might seem like an insurmountable problem, but there are a couple things you can do to take video in poorly lit or dark places. You can either make the most of the light you have, or you can add more light that only your camcorder can see. 2.6.1. Using Slow Shutter SpeedsBy slowing down the shutter speed of your camera, you give it more time to collect the available light, making more of the light that is out there. In many situations, such as under streetlights or other indirect lighting, using this slower shutter speed mode can be enough to produce usable video, and most camcorders offer a special Slow Shutter Speed mode. The resulting video can often be rather jerky and blurry, though; much like a still camera, a slower shutter speed exaggerates both camera shake and the movement of the things that you are capturing. Figure 2-10 is a frame from a video captured using the Color Slow Shutter Speed mode of a Sony camcorder in low light. You can't do much about the blurring from moving objects, but you can minimize the camera shake by mounting the camcorder on a tripod or holding the camcorder in both hands and leaning against a wall or building. Figure 2-10. A blurry image captured with a slow shutter speed 2.6.2. Adding More (Invisible) LightThe other trick is to add more light. While this might seem illogical, there are types of light that your camcorder can see but that you (or your subjects) can't. Specifically, your camcorder can see infrared (IR) light, which is invisible to the human eye. Most animals can't see it either, or they aren't bothered by it. To see what I mean, try this: take a remote control, point the end of the remote toward your eye, and press a button. You won't see anything, because your eyes can't see the IR light emitted by the remote. Now try the same thing, but pointing the end of the remote at your camcorder lens. On your camcorder screen, you'll see a brief flash of light from the end of the remote, because the camcorder can see the IR light. And this is what we can use to capture video in situations where there isn't enough light to record normal video: by using IR light, we can illuminate the subject without annoying or distracting it. In fact, this hack has been adopted by some of the camcorder manufacturers themselves. Many camcorders (such as most Sony models) have a Night Vision mode that uses a built-in IR light emitting diode (LED) light (Sony calls this mode Super NightShot, while Panasonic calls it 0Lux MagicPix). But this single IR LED isn't all that powerful: it can illuminate things only to a few feet away. This is fine if you are filming another Blair Witch knockoff (and please don't; they may have been funny the first five times, but not anymore), but it's not much use for things that are further away. If you plan on recording anything worthwhile, you'll need something a bit brighter, such as an IR illuminator. Some manufacturers also produce their own illuminators: Sony makes one called the HVL-IRH2 that works with any of their NightShot camcorders and also doubles as a conventional light. However, this only works when connected to the camcorder, and it uses the camcorder's battery. The fact that the illuminator is separate from the camcorder means that you can place it near the subject and leave it, while remaining at a distance with the camcorder. Figure 2-11 shows an IR illuminator purchased on eBay. Figure 2-11. A 39 LED IR illuminator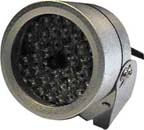 The downside of using IR mode is that your video turns to black and white, because the camcorder is only capturing the IR light, not the full spectrum of color light. This does make your video look rather like the night vision goggles that the military uses. Figure 2-12 shows light emitting from the illuminator; notice the lack of color. 2.6.3. Getting the Best ResultsIf you are shooting through a window or have other reflective surfaces nearby, turn off the built-in IR light of the camcorder to avoid reflections. And don't get confused if you turn on the IR illuminator and you don't see any light coming from it: remember that it emits infrared light that you can't see, so the most you'll see with the naked eye is a very dim red light. These techniques can be useful for keeping an eye on things in low light or total darkness. For example, my wife and I work with feral cats, and many of them don't like coming out when people are nearby. So, we use the IR illuminator and camcorder in night vision mode to watch them without disturbing them. Figure 2-13 is a frame of video taken with a Sony camcorder in very low light, using the Super NightShot Plus mode and the IR illuminator. If you're trying to video that elusive animal in the bushes, the moon can be your friend. Time your shooting with the full moon, because a full moon can provide enough light to take video if you use the night vision mode on your camcorder. You can check the phases of the moon at http://aa.usno.navy.mil/idltemp/current_moon.html. Figure 2-12. IR light captured using a digital camera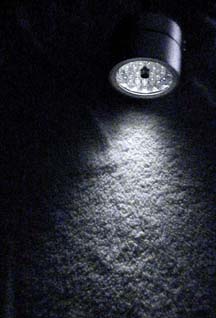 Figure 2-13. The ability to see at night, using IR light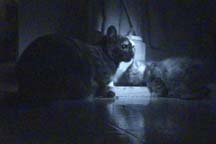 |
| < Day Day Up > |
EAN: 2147483647
Pages: 158