Hack 15. Stabilize Your Shots
| < Day Day Up > |
|
Using a monopod, your video camera, and a 5- to 10-pound weight, you can create your own shot stabilizer . If you have ever attempted to walk and record video at the same time, you have probably noticed the inevitable jiggle in you footage. In order to overcome this highly distracting result, a number of companies have brought products to market. Most notable is the SteadiCam, which is a professional solution to allow the cameraperson to move around freely while maintaining a smooth image. The problem is, SteadiCam gear is quite expensive and the knowledge of how to use it is not readily available. Fortunately, you can couple a monopod and a standard weight (the type you might find in a gym) to create a solution to stabilize your shots. By attaching a weight to the bottom of a monopod, you will be able to counterbalance your camera when it is attached to the top. There are a great number of monopods available, but I prefer those by Bogen-Manfrotto (http://www.bogenimaging.us/) because you can really abuse them and the end cap is removable on certain models. 1.16.1. Assembling the StabilizerOnce you have selected and purchased your monopod, you will want to attach a weight to the bottom of it. If your modopod has a removable end cap, you can remove the end-cap from the monopod, slide the weight onto the bottom, and reattach the end-cap. Figure 1-27 shows the result. If your monopod doesn't have a removable cap on the bottom, then you can drill a hole through the bottom portion of the monopod, slide the weight on, and then place a bolt through your hole to keep the weight attached. Figure 1-27. A monopod with a small weight attached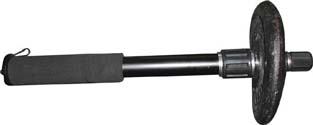
Once you have assembled your monopod and weight, place your camera on top of the monopod and secure it appropriately, as shown in Figure 1-28. Figure 1-28. Counter-balanced monopod with camera 1.16.2. Using the StabilizerTo use the stabilizer, lift and hold the monopod off the ground. As you walk around, your arm and shoulder will act as a type of shock absorber, allowing the shot to remain steady. You might even be able to jog alongside a subject while still capturing usable footage. You should practice using this solution to understand how it affects the final look of your video. For example, try walking up a flight of stairs both while using the monopod and using just the camera by itself. You should notice a tremendous amount of difference between the two shots, but both could have their place in certain situations. There are additional benefits of using the setup described here:
|

| < Day Day Up > |
EAN: 2147483647
Pages: 158