Hack 14. Build Your Own Blue Screen
| < Day Day Up > |
|
You can build a large in this case, 24' x 8' removable, disposable blue screen for under $30 . As a child in the late 70s, I was first introduced to the concept of using a blue screen in film and video while watching The Making of Star Wars . The compositing technique of filming action against a solid blue background, which could be replaced by any environment or other action filmed later, opens endless possibilities to the filmmaker. Today, off-the-shelf software provides consumers with the ability to put this technique to use in amateur films. 1.15.1. Understanding Your NeedsProfessional-grade compositing material can be costly, but almost any solid color material can serve as a small blue screen. One popular solution is to use fluorescent green or blue poster board to create small backdrops suitable for close-ups, but what about larger scenes? Building your own blue screen is actually easy, and the whole project can be completed within a couple hours. The finished screen constructed in this hack is about 24 feet wide (including the wraparound to a second wall) by 8 feet high. Being made of cheap, common materials, the screen is also disposable. The materials are lightweight, making it possible to build a portable version if needed. In fact, I produced a martial arts instructional DVD that actually employed a portable, green screen version of this setup. I strongly recommend attempting to shoot a few shots against a small piece of material and testing how well you can composite with it using your lights [Hack #22], camera, and software [Hack #70] before spending the time and energy to build a large screen. Once you're confident that it will work, go ask your parent or spouse for permission to cover one or two walls with the stuff. Most of all, have fun! 1.15.2. Gathering the MaterialsIn order to construct your blue screen, you'll obviously need a set of materials. This will require a run to your local strip mall to pick up the following supplies:
You should make sure you get a parent or spouse-approved room for the project. My spouse-approved room was an unused storage room in the basement. This was good for me, because it also happens to be the largest room in the house! Figure 1-21 shows me assessing the concrete wall. The strips used to mount the blue screen are removable, but the Liquid-Nails will leave a mark on (or strip the surface of) concrete. If you screw the strips into drywall, the screws will leave holes and the strips are likely to leave a crease. If you're mounting on concrete, you'll need to choose your poison. 1.15.3. Mounting the Pine StripsThe blue plastic is thin enough to see through if it lies against the wall, so you might want to use the strips even if you're mounting on plain drywall. I couldn't really mount the plastic against the brick wall; plus, the wall would show through. The strips leave a gap between the plastic and the wall, and they make it easy to mount the plastic by just using staples. Figure 1-21. Assessing the concrete wall Before mounting the strips to the wall (as shown in Figure 1-22), make sure you measure for fit and cut the strips to size. Also, use a level to mark off a horizontal line for each set of strips. Make sure to leave room for overlap at the center, so if the plastic is 40 inches wide, space the about strips 36 inches apart. Figure 1-22. Carefully mounting the pine strips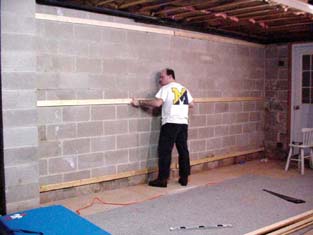 Finally, mount the strips along your markings. If you're mounting to drywall, you could use drywall screws to mount the strips to the wall. Just remember that they will leave marks. If the drywall is a solid, light color, you might be able to staple the plastic directly to the wall. The staples will leave only small holes, but there will be lots of them. I was mounting to cinder blocks, so I used a can of Liquid-Nails. Liquid-Nails is like caulk, but it becomes much harder and stronger. It bonds extremely well to brick, concrete, and wood. I applied the glue to the wall and the wood before mounting, which yielded good results. The glue takes 10 to 30 minutes to set, so you might want to have some extra wood around to lean against the strips to hold them in place while the glue dries. 1.15.4. Adding the Blue ScreenNow, we can finally mount the blue screen itself, as shown in Figure 1-23. Roll out the length of material needed and start stapling! Work across from one side to the other. Use three or four staples per foot to prevent tearing as you pull tension on the material. After going a foot or two on the top end, work the bottom end too.
Figure 1-23. Mounting the blue screen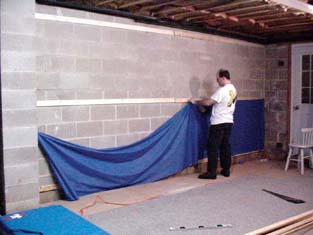 Make sure you pull the material as tight as possible without tearing for each staple to keep the finished screen flat. I goofed when placing the pine strips, and they were too far apart to completely overlap the two pieces. To fill the gap, I just used some blue, painter's masking tape. Figure 1-24 shows the completed blue screen, along with the painter's tape to cover the goof. Hopefully, you will learn from my mistake and measure it properly from the start. Figure 1-24. The final blue screen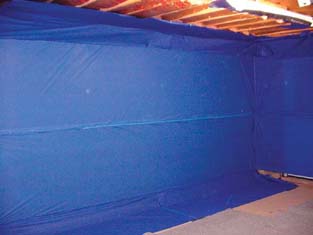 1.15.5. Adding the Finishing TouchesTo finish, I added some excess material to the top and bottom as well as to the adjacent wall. I did cover over the basement door, but the strips are screwed into the door frame rather than glued to the wall. But does it work? Sure it does! Figures 1-25 and 1-26 show two examples of composites done using this blue screen room. Figure 1-25. Shot on the home-built blue screen If you would like to see some of the video created using this blue screen, you can check out the movie at the following URLs:
You just have to love digital video technology! Figure 1-26. A successfully composited image Nick Jushchyshyn |

| < Day Day Up > |
EAN: 2147483647
Pages: 158