Hack 5. Log Using a Spreadsheet
| < Day Day Up > |
|
Logging your footage provides you with a searchable reference of your content . Regardless of the size of your project, from a few hours of footage to a few thousand, you need to know what content you have acquired. Although there are many specialized applications to help you log your footage, you can just as easily use a simple spreadsheet.
1.6.1. Double-Checking Your TapesBefore you start, make sure all of your tapes are uniquely labeled and numbered[Hack #3]. You also need to be sure the timecode on your tapes does not regenerate [Hack #4]. Although you can catch these problems while logging and fix them [Hack #48] before you begin editing, it is easier to fix these problems early in the process. Logging your footage is a time-consuming but worthwhile endeavor. As you progress, you will become intimate with your footage. While you're editing, you will discover that you recall seeing a particular shot, but you will not know on what tape or at what timecode the shot occurred. In such a situation, your logs will provide the necessary information. 1.6.2. Setting Up Your SpreadsheetTo set up your spreadsheet assign a column name for each of the following:
To log your footage, you need to enter the in-point, description, and out-point of the footage in a row on your spreadsheet. When entering information, you should enter unique information for Clipname for each log entry. You should also enter any additional information required by your editing system. 1.6.3. Setting Up to View Your FootageHow you view your footage while logging is completely up to you. Some people prefer to transfer their footage to VHS tapes with the timecode superimposed over the image, a process known as a window burn [Hack #75]. Others prefer to digitize all of their footage and view it on their computer. However you choose to log your footage, I strongly recommend not using your master tapes. A simple mechanical failure with your playback machine can easily destroy your master footage, which cannot be replaced. You should treat your master tapes as prized possessions because they are irreplaceable. (Of course, you could always reshoot. But what if you are editing a wedding?) 1.6.4. Logging Your FootageLogging your footage is a time-consuming process, but the payoff is well worth the investment. To successfully log your footage, there are three essential criteria: the tape number, the timecode of the in-point, and the description of the content. Beyond those three criteria, the out-point is helpful in determining the length of the log entry and is mandatory for most, if not all, editing systems. If you've set up your logging spreadsheet properly, you can use it to create a batch digitize list to help digitize your footage into your editing system. Using the batch list will provide a breakdown of your footage, which will exactly match your logs. Therefore, you will have the same information in both your spreadsheet and your editing system. 1.6.4.1. Enter one log per row.For each new log entry, create a new row. Continue this process until the tape's content is completely captured in your own words. Each log entry will range from 1 minute to 60 minutes, depending on your attention to detail.
1.6.4.2. Check the format of your timecode.While logging, you need to make sure you enter your timecodes in the correct format. If you are working in PAL format, you can ignore the rest of this paragraph. For NTSC, the correct format for drop-frame timecode Hours:Minutes:Seconds;Frames (HH:MM:SS;FF). More often then not, you will be working in Drop-Frame mode, so you will need to use a semicolon before your frame number (;FF). If you are working in Non-Drop Frame mode, use a colon (:FF). If you do not know which mode you are working in, you should be able to safely assume you are working in Drop-Frame.
If you are uncertain of which mode your tape is recorded on, you can tell by looking the timecode coming off the tape. If there is a semicolon or a period before the frame indicator, the timecode is Drop-Frame. You can think of it this way: one of the dots in the colon drops when using Drop-Frame. 1.6.4.3. Create a new file for each tape.You should create a new spreadsheet for each tape you log and save the spreadsheet as the name of the tape. For example, if you are logging tape number P001A, save the spreadsheet as P001A. Saving the spreadsheet with the same name as the tape's number will be essential for future reference. 1.6.5. Exporting a Batch Digitize ListWhen you have finished logging your footage, you can import your spreadsheet's information into your editing system. Since each system is different, there will be specific steps you need to follow. To begin, you should save your spreadsheet as a tab-delimited file for either Avid or Final Cut, or as a comma-separated file for Premiere. Once you have saved your log entries as a file, you will need to edit the file in a plain text editor.
1.6.6. Importing a Batch Digitize ListOnce you have made the necessary changes, save the file. Next, you need to import the batch list into your editing system:
You will have to perform these steps for each tape you plan on using in your project. The effort, however, is well worth it. Upon successfully importing your batch list, you can easily locate shots either by referring to your spreadsheets or by searching within your editing project. 1.6.7. Search Your ProjectIf you have located a shot using your spreadsheet, and want to see the footage as it exists in your editing system, you can easily find it[Hack #2], because the spreadsheet matches the information in your editing system. If you don't have access to your spreadsheet, you can simply search within your editing project and have the same result. Figure 1-5 shows the Find dialog box for Final Cut Pro, and Figure 1-6 shows the result. Figure 1-5. Finding media within Final Cut Pro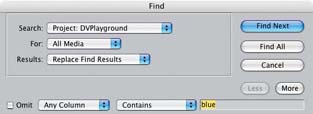 To locate footage, you should make sure you search from your Project and not your Timeline. This is because most editing systems are context sensitive, so if you are currently working in the timeline and perform a search, you will only search footage currently in the timeline. To use the search function:
Figure 1-6. Results from a search in Final Cut Pro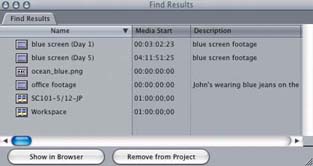 After locating the footage, open it in your application's source view, or just drop it onto your timeline. Having a detailed, and searchable, reference to your footage both in a spreadsheet and on your editing system, will save you hours of shuffling through your footage trying to find a shot. |


 Import
| < Day Day Up > |
EAN: 2147483647
Pages: 158