Hack 87. Attend a Conference from Another Location
| < Day Day Up > |
|
Sometimes you just can't make it to a meeting, a conference, or a lecture. Using Darwin Streaming Server and QuickTime Broadcaster, you can watch the action from a remote location. Whether you are a student or a businessman, there are times when you just can't make it to a gathering. If you have a friend or colleague who can attend, you will be able to watch the action from a distant location. Furthermore, if your friend chooses to, there will be an archive that you or your peers can watch at anytime. 7.13.1. Configuring the BroadcastIn order to broadcast the conference, your colleague will need to download and install the QuickTime Broadcaster application (http://www.apple.com/quicktime/download/broadcaster/; free). At the time of this writing, QuickTime Broadcaster is a Mac OS X only application. Once your colleague has downloaded and installed, she should launch Broadcaster as she would any other application on her computer. After launching Broadcaster, she will see a Show Details button on the lower-right side of the Broadcaster window. Clicking on the Show Details button will reveal a panel that allows her to change the settings for the Audio, Video, and Network configuration. When the configuration details are visible, the Show Details button toggles to read Hide Details, which, when clicked, does so. Figure 7-45 shows the Broadcaster window with configuration details available. If you want to obtain the best results, your colleague will need to know the speed of her connection to the Internet. A good way to determine the speed is to use a Speed Test, available through DSLReports (http://www.dslreports.com/stest). Figure 7-46 shows a speed test in progress and Figure 7-47 shows the results of the test. The speed test will reveal the upload speed, which is how fast data will flow from her computer onto the Internet. In order to optimize the broadcast, the amount of data being sent (the video broadcast) will have to be less than the upload speed. 7.13.1.1. Using the presets.Under each tab there is a Preset pop-up menu. This menu provides a list of preset configurations for Modem, DSL/Cable, and LAN connections. The Audio presets provide for either Speech or Music and the Video presets provides six options for low-motion or high-motion video across modem, DSL/Cable, and LAN connections. Additionally, you can create custom presets by altering the settings in a specific tab and choosing Preset: Figure 7-45. QuickTime Broadcaster configuration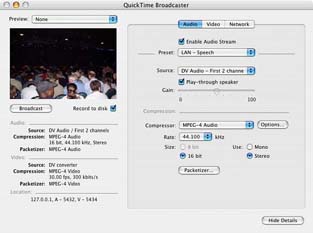 Figure 7-46. An upload test, in progress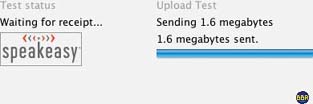 Based on the upload speed of your colleague's Internet connection, use the following presets:
For example, if the upload speed is 512K, your colleague should select the DSL/Cable preset. Figure 7-47. An upload speed of 1222 kbps, plenty for a video stream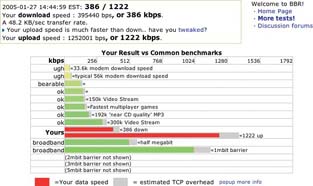 7.13.1.2. Changing the audio settings.Clicking on the Audio tab in the Details panel reveals a variety of settings to optimize the audio portion of the broadcast. More often than not, the audio will be more important than the video, so these settings are very important. Your colleague should also make sure she is able to capture good audio where she plans to sit. A good microphone, such as those available from Audio-Technica (http://www.audio-technica.com/) and Sennheiser (http://www.sennheiserusa.com/), will definitely help capture better quality audio and can be purchased from most quality distributors. In a lecture or conference setting (where a speaker is in front of an audience), you should use a shotgun microphone, while an omnidirectional microphone will help transmit better audio from a meeting. Figure 7-48 shows the Audio configuration tab in Broadcaster. The most important settings in the Audio tab are the Compression settings. Within the Compressor pop-up menu, there are a wide variety of choices. If you are planning on viewing the conference with a program other than QuickTime, you should make sure the player is MPEG-4 compliant and that the Compressor is set to MPEG-4 Audio. Selecting an audio compressor is a matter of personal choice. For most purposes, either Qualcomm PureVoice or MPEG-4 should provide good quality results. Depending on the selection, you can also modify the Rate, Size, and Mono/Stereo settings. Setting these to 32kHz, 16 bit, and Mono, respectively, will result in respectable quality audio. Figure 7-48. Using the LAN - Speech preset for audio.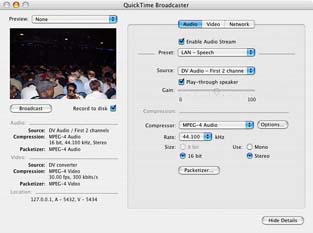 7.13.1.3. Changing the video settings.To change the video settings, select the Video tab. Your colleague can select any of the Presets, or customize her own setting. The Source pop-up menu will list the available video sources, in case there is more than one camera hooked up to the computer. Figure 7-49 shows the Video tab and its configuration options. The Width and Height parameters provide control over the visual dimension of the video image. Reducing the size of the image by one-half to one-fourth will usually result in a visually acceptable image, while reducing the bandwidth required. For example, NTSC DV is 720 x 480, reducing the image in half would result in a 360 x 240 setting. For the best results, the settings should be evenly divisible by four. Within the Compressor pop-up menu is a wide variety of codecs (compression/ decompression algorithms). QuickTime has a standard set of codecs, but there are also third-party codecs available on the Internet. Of the standard set, Sorenson, MPEG-4, and H.263 will all provide an acceptable image. Some codecs allow for more control over their settings through the Options… button. Figure 7-49. Broadcaster's Video configuration tab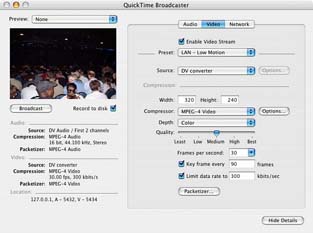
The Quality setting ranges from Least to Best and will affect overall quality of the image, with the Least setting showing the most visible signs of compression. The higher quality settings will also result in a larger requirement for upload speed. Changing the frames per second (fps) can help reduce the required upload speed. Most people can tolerate 7 to 8 frames per second, and 12 to 15 will provide the most tolerable video while keeping bandwidth requirements lower. If you have the upload speed to handle 30fps for NTSC or 25fps for PAL, then go for it! Key frames are used by the codec to determine how often to sample a complete video frame's worth of information for use in subsequent calculations. The more often a key frame is obtained, the higher quality the video. However, the more key frames there are, the more upload speed will be required. The key frame setting will depend on the frame rate of the broadcast, but a key frame every one-and-a-half to three seconds is a good average. Finally, limiting the data rate provides the most control over the required upload speed. When entering a data rate, both the upload speed and the audio rate need to be taken into consideration (remember, the broadcast is both audio and video). I recommend being conservative when limiting the data rate, so if there is 1MB of upload speed, limit the data rate to 500kbps. 7.13.1.4. Changing the network settings.The Network tab is where the parameters of your streaming server are entered, along with annotations, such as copyright information. If you already have access to a streaming server, more than one person will be able to view the conference. If not, you will need to set up your own streaming server [Hack #85], gain access to one, or allow only one person to view the gathering. Figure 7-50 shows the Network configuration tab. Figure 7-50. Network settings for Broadcaster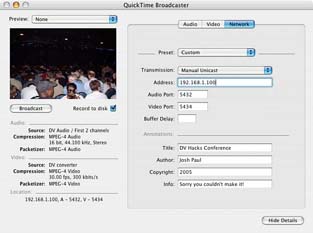 If your colleague is going to send the video stream to a single viewer (you), choosing Transmission: For both methods, the Buffer Delay setting provides a cache for the media, in seconds. For example, entering 7 in the Buffer Delay field would result in a seven-second delay between the time the audio and video are captured to the time they are broadcast. The delay allows for network slowdowns by making a store of media available. 7.13.2. Starting a BroadcastAfter all of the settings have been configured, your colleague should click the Broadcast button to start broadcasting. If you are a single viewer, you need to obtain an .sdp file from the broadcasting computer. A .sdp file can be created using QuickTime Broadcaster by choosing File Obviously, there needs to be communication between you and your colleague in order for the conference to be viewed successfully. 7.13.3. Archiving a BroadcastIf your colleague is using a digital video camera, the best way to archive the broadcast is to record the conference to tape while broadcasting. Then, after the conference has finished, digitize the recorded footage and compress it for the streaming server [Hack #83]. This approach will give the highest-quality results. If your colleague is using a webcam, or if she forgot to bring a tape with her, she can select to Record to disk in QuickTime Broadcaster's preferences. By recording the broadcast to disk, the same video file that is sent to the streaming server will be preserved on her computer as well. She can then transfer the final video file to the streaming server.
An archived broadcast will be available immediately upon placing the applicable file inside the streaming server's media directory. |
 ave Preset… in the pop-up menu.
 Manual Unicast will enable you to access the video stream. In the Address field, enter the IP address of the
| < Day Day Up > |
EAN: 2147483647
Pages: 158
- ERP System Acquisition: A Process Model and Results From an Austrian Survey
- The Effects of an Enterprise Resource Planning System (ERP) Implementation on Job Characteristics – A Study using the Hackman and Oldham Job Characteristics Model
- Context Management of ERP Processes in Virtual Communities
- Distributed Data Warehouse for Geo-spatial Services
- Data Mining for Business Process Reengineering
- Using SQL Data Definition Language (DDL) to Create Data Tables and Other Database Objects
- Understanding SQL Transactions and Transaction Logs
- Using Data Control Language (DCL) to Setup Database Security
- Using Keys and Constraints to Maintain Database Integrity
- Working with SQL JOIN Statements and Other Multiple-table Queries