Integrating Workflow Input Forms
This chapter concludes with a discussion of integrating workflow input forms into a workflow template. Our discussion focuses on a sample Visual Studio project named LitwareWorkflows that accompanies this chapter. The LitwareWorkflows project contains a single WF program named LitwareApproval, along with a feature that defines a workflow template. The workflow template integrates each of the four different types of workflow input forms. By becoming familiar with the LitwareWorkflows sample project, you can learn the basic techniques that enable you to develop and integrate custom workflow input forms into the workflow templates that you create.
Open the project named LitwareWorkflows and take a moment to become familiar with all of the source files inside. As you can see from Figure 8-16, a file named LitwareApproval.cs contains the definition for the WF program itself. Next, three XML files are used to define the feature named LitwareWorkflows that installs the workflow template within a WSS farm. At this point in the chapter, you should already have a general understanding about how to create a WF program and the feature used to install it as a workflow template. We will now focus on how the other source files inside the LitwareWorkflows project are used to integrate workflow input forms.
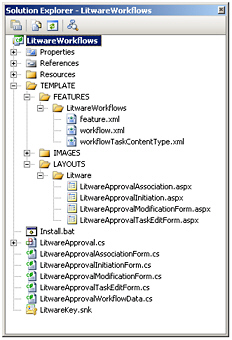
Figure 8-16: The LitwareWorkflows project demonstrates how to implement the four different types of workflow input forms.
The LitwareWorkflows project contains four different .aspx files to supply each of the four available types of input forms: an association form, an initiation form, a modification form, and a task edit form. Note that all of these forms are implemented as custom application pages that are deployed within the LAYOUTS directory. As you remember, the fundamental concepts of developing and deploying custom application pages were covered in Chapter 2, “SharePoint Architecture.”
It is recommended that you do not deploy your custom application pages directly inside the LAYOUTS directory. Instead, you should create a company-specific directory inside the LAYOUTS directory to deploy your custom application pages. The LitwareWorkflows project is structured to deploy its four custom application pages within a custom Litware directory that is nested inside the LAYOUTS directory.
Open the file named workflow.xml and inspect the definition of the Workflow element that defines the workflow template. You should see the attributes named AssociationUrl, InstantiationUrl, and ModificationUrl that contain references to three of the workflow input forms.
<Workflow Id="" Name="Litware Approval" Description="Sample workflow template demonstrating workflow input forms" CodeBeside CodeBesideAssembly="LitwareWorkflows, [full 4-part assembly name]" AssociationUrl="_layouts/Litware/LitwareApprovalAssociation.aspx" InstantiationUrl="_layouts/Litware/LitwareApprovalInitiation.aspx" ModificationUrl="_layouts/Litware/LitwareApprovalModificationForm.aspx" TaskListContentType > <MetaData> <Modific_Name> Modify workflow instance with a custom Litware form </Modific_Name> </MetaData> <Categories/> </Workflow> While there are attributes containing references to three of four of the workflow input forms, there is no reference to the task edit form because you do not integrate a task edit form in the same fashion as the other three types of workflow input forms. Instead, if you want a custom form as opposed to the standard WSS task edit form, you must create a custom content type that inherits from the standard workflow task content type. When you create a custom content type for a custom workflow task, you can define it to use its own custom edit form, which is the approach used in the LitwareWorkflows project. Note that within the Workflow element inside workflow.xml is a TaskListContentTypeId attribute that is configured with the ID content type, which identifies the custom content type defined inside workflowTaskContentType.xml.
Walk Through Using the Litware Approval Workflow Input Forms
To test the workflow template and workflow input forms defined by the LitwareWorkflows project, you must do three things. First, you must install the assembly named LitwareWorkflow.dll into the GAC. Second, you must copy all of the files that need to be deployed inside the TEMPLATES directory. Third, you must install the feature that defines the workflow template. The LitwareWorkflows project contains an install.bat file that automates all three steps. You can run this batch file simply by building the LitwareWorkflows project.
Once you build the LitwareWorkflow project, you should then be able to activate the feature with the Litware Approval workflow template within any site collection within the farm. Next, create a new site collection or navigate to an existing site collection so that you can test this workflow template. Once you navigate to a top-level site within this site collection, go to the standard application page that allows you to activate site collection features. You should see the feature titled A Sample Feature: Litware Workflows. Activate this feature to make its workflow template available within the site collection. At this point, you should be able to use the workflow template to create a new workflow association.
Custom Association Forms
It’s now time to create a new list (or document library) so that you have a place to create a new workflow association from the Litware Approval workflow template. Once you create the new list, go to the List Settings page and click the Workflow Settings link to the page on which you can view the existing workflow associations. Click the Add A Workflow link to navigate to the standard application page named AddWrkfl.aspx, which allows you to create a new workflow association for the list. You should see Litware Approval as an available workflow template, as shown in Figure 8-17.
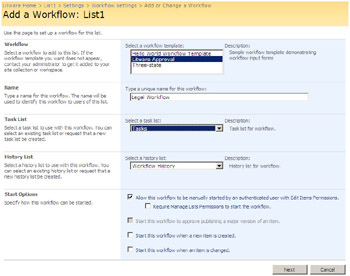
Figure 8-17: The standard application AddWrkfl.aspx page is always shown before a custom association form.
The AddWrkfl.aspx page allows the user to select a workflow template, provide a unique name, and parameterize other standard aspects of a workflow association. For example, the user can parameterize the workflow association to use an existing task list and history list. The user can alternatively choose to create a new task list and/or new history list. Continue the walk-through by selecting the Litware Approval workflow template, giving the new workflow association the name Legal Approval, and then clicking Next.
Here’s an important question. What happens when a user clicks the Next button on the AddWrkfl.aspx page? The answer depends on whether your workflow template is configured with an association form. If your workflow template is not configured with an association form, the code behind the Next button executes all of the logic required to create the workflow association and create a new task list and new history list if necessary.
However, if your workflow template is configured with an association form, clicking Next simply redirects the user to that association form. When you click Next to create the Legal Approval workflow association in the walk-through, you should be redirected to the custom association form named LitwareApprovalAssociation.aspx, as shown in Figure 8-18.
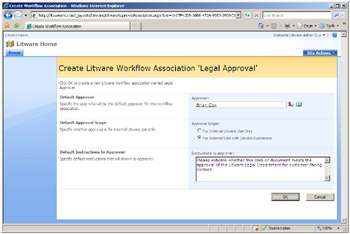
Figure 8-18: A custom workflow association form is used to gather parameterization information for a new workflow association.
An important observation is that when you configure a workflow template with a custom association form, you then take on the responsibility of supplying the code to create the new workflow association. You must also supply the code to create a new task list and/or new history list if that is what the user requests.
Take a moment and consider the primary purpose of a custom association form. It’s used to prompt users for extra parameterization data whenever they create a new workflow association. In the case of the Litware Approval workflow template, the association form is used to obtain default values for the approver, the approval scope (internal versus external), and instructions to the approver. When a user enters data into this association form and clicks OK, your code must serialize the user input values into a string that is saved as association data. The association data are then used by the initiation form each time a user starts a new workflow instance from the workflow association.
Implementing a Custom Association Form
We will now walk through some implementation details of the association form. Open LitwareApprovalAssociation.aspx and inspect what’s inside. You should notice that this source file does not contain any code inside. Instead, it simply contains input controls, two command buttons, and layout details. The actual code for the association form is written into a class named LitwareApprovalAssociationForm that is compiled into the same assembly DLL as the WF program itself, LitwareWorkflows.dll. If you look at the Page directive within LitwareApprovalAssociationForm.aspx, you can see that it is defined to inherit from the code-behind class named LitwareApprovalAssociationForm.
Open the source file named LitwareApprovalAssociationForm.cs and examine the class inside that defines the behavior for LitwareApprovalAssociationForm.aspx. You can see that the LitwareApprovalAssociationForm class inherits from the LayoutsPageBase, which follows the best practice for developing custom application pages. You might also notice that this class contains over 300 lines of code even though this is a fairly simple example about creating a custom association form. The high-level structure for this class definition looks like the following code:
public class LitwareApprovalAssociationForm : LayoutsPageBase { // control fields // form-level variables protected override void OnLoad(EventArgs e) {...} protected void PopulateFormDataFromString(string AssociationData){...} protected string SerializeFormDataToString(){...} protected void UpdateAssociation(SPWorkflowAssociation wfa, SPList TaskList, SPList HistoryList) {...} public void cmdCancel_OnClick(object sender, EventArgs e) {...} public void cmdSubmit_OnClick(object sender, EventArgs e) {...} protected override void OnPreRender(EventArgs e) {...} } LitwareApprovalAssociationForm.aspx defines several input controls to gather input data from the user. For example, it defines an instance of the WSS PeopleEditor control that provides a handy technique when you need a user to select another user, such as the approver. The following example demonstrates what the control tag looks like inside LitwareApprovalAssociationForm.aspx.
<SharePoint:PeopleEditor AllowEmpty="false" ValidatorEnabled="true" MultiSelect="false" runat="server" SelectionSet="User" width='300px' />
When you have an .aspx file and a code-behind class, there is a handy technique in ASP.NET programming in which the code-behind class defines a control field by using the same name as a control instance in the .aspx page. When the ASP.NET runtime compiles the .aspx file, it adds support to create the control instance and assign a reference to the control field in the code-behind class. This makes it possible for methods within the code-behind class to access the control instances defined inside the .aspx file. All of the workflow input forms in the LitwareWorkflows project rely on this technique. For example, the LitwareApprovalAssociationForm class defines a control field named pickerApprover to match the control instance defined in LitwareApprovalAssociationForm.aspx.
public class LitwareApprovalAssociationForm : LayoutsPageBase { // define control field with name that matches .aspx file protected PeopleEditor pickerApprover; } The benefit to using this technique is that now all of the methods within the LitwareApprovalAssociationForm class have direct access to all of the control instances defined inside LitwareApprovalAssociationForm.aspx. This is important because the code-behind class must provide the code to initialize input controls with default values and retrieve the input values that are entered by users.
Now, examine the form-level variables (that is, fields) in the LitwareApprovalAssociationForm class and then walk through the code inside the OnLoad method. You can see that the code in this event handler retrieves parameter values that are passed by WSS and uses them to initialize strings, GUIDs, and various objects from the WSS object model. You can also see that the code in the OnLoad event must determine whether the workflow association is being created on a list, a site-level content type, or a list-level content type. If the new workflow association is being created on a list, conditional code behind the OK button executes this code:
WorkflowAssociation = SPWorkflowAssociation.CreateListAssociation(WorkflowTemplate, WorkflowAssociationName, TaskList, HistoryList);
However, when the workflow association is being created on a content type in the two other possible scenarios, the code behind the OK button must be conditionally programmed to call either CreateSiteContentTypeAssociation or CreateListContentTypeAssociation instead of CreateListAssociation. The code must also deal with the scenario in which the user is updating an existing workflow association instead of creating a new one. In this scenario, the code must call the UpdateWorkflowAssociation method on either an SPList object or SPContentType object.
A utility method named UpdateAssociation accepts an SPWorkflowAssociation object and makes the necessary changes to prepare the object to be saved. As you can see, your code must deal with whatever options are selected by the user, such as whether the workflow association should be configured to automatically start new workflow instances or whether to allow users to start workflow instances manually.
protected void UpdateAssociation(SPWorkflowAssociation wfa, SPList TaskList, SPList HistoryList) { wfa.Name = WorkflowAssociationName; wfa.AutoStartCreate = (Request.Params["AutoStartCreate"] == "ON"); wfa.AutoStartChange = (Request.Params["AutoStartChange"] == "ON"); wfa.AllowManual = (Request.Params["AllowManual"] == "ON"); wfa.AssociationData = SerializeFormDataToString(); if (wfa.TaskListTitle != TaskList.Title) { wfa.SetTaskList(TaskList); } if (wfa.HistoryListTitle != HistoryList.Title) { wfa.SetHistoryList(HistoryList); } } The other important aspect of implementing an association form is how to manage user input values. The values that a user enters into the form’s input controls must be serialized as a string and then saved to the AssociationData property of the SPWorkflowAssociation object. When a user chooses to modify an existing workflow association, the current value of the AssociationData property must be deserialized and then used to populate the form’s input controls during initialization.
Note that the examples of serializing and deserializing data used in the LitwareWorkflows project involve the use of a schema-generated class named LitwareApprovalWorkflowData. This class can be used together with the XmlSerializer class to create strong-typed .NET objects that can be converted back and forth with XML documents that adhere to the following XML format:
<LitwareApproval> <Approver>LITWAREINC\BrianC</Approver> <ApprovalScope>Internal</ApprovalScope> <Instructions>This is a sample instruction</Instructions> <Comments>This is a sample comment</Comments> </LitwareApproval>
The LitwareApprovalAssociationForm class supplies two methods, named SerializeFormDataToString and PopulateFormDataFromString. These methods are used to move input data back and forth between the form’s input controls and a serialized string that is saved back to the AssociationData property prior to creating or updating the workflow association. The following example displays the implementation of the SerializeFormDataToString method.
protected string SerializeFormDataToString() { LitwareApprovalWorkflowData FormData = new LitwareApprovalWorkflowData(); PickerEntity ApproverEntity = (PickerEntity)pickerApprover.Entities[0]; FormData.Approver = ApproverEntity.Key; if (radInternalApproval.Checked) { FormData.ApprovalScope = "Internal"; } else { FormData.ApprovalScope = "External"; } FormData.Instructions = txtInstructions.Text; using (MemoryStream stream = new MemoryStream()) { XmlSerializer serializer = new XmlSerializer(typeof(LitwareApprovalWorkflowData)); serializer.Serialize(stream, FormData); stream.Position = 0; byte[] bytes = new byte[stream.Length]; stream.Read(bytes, 0, bytes.Length); return Encoding.UTF8.GetString(bytes); } } You can see how most of the pieces fit together when it’s time to create and parameterize a new workflow association. You can now understand the following code behind the association form’s OK button, which is written to create and parameterize a new workflow association and then to append it to the collection of workflow associations for the target list.
WorkflowAssociation = SPWorkflowAssociation.CreateListAssociation(WorkflowTemplate, WorkflowAssociationName, TaskList, HistoryList); UpdateAssociation(WorkflowAssociation, TaskList, HistoryList); List.AddWorkflowAssociation(WorkflowAssociation); The final implementation detail that warrants your attention is the logic in the association form that’s responsible for creating a new task list and new history list when required. It’s a bit peculiar, but WSS places a z character at the beginning of the incoming list name to indicate that it is the name for a new list that needs to be created. There is logic in the OnLoad method to initialize Boolean variables named NewTaskListRequired and NewHistoryListRequired with a value of true or false. The first few lines of code behind the OK button then execute the following code:
if (NewTaskListRequired) { Guid TaskListId = Web.Lists.Add(NewTaskListName, "Workflow Tasks", SPListTemplateType.Tasks); // obtain reference to SPList item TaskList = Web.Lists[TaskListId]; } if (NewHistoryListRequired) { Guid HistoryListId = Web.Lists.Add(NewHistoryListName, "Workflow History", SPListTemplateType.WorkflowHistory); // obtain reference to SPList item HistoryList = Web.Lists[HistoryListId]; } As you can see, association forms require a good deal of code. However, you can also see that much of this code is boilerplate in nature and, once written, it can be generically reused across association forms for many different workflow templates.
Custom Initiation Forms
It is now time to discuss the creation of a custom initiation form. Let’s start the discussion by conducting a walk-through of the user experience. Once the user creates the Legal Approval workflow association from the Litware Approval workflow template, the user should then be able to see the association from the standard application page named Workflow.aspx, as shown in Figure 8-19. Recall that the user can navigate to the Workflow.aspx page by selecting the Workflow menu item from the ECB menu for an item or document.
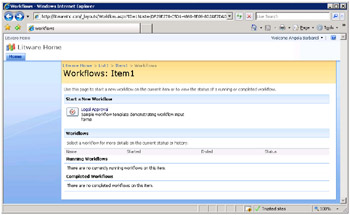
Figure 8-19: The Workflow.aspx page allows users to initiate workflow instances from any available workflow associations.
From the Workflow.aspx page, a user can click on the link to any available workflow association to start a new workflow instance. If the underlying workflow template is not configured with an initiation form, WSS automatically starts the workflow instance. However, when the underlying workflow template is configured with an initiation form, the user is then redirected to it.
In our scenario, click the Legal Approval link, which takes you to LitwareApprovalInitiation.aspx, as shown in Figure 8-20. You can see that the initiation form’s input controls initially display the default values from the AssociationData property of the workflow association. This gives the user the ability to leave the default values as they are or make whatever changes make sense for the particular workflow instance being created.
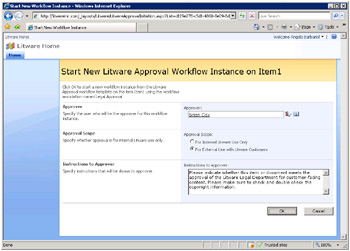
Figure 8-20: A custom initiation form gives the developer a chance to prompt the user for parameterization data that can be passed to the WF program when the new workflow instance is activated.
We want to make one minor point before moving on to discuss the implementation details of creating a custom initiation form. Custom initiation forms can be used only with workflow associations that allow the user to manually start workflow instances through the Workflow.aspx page. You cannot present the user with an initiation form in scenarios in which you have configured a workflow association to automatically start new workflow instances whenever a new item is added to a list or a new document is uploaded to a document library. These types of scenarios do not provide a natural flow to present the user with a custom initiation form and are therefore not supported by WSS.
Implementing a Custom Initiation Form
If you look inside LitwareApprovalInitiation.aspx, you observe that the input control tags and page layout are almost identical to those in LitwareApprovalAssociation.aspx. This makes sense because the association form is used to obtain default values for all workflow instances, and the initiation form then gives the user the opportunity to see these default values and optionally change them when starting a particular workflow instance.
LitwareApprovalInitiation.aspx relies on a code-behind base class named LitwareApprovalInitiationForm. The high-level structure for the LitwareApprovalInitiationForm class definition looks like the following code:
public class LitwareApprovalInitiationForm : LayoutsPageBase { // control fields // form-level variables protected override void OnLoad(EventArgs e) {...} protected void PopulateFormDataFromString(string AssociationData){...} protected string SerializeFormDataToString(){...} public void cmdCancel_OnClick(object sender, EventArgs e) {...} public void cmdSubmit_OnClick(object sender, EventArgs e) {...} protected override void OnPreRender(EventArgs e) {...} } The OnLoad method uses incoming parameters passed by WSS to create a new SPWorkflowAssociation object. It then uses this SPWorkflowAssociation object to obtain association data from the current workflow association so that it can make a call to the PopulateFormDataFromString method to initialize the form’s input controls with default values. When the user changes the values within these input controls and clicks OK to start a new workflow instance, logic exists to call SerializeFormDataToString to serialize these data into a form-level variable named InitiationData. After that, there is a call to start the actual workflow instance.
When you need to start a workflow instance, you interact with an SPWorkflowManager object. The SPWorkflowManager object is exposed through the WorkflowManager property on the SPSite obect that represents the current site collection. The SPWorkflowManager object provides a method named StartWorkflow that does exactly what its name suggests.
Web.Site.WorkflowManager.StartWorkflow(ListItem, WorkflowAssociation, InitiationData); Now take a moment to consider how the two workflow input forms you have seen so far interact with the WF program. You should realize that all of the code behind the association and initiation forms execute before the WF program starts running. It is not until the point at which the user clicks the OK button on the initiation form and the call to StartWorkflow is made that the WF program is called into action. At that point, code in the event handler of the OnWorkflowActivated activity of LitwareApproval.cs is able to retrieve the initiation data, deserialize them, and store them in fields defined within the WF program.
public class LitwareApproval : SequentialWorkflowActivity { // fields to store initiation data from initiation form public string Approver = default(string); public string ApprovalScope = default(string); public string ApproverInstructions = default(string); private void onWorkflowActivated1_Invoked(...) { // deserialize initiation data; string InitiationData = workflowProperties.InitiationData; XmlSerializer serializer = new XmlSerializer(typeof(LitwareApprovalWorkflowData)); XmlTextReader reader = new XmlTextReader(new StringReader(InitiationData)); LitwareApprovalWorkflowData FormData = (LitwareApprovalWorkflowData)serializer.Deserialize(reader); // assign form data values to workflow fields Approver = FormData.Approver; ApprovalScope = FormData.ApprovalScope; ApproverInstructions = FormData.Instructions; } }
Custom Modification Forms
Once a workflow instance is in progress, you can supply a modification form that allows users to modify its state. When you properly integrate a modification form, the user is presented with a link on the WrkStat.aspx workflow status page, as shown in Figure 8-21. As you can see, the link to the modification form, Modify This Workflow With Custom Litware Form, is positioned under the standard information about the current workflow instance and above the task list.
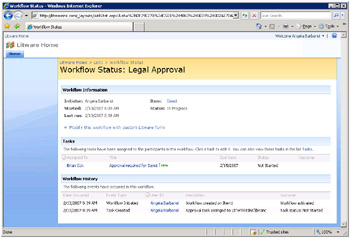
Figure 8-21: The WrkStat.aspx workflow status page displays a link for any active workflow modification.
When you create a workflow modification form, you can design it to display whatever input controls make sense for the modifications a user might want to make to a workflow instance in progress. The modification form used with the Litware Approval workflow template is shown in Figure 8-22. As you can see, it is designed to provide the user who initiated the workflow instance with an opportunity to change the approver, approval scope, and/or instructions while the workflow instance is still awaiting approval.
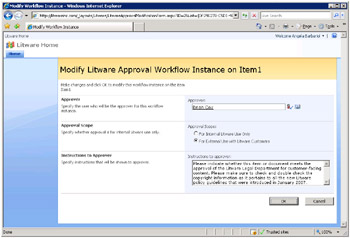
Figure 8-22: A workflow modification form allows users to modify a workflow instance while it is still in progress.
Implementing a Custom Modification Form
Let’s revisit the elements that have been added to workflow.xml and that are used to configure a workflow modification form. The ModificationUrl attribute in the Workflow element references a specific .aspx file, which in this case is LitwareApprovalModificationForm.aspx. Another important element is nested within the MetaData element that defines a specific workflow modification, as shown in the following XML fragment.
<Workflow <!-- other attributes omitted for clarity --> ModificationUrl="_layouts/Litware/LitwareApprovalModificationForm.aspx" > <MetaData> <Modific_Name> Modify workflow instance with a custom Litware form </Modific_Name> </MetaData> </Workflow> Though a workflow template can have only one workflow modification form, it can have more than one modification. Each modification is identified through a unique GUID and is defined using an element nested within the MetaData element that follows this form:
<Modification_SomeGuid_Name>
Inside this Modification element is text that is used to provide the caption for the link that the user will see on WrkStat.aspx. You have seen what needs to be set up in terms of declarative logic within the feature for the workflow template. However, the next section is somewhat tricky because you must add two different activities to your WF program to make the workflow modification work properly.
| Tip | Due to a bug in this version of WSS, any GUID used for a Modification ID must contain only lowercase letters. Things will not work properly if you use a GUID that contains uppercase letters. |
First, you must add a method activity of type EnableWorkflowModification. This activity is used to make the modification active at a specific point within the life cycle of each workflow instance. Secondly, you must add an event activity named OnWorkflowModifed. This activity listens for the occurrence of modifications by users and responds by firing an event handler that executes whatever logic you provide.
You must decide at what point in time you want a modification to become active within the life cycle of a workflow instance. In the case of the LitwareApproval workflow template, the modification is designed to become active after the approval task is created so that workflow instance initiators can access the modification form while waiting for the approvers to do their work.
The technique for making a modification active requires creating an activity from the EventHandlerScope activity type supplied by the WF base activity library. You must then add a Sequence activity so that you can add several child activities inside the EventHandlerScope activity. Next, you should add an EnableWorkflowModification activity as the first activity that executes within the EventHandlerScope activity, as shown in Figure 8-23. The EnableWorkflowModification activity is a method activity that activates the modification and makes the link show up on the WrkStat.aspx page.
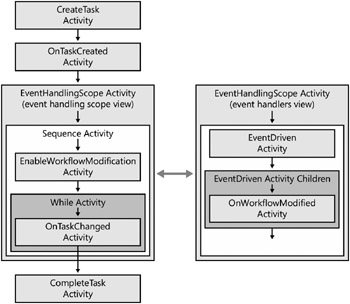
Figure 8-23: You can use an EnableWorkflowModification activity and an OnWorkflowModified activity within the scope of an EventHandlerScopeActivity activity to make a workflow modification active.
The next step is to set up the listener by using the OnWorkflowModifed event activity type. If you right-click the EventHandlingScope activity in the workflow designer, you notice various viewing options, including View EventHandlingScope and View Event Handlers. You need to switch over to the View Event Handlers to add and configure the OnWorkflowModifed activity.
Once you switch over to View Event Handlers, you can add an activity of the EventDriven activity type to the EventHandlingScope activity, which then makes it possible to add an event activity that acts as a listener. In the case of the Litware Approval workflow template, a single EventDriven activity contains the OnWorkflowModified activity. The main concept to grasp here is that the event handler for the OnWorkflowModified activity fires when the user updates information in the modification form and clicks the OK button.
Each modification relies on a GUID and a correlation token. The GUID for a modification is hard-coded into the workflow template inside the workflow.xml file. When you add an EnableWorkflowModification activity and an OnWorkflowModified activity to a WF program to activate a modification, you must configure the ModificationId property of both activities with this GUID. You must also create a new correlation token and assign it to both activities. Note that you can create the correlation token by using the same technique you used with task-related activities. You should be able to see that the two modification activities in LitwareApproval.cs are configured with a correlation token named modificationToken. It is also important to point out that the OwnerActivityName for the correlation token named modificationToken is configured as the activity named eventHandlingScopeActivity and not the workflow program named LitwareApproval.
When you create a modification, you must add code to the WF program to pass any initialization data to the modification form that it needs. In our case, the WF program must pass the same data that the user enters on the initiation form. However, these data now exist only within the fields of the WF program. Therefore, the event handler of the EnableWorkflowModification must serialize the form data again and assign them to a field named modificationContextData that is data bound to the ContextData property of the EnableWorkflowModifcation activity. This now makes it possible for code inside the modification form to retrieve these context data.
The LitwareApprovalModificationForm class defines the following fields as form-level variables.
// form-level variables protected SPList List; protected SPListItem ListItem; protected SPWorkflow WorkflowInstance; protected Guid ModificationID; protected SPWorkflowModification Modification; protected string ContextData;
The OnLoad event then supplies the logic to initialize these fields and retrieve content data passed by the WF program by accessing the ContextData property of the SPWorkflowModification object.
// Retrieve parameters passed by WSS string paramList = Request.Params["List"]; string paramID = Request.Params["ID"]; string paramWorkflowInstanceID = Request.Params["WorkflowInstanceID"]; string paramModificationID = Request.Params["ModificationID"]; // Initialize form-level variables by creating WSS objects List = Web.Lists[new Guid(paramList)]; ListItem = List.GetItemById(Convert.ToInt32(paramID)); WorkflowInstance = ListItem.Workflows[new Guid(paramWorkflowInstanceID)]; ModificationID = new Guid(paramModificationID); Modification = WorkflowInstance.Modifications[ModificationID]; ContextData = Modification.ContextData;
Once the form initializes the data for the ContextData field, it can populate the input controls for the modification in a fashion similar to that used in the association and initiation forms. The final step in implementing the modification form is to add code behind the OK button that calls the ModifyWorkflow method on the WorkflowManager to pass the updated context data back to the WF program in a serialized form.
ContextData = SerializeFormDataToString(); Web.Site.WorkflowManager.ModifyWorkflow(WorkflowInstance, Modification, ContextData);
At this point, control is returned back to the WF program. The event handler for the OnWorkflowModified activity fires and allows your code to do whatever it needs to do with the updated context data. Note that you must data-bind the ContextData property on the OnWorkflowModified activity to a field within the WF program to obtain access to the data that are passed back from the modification form. Once you do this, your event handler can write the updated values from the context data into the fields of the WF program that are used to persist the data for the current workflow instance.
Custom Task Edit Forms
We have now reached the fourth and final type of workflow input form: the task edit form. You should design and implement a custom task edit form when you want to take over the user experience when it’s time for a user to complete a task. In the example of the Litware Approval workflow template, a custom edit task named LitwareApprovalTaskEditForm.aspx, shown in Figure 8-24, is presented to users when they are ready to approve or reject an approval request.
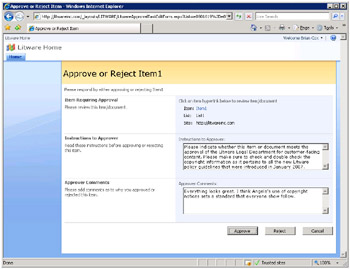
Figure 8-24: A custom task edit form allows you to take over the user experience when a user needs to complete a workflow-specific task.
You should see that there is an obvious benefit to using a custom task edit form. Instead of relying on the standard workflow task edit form, you can add extra command buttons, such as Approve and Reject, and direct the user’s attention to the data and input values that matter to complete the task at hand. This can greatly help to streamline the human element when automating a business process, such as document approval.
Implementing a Custom Task Edit Form
Implementing a custom task edit form begins with creating a custom content type that inherits from the workflow task content type that is part of WSS. As you recall, we covered the basics of creating custom content types in Chapter 6, “Lists and Content Types.” You should reread that section if you need a refresher on all of the details. The custom content type created for the Litware Approval workflow template is defined inside workflowTaskContentType.xml as follows:
<Elements xmlns="http://schemas.microsoft.com/sharepoint/"> <ContentType Name="Litware Workflow Task" Group="Litware Content Types" Description="Create a Litware Workflow Task" Version="0" Hidden="FALSE" > <FieldRefs> <FieldRef Name="Notes" DisplayName="Instructions"/> <FieldRef Name="Comments" DisplayName="Comments"/> </FieldRefs> <XmlDocuments> <XmlDocument NamespaceURI="http://schemas.microsoft.com/sharepoint/v3/contenttype/forms/url"> <FormUrls xmlns="http://schemas.microsoft.com/sharepoint/v3/contenttype/forms/url"> <Edit>_layouts/LITWARE/LitwareApprovalTaskEditForm.aspx</Edit> </FormUrls> </XmlDocument> </XmlDocuments> </ContentType> </Elements> The content type ID for the standard workflow task content type is 0x010801. Therefore, any content type that derives from this must use a value of 0x010801 as the first part of its content type ID. You can also see that this custom content type definition adds two extra fields named Instructions and Comments. These fields are used to store extra data in the tasks created to assist in the Litware approval process.
Finally, note the XmlDocument section at the bottom of the content type definition. This section demonstrates the technique used to integrate the custom task edit form into a workflow template. When a user chooses to edit an approval task, WSS presents the user with the LitwareApprovalTaskEditForm.aspx page instead of the standard workflow task edit form.
Code inside the OnLoad method of the LitwareApprovalTaskEditForm class is able to retrieve the instructions that were written into the task when it was created. There is also code behind the Approve and Reject buttons that call the static AlterTask method of the SPWorkflowTask class. This method accepts a HashTable of named properties and causes the event handler for the OnTaskModified activity within the WF program to fire.
Hashtable taskHash = new Hashtable(); taskHash["Comments"] = txtComments.Text; taskHash["TaskStatus"] = "Completed"; taskHash["WorkflowOutcome"] = "Approved"; SPWorkflowTask.AlterTask(TaskItem, taskHash, true);
Choosing Between .aspx Forms and InfoPath Forms
We have walked you through the implementation details required to integrate all four different types of custom workflow input forms into a workflow template using .aspx files. As you can see, there are quite a few programming issues that you need to manage in the code that is written behind these .aspx pages. Now that you have seen what’s required to integrate custom workflow input forms the hard way, it’s important that you evaluate whether this approach is necessary for a given development scenario.
If you are developing workflow templates that run exclusively in a MOSS environment, you have the much easier option of building your custom workflow input forms by using the forms designer of Microsoft InfoPath 2007. The InfoPath forms designer provides you with a significantly more pleasant experience for creating the user interface for a workflow input form. More importantly, it also relieves you of the responsibility of writing any code behind .aspx pages. MOSS supplies standard .aspx pages and code for you. The only code you need to write when integrating InfoPath forms into a workflow template is the code that goes into the WF program that serializes data and passes them back and forth with the InfoPath forms.
While using InfoPath to create custom workflow input forms increases your productivity, there is an obvious catch. The workflow templates you create then have a dependency on MOSS and cannot run in any WSS farms that do not have MOSS installed. Creating workflow templates that integrate workflow input forms using .aspx is far more flexible because these templates can be deployed within any WSS farm whether MOSS has been installed or not.
EAN: N/A
Pages: 92