Site Customization
Now that you have created your first site collection, you must decide how to configure it and how to customize its top-level site. WSS provides many options for configuring and customizing sites. We will start by exploring the various options that are available to users who have been assigned administrative privileges at the site collection level.
In the top-right corner of the page, you can see the Site Actions menu. This menu provides commands that allow you to create new site elements, customize the current page, and navigate to the Site Settings page. It is important to note that this is a menu that provides security trimming. That means that although someone with administrative privileges will see all the Site Actions menu commands, less privileged users will see a reduced set of commands. For site visitors with read-only access, the Site Actions menu will be completely hidden.
The Site Settings Page
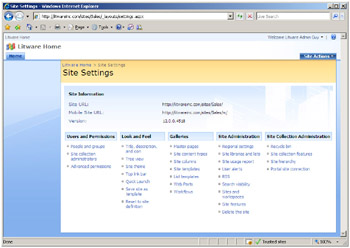
The Site Settings page provides links to pages that allow you to perform various administrative and customization tasks. The standard Site Settings page for a top-level site is shown in Figure 1-8.

Figure 1-8: Each site provides a Site Settings page that provides various configuration and customization options.
If you are new to WSS, you should take some time to explore all of the administrative pages that are accessible through the Site Settings page. Note that the Site Settings page for a top-level site contains one section for Site Administration and a second section for Site Collection Administration. The Site Settings page for child sites will not include the section for Site Collection Administration.
You can see that there is a Users And Permissions section dedicated to security configuration as well as a Look And Feel section for changing the appearance of the user interface and navigation options. There is also a Galleries section that allows you to see and configure various elements within the current site such as master pages, site columns, and content types. Over the next few chapters, we will explore each of these galleries in depth.
The Create Page
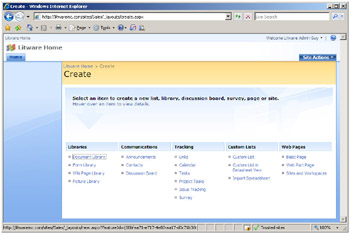
The Site Actions menu also provides the Create menu command, which takes you to the Create Page, as shown in Figure 1-9. The functionality provided to users by the Create Page is one of the most enabling aspects of WSS. That is because the Create Page allows users to customize the current site by creating new site elements on demand such as lists, document libraries, Web Part Pages, and child sites.

Figure 1-9: The Create Page allows users to provision new site elements on demand.
The Create Page shown in Figure 1-9 contains links for the standard element types that are available out-of-the-box with WSS. These standard element types have been designed to facilitate team-level collaboration. They include list types for collaborating on list-based items such as announcements, contacts, links, calendar events, tasks, and issue tracking.
The standard collaboration features of WSS also include support for creating several different types of document libraries. In addition to the standard document library type, there are also more specialized document library types for picture libraries and wikis.
While the Create Page is great for users with site administrator privileges, it will interest developers as well. The set of creatable element types seen by the user on the Create Page is completely extensible. Throughout this book, you will see several different techniques you can use to add custom element types, such as your own list types and document library types that have been designed to solve a unique business problem. What’s nice about this is that your custom element types will show up right alongside the standard WSS element types, presenting a very consistent experience for users as they provision new elements within their sites.
Creating Lists and Document Libraries
WSS makes it extremely easy for a user with the proper permissions to customize a site by creating new lists and document libraries. The user simply clicks on the link for the desired list type on the Create Page and is then taken to another page and prompted to enter a name and description for the list. Note that the names of lists and document libraries must be unique within the scope of the current site.
Once a list or a document library has been created, it is ready for use. Each list and document library provides a set of pages that allows users to add, view, modify, and delete items and documents. You should now create one or more lists in your new blank site so you can continue to follow along with the next section.
Customizing Lists with the List Settings Command
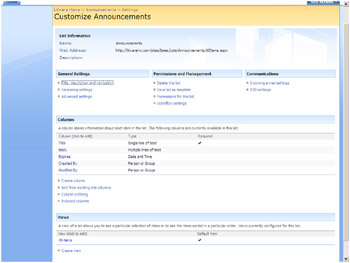
WSS is very flexible in that it allows users to customize many aspects of an existing list or document library. Each list provides a toolbar with a Settings menu. The Settings menu provides a List Settings command that takes the user to a special page, shown in Figure 1-10. The resulting page has a title with the word Customize and then the name of the list. For example, the title generated by List Settings for the Announcements list will be Customize Announcements.

Figure 1-10: The List Settings command displays a page allowing users to customize a list.
The List Settings command allows the user to customize a list’s properties such as its name and whether it is shown as a link in the Quick Launch navigation section. This Settings page also allows the user to configure other important aspects of the list including security and versioning. The List Settings page also provides users with the flexibility to customize a list or document library by adding, removing, and modifying columns and views.
Site Customization and Personalization Using Web Parts
The inclusion of Web Part technology is one of the most powerful aspects of WSS. Web Part Pages provide each site with an extensible HTML-based user interface.
Let’s take a moment and examine a Web Part Page from the perspective of a Web Part consumer. If you are a site administrator, you can select the Edit Page command from the Site Actions menu on the home page of a site to enter into a customization mode where you can move, add, modify, or delete Web Parts. Changes made to Web Parts in this mode are referred to as customizations because they are seen by all the users of the site.
WSS also provides less privileged users with the ability to personalize Web Part Pages by adding and modifying Web Parts. Keep in mind that WSS uses the terms customization and personalization to mean different things. Customization changes are seen by all users. Personalization changes are seen by only the user who made them. WSS is smart enough to store the shared customization data and private personalization data separately in the content database. In code, you will see this referred to as shared storage and personal storage. A Web Part page is laid out in terms of Web Part zones. A Web Part is added to a Web Part page by being placed within a Web Part zone. WSS allows users to create new Web Part pages using a preprovided set of templates. With the browser, you can use one of these Web Part page templates to create a new Web Part page with a predefined layout of zones. When a user creates a new Web Part page using the browser, the resulting Web Part page must be created within the context of a document library.
EAN: N/A
Pages: 92