Recipe 9.27. Animating with Transparency
ProblemYou want to add some simple animation to a form and make it interesting enough to catch the user's eye without being overbearing or distracting. SolutionSample code folder: Chapter 09 \TransparentAnimation One idea is to use a timer to redraw graphics whose transparency varies over time. DiscussionThere are many ways to add simple animation to your graphics, and adjusting the transparency is just one simple trick that can add an interesting and creative effect to your images. This example also demonstrates how the alpha setting of a color changes drawings through the full range of transparency, from completely invisible to completely opaque. Create a new Windows Forms application, and add a Timer control named Timer1. Set its Interval property to 10 (milliseconds) and its Enabled property to true. Also, set the form's DoubleBuffered property to TRue. A good way to drive the animation action is by redrawing with each tick of a timer. Notice that the drawing commands are not done in the timer's Tick event. Instead, you tell the form to refresh itself and add the graphics commands where they really belongin the form's Paint event. Add the following code to the form's class template to have the timer trigger screen updates: Private Sub Timer1_Tick(ByVal sender As System.Object, _ ByVal e As System.EventArgs) Handles Timer1.Tick ' ----- Update the animated display. Me.Refresh() End Sub The form's Paint event is called at the rate set by the Interval property of the timer. The 10-milliseconds setting provides a fairly smooth and noticeable transparency transition. Use a larger number for slower, more subtle action. The currentSetting variable increments or decrements each time through the Paint event handler, with the change amount reversing direction when 0 or 255 is reached: Private Sub Form1_Paint(ByVal sender As Object, _ ByVal e As System.Windows.Forms.PaintEventArgs) _ Handles Me.Paint ' ----- Display the next step in the animation. Static currentSetting As Integer = 0 Static changeFactor As Integer = 1 Dim transparentGreen As Color Dim canvas As Graphics = e.Graphics Dim trianglePoints() As Point = {New Point(180, 50), _ New Point(30, 280), New Point(330, 280)} ' ----- Adjust the transparency factor. currentSetting += changeFactor If (currentSetting = 0) Or (currentSetting = 255) Then ' ----- Change direction. changeFactor = -changeFactor End If The following line is the heart of this example; it shows how to create a color with a controllable degree of transparency. You can pass just red, green, and blue values to Color.FromArgb() to create a solid shade, or you can add the fourth parameter, called alpha, to control the color's transparency. The values of all four parameters range from 0 to 255. Anything drawn with the designated color will be drawn with the indicated amount of transparency: ' ---- Set the transparent green color. transparentGreen = Color.FromArgb(currentSetting, 0, 255, 0) These statements draw the solid geometric objects in the background, in preparation for drawing a transparent triangle in front of them: ' ----- Draw some geometric figures. canvas.FillEllipse(New SolidBrush(Color.Red), _ 10, 20, 200, 150) canvas.FillRectangle(New SolidBrush(Color.Blue), _ 100, 100, 250, 100) There is no GDI+ method to draw a triangle, per se. But a triangle is just a three-sided polygon, so it's easy to use the DrawPolygon() or FillPolygon() methods to do the trick. In this case we fill a polygon (triangle) using a solid brush comprised of our current shade of transparent green: ' ----- Draw a transparent green triangle in front. canvas.FillPolygon(New SolidBrush(transparentGreen), _ trianglePoints) End Sub Figure 9-38 shows the graphics with the triangle drawn using an intermediate transparency. Figure 9-38. The triangle in the foreground fades from complete transparency to complete opacity and back again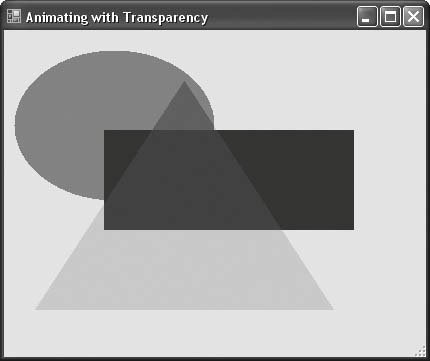 |
EAN: 2147483647
Pages: 400