Data Validation
| Because this sample code uses the Visual Basic Val function to preprocess the user-supplied data, it almost always works without error. Any data considered invalid is simply converted to zero. Another option would be to chastise the user for invalid entry before processing occurs, to validate the supplied values. The five validators in the Validation section of the Web Forms Toolbox help you do just that.
All of these controls perform server-side validation, and they optionally do their data check using client-side scripts (the default). Having the client-side check reduces the need to go back to the web server just to ensure a required field has data. Having the server-side check ensures that the data is valid even if the client has disabled scripting support. The validators display their own error messages, so you place them on the page where you want the error message to appear. You can also have multiple validators display their collective issues in a single location by using a ValidationSummary control. Let's add some validation to the two input fields in the multiplication sample. We want to ensure that the data is supplied, and that both values are valid integers. To do this, we must add both a RequiredFieldValidator and a CompareValidator for each field. Right-click in the bottom-right cell of the table, just after the Product label, and choose Insert
Just to the right of that validator, in the same table cell, add a CompareValidators, and set these properties:
Add a similar pair of validators to the second table row, using "SecondOperand" for the ControlToValidate. Your web page should look like Figure 22-8. Figure 22-8. Bulking up on the validation support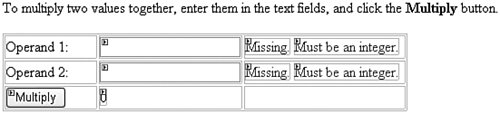 Run the program and just try to enter faulty data in the input cells. The page will complain immediately when you click the Multiply button. That's all the multiplying we'll do for now. I've saved a copy of the project for you in the WebSite1 subdirectory in the main directory where you installed this book's sample code. |
EAN: 2147483647
Pages: 247