Project
| When we last left the Technical Resource Kit document for the Library Project, it listed five built-in reports:
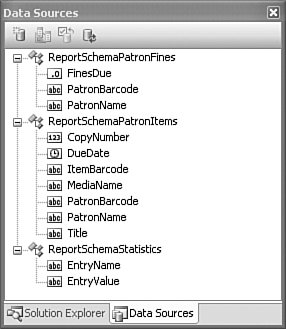
We'll add these five reports to the project in this chapter. Before we write any code, we need to figure out how we're going to get the data. Because the data will come from the Library database, we just need to craft the SQL statement for each report that will link to the designed report. The fifth report, "statistics," will report things such as the number of items, the number of patrons, and other similar statistical values from the Library database. Because this data can't really come from a single SQL statement, we'll extract the data from the database and build a custom data source that feeds into the report. Crafting the SQL StatementsThe first report, "items checked out," lists the patron name and item title for every item currently checked out by the user. It involves the Patron table (to get the patron name), the PatronCopy table (the check-out event), the ItemCopy table (the actual item checked out), and the NamedItem table (where the item title appears). We'll also include the CodeMediaType table, which tells us if the item is a book, a CD, or some other media type. Microsoft SQL Server Management Studio Express includes a visual Query Designer that we can use to design the query. Figure 20-14 shows the five needed tables as linked together by the designer. Figure 20-14. The five tables in the checked-out items query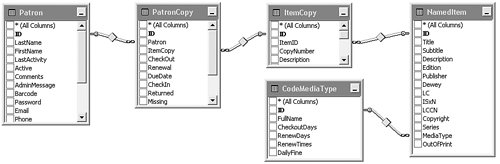 Whether you use the query designer or build the SQL statement by hand, you eventually come up with something similar to the following, which we'll use within the Library application. /* ----- Report #1: Items checked out report. */ SELECT PA.LastName + ', ' + PA.FirstName AS PatronName, PA.Barcode AS PatronBarcode, PC.DueDate, IC.CopyNumber, IC.Barcode AS ItemBarcode, NI.Title, CMT.FullName AS MediaName FROM Patron AS PA INNER JOIN PatronCopy AS PC ON PA.ID = PC.Patron INNER JOIN ItemCopy AS IC ON PC.ItemCopy = IC.ID INNER JOIN NamedItem AS NI ON IC.ItemID = NI.ID INNER JOIN CodeMediaType AS CMT ON NI.MediaType = CMT.ID WHERE PC.Returned = 0 AND PC.Missing = 0 AND IC.Missing = 0 ORDER BY NI.Title, IC.CopyNumber, PA.LastName, PA.FirstName This query links up all of the tables, and then requests every record that has not been returned (PC.Returned = 0). It ignores any item marked as missing (PC.Missing = 0 AND IC.Missing = 0). This query will eventually drive the report. But for now, keep in mind that RDLC reports don't actually need a real SQL statement or database table for the report schema. We can also build a compatible schema by hand using a class. This turns out to be a lot cleaner, because we won't have a lot of data-set-related files strewn throughout the project source code. (The LibraryDataSet data source we created in the sample report earlier in this chapter added four source files and nearly 50K of source code to the project, not counting the RDLC report! The class-based data source didn't add any code other than the class definition itself, and a little bit of XML in the RDLC file.) As for the data source schema, we can extrapolate it from the SELECT clause of the SQL query. If we were to design a class with a matching schema, it would look like this (without the property detail code). Class Report1Schema Public Property PatronName As String Public Property PatronBarcode As String Public Property DueDate As Date Public Property CopyNumber As Integer Public Property ItemBarcode As String Public Property Title As String Public Property MediaName As String End Class The next two reports are for "overdue items" and "missing items." For me, the schema for report #1 is exactly what I want to see in these other two reports, so let's just use the same SQL statement. All we need to do is change the WHERE clause. For the overdue items report, use this WHERE clause. WHERE PC.Returned = 0 AND PC.Missing = 0 AND IC.Missing = 0 AND PC.DueDate < GETDATE() The missing items report will use this WHERE clause. WHERE PC.Missing = 1 OR IC.Missing = 1 The fourth report displays the amount of fines still owed by patrons, so it will require a different schema. Here's its SQL statement, which uses some aggregate grouping features. /* ----- Report #4: Fines owed by patron. */ SELECT PA.LastName + ', ' + PA.FirstName AS PatronName, PA.Barcode AS PatronBarcode, SUM(PC.Fine - PC.Paid) AS FinesDue FROM Patron AS PA INNER JOIN PatronCopy AS PC ON PA.ID = PC.Patron GROUP BY PA.LastName + ', ' + PA.FirstName, PA.Barcode HAVING SUM(PC.Fine - PC.Paid) > 0 ORDER BY PatronName Here's the schema that goes with report number 4. Class Report4Schema Public Property PatronName As String Public Property PatronBarcode As String Public Property FinesDue As Decimal End Class For the final report, we'll just use a schema with two string values: a statistic name, and its related value. Here's its schema. Class Report5Schema Public Property EntryName As String Public Property EntryValue As String End Class Well, that's enough preparation. Let's start coding. Project Access Load the "Chapter 20 (Before) Code" project, either through the New Project templates, or by accessing the project directly from the installation directory. To see the code in its final form, load "Chapter 20 (After) Code" instead. Adding Report SchemasThe ReportSchemas.vb file, already added to the project, includes the three schemas used for the five built-in reports. Just to remind us of the members, here are the public property definitions included in each class, minus the Get and Set accessors, and minus the private class members. Public Class ReportSchemaPatronItems ' ----- Used for the following reports: ' Report #1: Items checked out report ' Report #2: Items overdue report ' Report #3: Items missing report Public Property PatronName() As String Public Property PatronBarcode() As String Public Property DueDate() As Date Public Property CopyNumber() As Integer Public Property ItemBarcode() As String Public Property Title() As String Public Property MediaName() As String End Class Public Class ReportSchemaPatronFines ' ----- Used for the following reports: ' Report #4: Fines owed by patron Public Property PatronName() As String Public Property PatronBarcode() As String Public Property FinesDue() As Decimal End Class Public Class ReportSchemaStatistics ' ----- Used for the following reports: ' Report #5: Library database statistics report Public Property EntryName() As String Public Property EntryValue() As String End Class Once the schema classes are in the project, you will need to build the project before those classes can be used in RDLC reports as data sources. In the Library Project, build the project now with the Build Figure 20-15. The three data source schemas Adding ReportsBecause we already jointly created an RDLC report earlier in the chapter, I went ahead and added the five built-in reports for you.
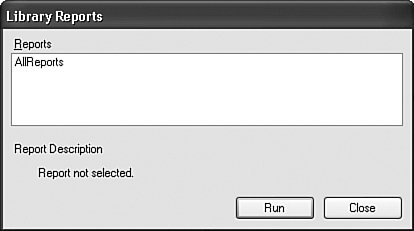
Adding a Report ViewerIt's time to add a ReportViewer control. Because a single ReportViewer control can display any type of RDLC report, we'll just add a single form to handle all five built-in reports. Add a new form named ReportBuiltinViewer.vb to the project. Set its Text property to "Library Report," and its WindowState property to Maximized. Also, load the project's icon (Book.ico) into the Icon property. You'll find a copy of this file in the project installation directory. If you want, you can size the form to some reasonable starting point for a report (I used "680, 400"), but each report will start out maximized when used. Add a ReportViewer control named ReportContent to the form, and set its Dock property to Fill. Set both the ShowBackButton and ShowDocumentMapButton properties to False. The code we will add to this form is a variation of code we wrote earlier in this chapter. The code that starts each report will pass to this form the name of the report RDLC file, the name of the data schema used, and the actual data. Because these reports will be modeless (you can keep them open while still using other parts of the Library program), we can't let the calling code wait around for the user to close the report before we discard the report data. We'll let the report dispose of the data itself. To do this, we need to keep a reference to that data. Add the following statement to the ReportBuiltinViewer form class. Insert Snippet Insert Chapter 20, Snippet Item 1. Private StoreDataTable As Object Remember, reports can use a variety of data source formats, including true database connections, arrays, and collections. Reports #1 through #4 will use a System.Data.DataTable instance, while report #5 will pass a generic List collection. The best time to dispose of the data is when the report is closing. Add the following event handler to the form, which confirms that the data supports the disposal process before calling the Dispose method. Insert Snippet Insert Chapter 20, Snippet Item 2. Private Sub ReportBuiltinViewer_FormClosing( _ ByVal sender As Object, ByVal e As _ System.Windows.Forms.FormClosingEventArgs) _ Handles Me.FormClosing ' ----- Get rid of the data. If (TypeOf StoreDataTable Is IDisposable) Then CType(StoreDataTable, IDisposable).Dispose() End If End Sub The code that opens this display form will pass in the essential report values through a public method named StartReport. Add its code now. Insert Snippet Insert Chapter 20, Snippet Item 3. Public Sub StartReport(ByVal whichReport As String, _ ByVal whichDataSchema As String, _ ByVal whichData As Object) ' ----- Run one of the built-in reports. whichReport is ' the name of the RDLC report file, in the format ' "Library.xxx.rdlc." whichDataSchema provides the ' name of the schema to use, in the format ' "Library_xxx." whichDataSet is the actual data ' to link to the report, which must match the schema. Dim customDataSource As New _ Microsoft.Reporting.WinForms.ReportDataSource ' ----- Connect the viewer, the report, and the data. ReportContent.LocalReport.ReportEmbeddedResource = _ whichReport customDataSource.Name = whichDataSchema customDataSource.Value = whichData ReportContent.LocalReport.DataSources.Add( _ customDataSource) ' ----- Display the report. StoreDataTable = whichData Me.Show() End Sub This code tells the viewer which report to use as an embedded resource, and then attaches the data as a custom data source. "Local" in these property names indicates a local (client) report instead of a "server" report that runs within SQL Server. When we were playing with the reports before, we saw that the default display mode was the "fill-the-entire-screen-with-page-content" mode. Personally, I like to see those fake page boundaries. The ReportViewer control doesn't include a property that lets us change this default view (why not?), but we can still adjust the initial display style through methods on the control. When we added the report viewer to the form, Visual Studio also added the following statement to the form's Load event handler. ReportContent.RefreshReport() Add the following code just before that statement. Insert Snippet Insert Chapter 20, Snippet Item 4. ' ----- Generate and display the report. ReportContent.SetDisplayMode( _ Microsoft.Reporting.WinForms.DisplayMode.PrintLayout) ReportContent.ZoomMode = _ Microsoft.Reporting.WinForms.ZoomMode.Percent ReportContent.ZoomPercent = 100 Adding Built-In ReportsI forget how long ago we added the ReportSelect.vb form that drives reporting, but it is already there in the project. In case you forgot what it looked like (I did), Figure 20-16 gives us a refresher. Figure 20-16. The report selection form We previously added support for our five built-in reports in this form's code. In a tribute to the never-ending reality of forgetting to finish all of the code, we need to add some code that we overlooked earlier. If you use an XML report configuration file to populate the report list, and you provide a description for each report in the XML, each entry displays that description in the lower-half of the report selection form. But if you don't use a configuration file, and just depend on the form to add the five built-in reports by default (which it does), the form won't display associated descriptions, because we forgot to add them. Add a function to the ReportSelect class that returns a short description for each of the five reports. Insert Snippet Insert Chapter 20, Snippet Item 5. Private Function GetBuiltinReportDescription( _ ByVal whichReport As ReportItemEnum) As String ' ----- Return a predefined description for the ' built-in reports. Select Case whichReport Case ReportItemEnum.BuiltInCheckedOut Return "Displays all items currently checked " & _ "out, sorted by name." Case ReportItemEnum.BuiltInOverdue Return "Displays all overdue items, sorted by name." Case ReportItemEnum.BuiltInMissing Return "Displays all missing items, sorted by name." Case ReportItemEnum.BuiltInFinesOwed Return "Displays all unpaid fines owed by " & _ "patrons, sorted by patron name." Case ReportItemEnum.BuiltInStatistics Return "Displays some record counts from the " & _ "Library database." Case Else Return "There is no description for this report." End Select End Function We'll call this code from two places. The first is in the LoadReportGroup method. This code loads the XML report configuration file. If that file includes one of the built-in reports, but doesn't supply a description with it, we'll supply the description ourselves. About halfway through that code, you'll find these lines. ' ----- So, what type of entry is it? If (scanNode.Attributes("type").Value = "built-in") Then About five lines below this is the following statement. reportEntry.ItemType = CType(CInt( _ reportEntry.ReportPath), ReportItemEnum) Add the following code just after that statement. Insert Snippet Insert Chapter 20, Snippet Item 6. If (reportEntry.Description = "") Then _ reportEntry.Description = _ GetBuiltinReportDescription(reportEntry.ItemType) The second need for the built-in descriptions appears in the RefreshReportList method. This method makes the call to LoadReportGroup to retrieve the XML configuration. But if after that the report list is still empty, RefreshReportList adds the five default reports, which each require a description. Near the end of the method, within a For...Next loop, you'll find this closing statement. ' ----- Add the report entry to the list. AllReports.Items.Add(reportEntry) Add the following code just before that statement. Insert Snippet Insert Chapter 20, Snippet Item 7. reportEntry.Description = GetBuiltinReportDescription( _ reportEntry.ItemType) Okay, that's it for the fix-up code. Now back to writing the actual reports. The code to start each of the five reports already exists in the ReportSelect form's ActRun_Click event handler. Most of that code includes a Select Case statement that acts as a switchboard for the selected report. Here's the part that calls the five built-in reports. Case ReportItemEnum.BuiltInCheckedOut ' ----- Items Checked Out ' TODO: Write BasicReportCheckedOut() Case ReportItemEnum.BuiltInOverdue ' ----- Items Overdue ' TODO: Write BasicReportOverdue() Case ReportItemEnum.BuiltInMissing ' ----- Items Missing ' TODO: Write BasicReportMissing() Case ReportItemEnum.BuiltInFinesOwed ' ----- Fines Owed by Patrons ' TODO: Write BasicReportFines() Case ReportItemEnum.BuiltInStatistics ' ----- Library Database Statistics ' TODO: Write BasicReportStatistics() Clearly, this code isn't accomplishing much. Change each of the TODO lines, removing the ' TODO: Write portion of the statement. So in the line that says: ' TODO: Write BasicReportCheckedOut() change the code to: BasicReportCheckedOut() Do that for each of the five TODO lines, and let me know when you're done. Exposing these five method calls means that we have to write those methods, darn it. These methods will retrieve the data for the report, and send that data to the report viewer, along with the name of the RDLC file. They're actually quite short and simple, considering the beautiful reports you will get out of them. Let's start by adding the BasicReportCheckedOut method to the ReportSelect class. Insert Snippet Insert Chapter 20, Snippet Item 8. Private Sub BasicReportCheckedOut() ' ----- Run built-in report #1: Items checked out report. Dim sqlText As String Dim reportData As Data.DataTable Dim reportForm As ReportBuiltinViewer On Error GoTo ErrorHandler ' ----- Retrieve the data as a dataset. sqlText = "SELECT PA.LastName + ', ' + " & _ "PA.FirstName AS PatronName, " & _ "PA.Barcode AS PatronBarcode, " & _ "PC.DueDate, IC.CopyNumber, " & _ "IC.Barcode AS ItemBarcode, " & _ "NI.Title, CMT.FullName AS MediaName " & _ "FROM Patron AS PA " & _ "INNER JOIN PatronCopy AS PC ON PA.ID = PC.Patron " & _ "INNER JOIN ItemCopy AS IC ON PC.ItemCopy = IC.ID " & _ "INNER JOIN NamedItem AS NI ON IC.ItemID = NI.ID " & _ "INNER JOIN CodeMediaType AS CMT ON " & _ "NI.MediaType = CMT.ID " & _ "WHERE PC.Returned = 0 " & _ "AND PC.Missing = 0 " & _ "AND IC.Missing = 0 " & _ "ORDER BY NI.Title, IC.CopyNumber, " & _ "PA.LastName, PA.FirstName" reportData = CreateDataTable(sqlText) ' ----- Check for no data. If (reportData.Rows.Count = 0) Then reportData.Dispose() MsgBox("No items are checked out.", MsgBoxStyle.OkOnly _ Or MsgBoxStyle.Exclamation, ProgramTitle) Return End If ' ----- Send the data to the report. reportForm = New ReportBuiltinViewer reportForm.StartReport("Library.ReportCheckedOut.rdlc", _ "Library_ReportSchemaPatronItems", reportData) Return ErrorHandler: GeneralError("ReportSelect.BasicReportCheckedOut", _ Err.GetException()) Return End Sub The code retrieves the report-specific records from the database, and makes sure that at least one record was included. (We could have added the SQL statement to the Library database as either a Stored Procedure or a View, and called that instead. For the purposes of this tutorial, it was simpler to store the statement directly in code.) It then calls the report viewer, passing the name of the RDLC file, the schema name (in the format ProjectName_ClassName), and the data table. Next, add the BasicReportOverdue and BasicReportMissing methods. I won't show the code here since, except for the name of the RDLC file and the WHERE clause in the SQL statement, they are identical to BasicReportCheckedOut. Insert Snippet Insert Chapter 20, Snippet Item 9. Add in the BasicReportFines method, which handles built-in report #4. Insert Snippet Insert Chapter 20, Snippet Item 10. It's also quite similar to the BasicReportCheckedOut method, but it uses the SQL statement we designed earlier for patron fine retrieval. It also uses a different schema and report name. reportForm.StartReport("Library.ReportPatronFines.rdlc", _ "Library_ReportSchemaPatronFines", reportData) The last method to add to ReportSelect.vb is BasicReportStatistics, which handles built-in report #5. It's a little different from the other four because it gathers data from six different tables, one at a time. In each case, it retrieves a count of the number of records in a database table. The results are then stored in a generic collection (System.Collections.Generic.List), where each list entry is an instance of ReportSchemaStatistics, the class we used for the fifth report's data schema. What a coincidence! Here's the code for BasicReportStatistics for you to add now to the ReportSelect form class. Insert Snippet Insert Chapter 20, Snippet Item 11. Private Sub BasicReportStatistics() ' ----- Run built-in report #5: Library database ' statistics report. Dim sqlText As String Dim reportData As Collections.Generic.List( _ Of ReportSchemaStatistics) Dim oneEntry As ReportSchemaStatistics Dim reportForm As ReportBuiltinViewer Dim resultValue As Integer Dim counter As Integer Const tableSets As String = "Author,Publisher," & _ "Subject,NamedItem,ItemCopy,Patron" Const tableTitles As String = "Authors,Publishers," & _ "Subject Headings,Items,Item Copies,Patrons" On Error GoTo ErrorHandler ' ----- Build the report data. It's all counts from ' different tables. reportData = New Collections.Generic.List( _ Of ReportSchemaStatistics) For counter = 1 To CountSubStr(tableSets, ",") + 1 ' ----- Process one table. sqlText = "SELECT COUNT(*) FROM " & _ GetSubStr(tableSets, ",", counter) resultValue = DBGetInteger(ExecuteSQLReturn(sqlText)) ' ----- Add it to the report data. oneEntry = New ReportSchemaStatistics oneEntry.EntryName = _ GetSubStr(tableTitles, ",", counter) oneEntry.EntryValue = CStr(resultValue) reportData.Add(oneEntry) Next counter ' ----- Send the data to the report. reportForm = New ReportBuiltinViewer reportForm.StartReport("Library.ReportStatistics.rdlc", _ "Library_ReportSchemaStatistics", reportData) Return ErrorHandler: GeneralError("ReportSelect.BasicReportStatistics", _ Err.GetException()) Return End Sub Because we really need to get the same information (COUNT(*)) for each of the six tables involved, I just implemented the code as a loop, and built the SQL statement for each one as I passed through the loop. A friendly table name and the record count are then stored in the generic list, which is eventually sent to the report. You can now run the application and use the five built-in reports. You must log in as a librarian or administrator, and then access the Print Reports panel on the main form. Believe it or not, we're almost finished with the application. The only big thing left to do is to process past-due patron items to see if fines are required. We'll add this code in the next chapter, and also take a look at licensing. |
EAN: 2147483647
Pages: 247