6.1. Built-in Timeline Effects Flash comes with a handful of Timeline effects, including Distributed Duplicate, Blur, Expand, Explode, Transition, and Transform. As you see in the following sections, all you have to do to apply a Timeline effect is select an object on the Stage, click a button to display the effect wizard (basically, a settings window) and then fill out a few bits of information describing how you want Flash to apply the effect to this particular object. When you finish, Flash generates all the drawings, symbols, and tweened frames necessary to create the animated effect and then sticks them in their own layer on the Timeline. (As a bonus, Flash sticks the symbols it creates during the generation process into the Library for you to inspect or reuse as you please .) You can apply a Timeline effect to any kind of object: editable lines and shapes , grouped objects, text blocks, symbols, or bitmaps.
Note: Flash offers two additional Timeline effects that don't involve animation and so aren't covered here: Drop Shadow, which applies a drop shadow effect similar to the Drop Shadow filter described on Section 7.1.4.3 and Copy to Grid, which lets you copy a single object and position the copies in evenly aligned rows and columns .
There's only one catch: You can't modify a Timeline effect by hand. If you want to tweak the effect, you have to remember to use the same effects wizard you used to create it in the first place. If you don't, you risk breaking or even removing the effect. (See the box on Section 6.1.1.) 6.1.1. Distributed Duplicate (Tumbling) The Distributed Duplicate effect lets you copy an object and then paste copies of that object on the Stage in a straight line. You get to choose the angle of the straight line; you also get to tell Flash how close you want the copies to appear to each other and whether or not you want the copies in different colors. If you like, you can spread the effect out over a series of frames and add rotation, as you see in the following steps, to turn a static diagonal line of copies into an animated sequence that looks as if the object's tumbling.
Note: You can download the Flash document in this example (dd_begin.fla), a working copy (dd.fla), and all the other examples in this chapter from the "Missing CD" page at www.missingmanuals.com/cds.
To apply a Distributed Duplicate Timeline effect: -
Open the file dd_begin.fla. Then, on the Stage, select the die (Figure 6-1) . Make sure you see the blue selection box around the die. If you don't select an object first, Flash doesn't let you choose a Timeline effect. -
Select Insert  Timeline Effects Assistants Distributed Duplicate . Timeline Effects Assistants Distributed Duplicate . Up pops the Distributed Duplicate window in Figure 6-2. UP TO SPEED
No Such Thing as a Free Lunch | | When you apply a Timeline effect, it's Flash that does all the grunt work, so it's Flash that gets to decide how to organize and name the layers and symbols it createsnot you. If you go back later and change the names of the layers and symbols, Flash renames them the instant you modify the effect (Section 6.1.2). Flash does let you edit both the instance of the single-frame graphic symbol it generates as part of the effect process and the single-frame graphic symbol itself. But if you try to edit the multiframe graphic symbol or make any changes directly to the Timelinein other words, if you try to edit the effect by handFlash either removes the effect immediately or displays this error message: 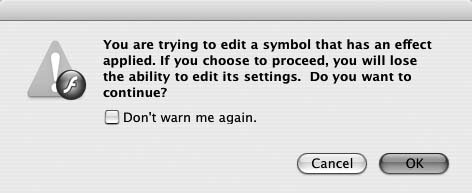 Click OK in the error message, and you can't modify the effect using the effects window (the wizard) ever again. If you try, you find the Modify Timeline Effects Edit Effect menu option appears grayed out. The best strategy: Take advantage of the point-and-click ease of Timeline effects, but don't edit them by hand unless you have to. And even then, wait until you're absolutely , positively sure you won't need to edit them through the wizard again. (You'd also be wise to make a backup copy of your document first.) | Figure 6-1. In this example, the die's a grouped object, but you can apply Timeline effects to ungrouped graphics, bitmaps, or symbols. Just keep in mind that Flash turns your object into a symbol as part of the Timeline effect process, and you can't edit that symbol without breaking your effect. 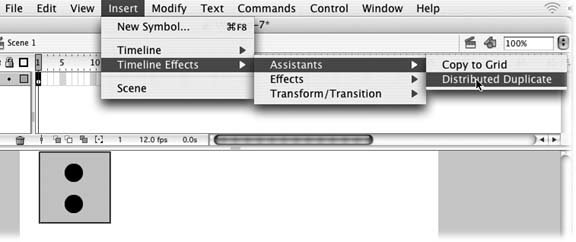 Next , you'll change the settings to create a tumbling effect. -
Click the Offset Rotation box and then type 25 . Click the Offset Start Frame box and then type 10 . Then, turn off the checkbox next to Change Color . You can preview the effect by clicking the Update Preview button. Flash displays the results of your changes in the preview area of the Distributed Duplicate window (Figure 6-3). Figure 6-2. In the preview area, you see Flash's best guess at how you want your effect to appear. If it's not what you want (and it rarely is), you can change any of the settings on the left side of the Distributed Duplicate window. Click Update Preview frequently to see the effects of your changes. When you're satisfied, click OK to return to your workspace. 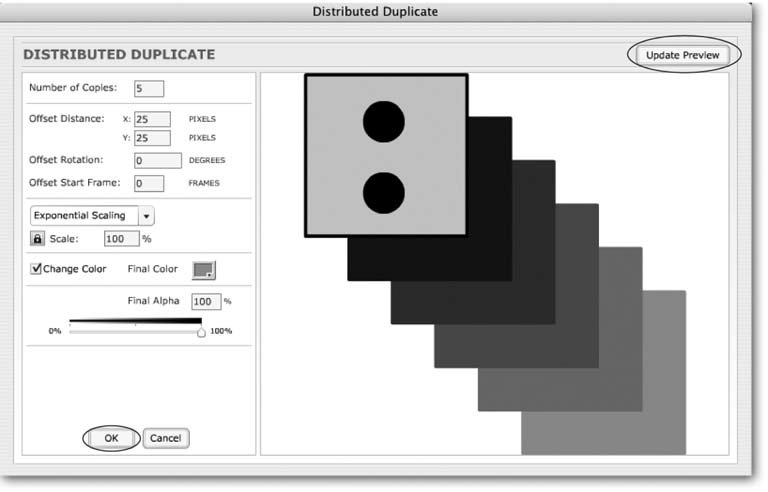 Figure 6-3. You want to get in the habit of using the Update Preview window to preview your effectsit's much, much quicker than clicking OKand then testing your animation the usual way, by selecting Control Test Movie. Here you see the results of changing a couple of settings (circled). But by changing different settings, as described below, you can create a number of surprisingly different looks. 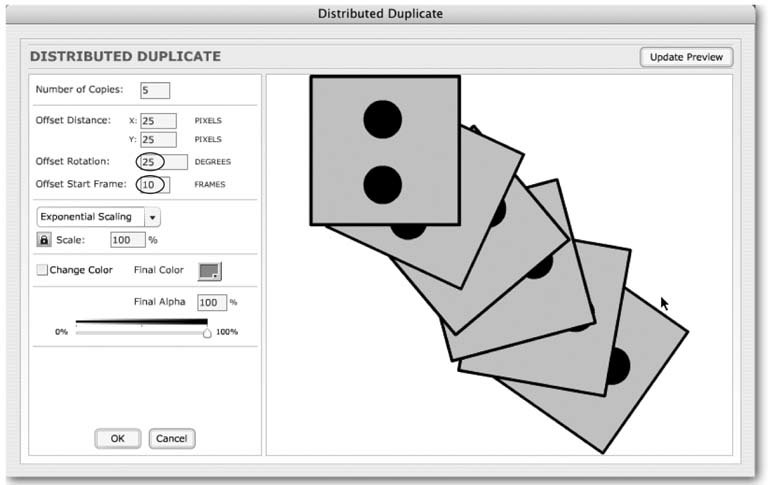 -
Click OK to save your effect and return to your workspace . The Distributed Duplicate window disappears. On the Timeline, you see a 50-frame graphic symbol. You also notice that Flash has placed the 50-frame graphic symbol (in this example, named Distributed Duplicate 6) in the Library, along with a single-frame graphic symbol named effectSymbol (Figure 6-4).
Tip: The full story on graphic symbols comes in the next chapter.
Figure 6-4. In this example, the Number of Copies was set to 5 and the Offset Start Frame (the number of frames between copies) was set to 10, so Flash generated a total of 50 frames in the layer it named Distributed Duplicate 6. It also saved a copy of the one-frame die symbol (effectSymbol) it created from the original grouped object and a copy of the 50-frame graphic symbol (Distributed Duplicate 6) it placed on the Timeline and put them both in the Library for you to reuse as you see fit. 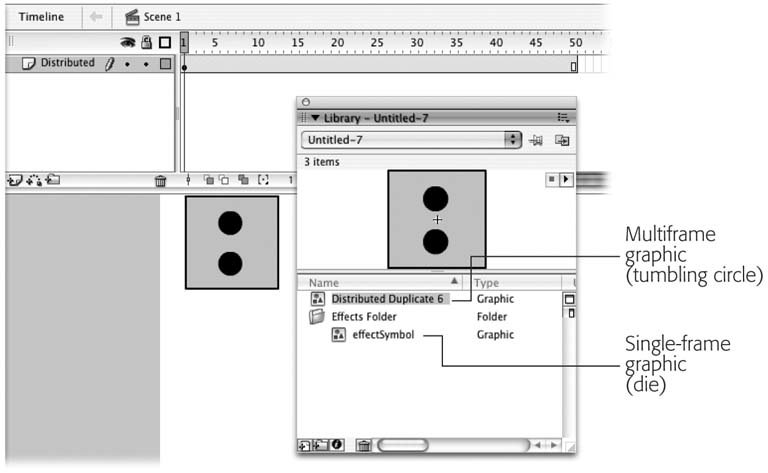
Here's a rundown of all the settings you can change in the Distributed Duplicate window: -
Number of Copies . Tells Flash how many copies of your original object to display. -
Offset Distance . Tells Flash how far apart (in pixels) you want it to place each copy, and in what direction. You can type individual numbers for horizontal distance (X) and vertical distance (Y). For example, typing for X and 50 for Y tells Flash to display the copies straight up and down; typing 50 for X and for Y tells Flash to display copies horizontally. -
Offset Rotation . Tells Flash how far to rotate each copy with respect to the previous copy. If you type 0 for this setting, Flash doesn't rotate the copies at all. -
Offset Start Frame . Tells Flash how slowly you want it to display the new copies, with larger numbers resulting in slower displays. For example, if you type 5 , Flash places five frames in between the frames containing each copied object; if you type 10 , Flash places 10 frames in between; and so on. If you type for this setting, Flash creates a single-frame, static effect. -
Exponential Scaling/Linear Scaling, Lock icon, and Scale . You can tell Flash to shrink or expand each copy it displays, based either on the previous copy (Exponential Scaling) or the original object (Linear Scaling). Clicking the Lock icon lets you type individual scaling percentages for the horizontal (X) and vertical (Y) dimensions of your object; clicking it again locks the scaling to a single, overall, uniform percent (Scale). For example, typing in an overall Scale of 50 with Exponential Scaling turned on tells Flash to shrink each copy in half compared to the previous copy; typing in an overall Scale of 200 tells Flash to expand each copy to twice the size of the previous copy. -
Change Color, Final Color, and Final Alpha . Turning on the Change Color checkbox tells Flash to display each copy in a slightly different color, starting with the color and transparency of the original object and ending with the color and transparency you choose using the Final Color color picker and the Final Alpha slider, respectively. 6.1.2. Blur The Blur effect lets you change the transparency, position, and scale of an object to create a blurring, or smudging , effect. You get to tell Flash how hard or soft you want the effect, along with whether you want it to move your object horizontally, vertically, or both. If you choose both, as in the following example, the object appears to recede into the distance, creating smudgy trails as it disappears. To apply a Blur effect: -
Open the file blur_begin.fla . You can find this file on the Missing Manuals CD, along with a working copy of the example called blur.fla. -
-
Change the intensity of the blur by clicking the Resolution box and then typing in 55 (instead of 15); then click Update Preview . In the preview area, you see the results of the change: a much more intense , almost abstract effect (Figure 6-6). Figure 6-6. Here you see the results of the blur. Click OK, and Flash returns you to your workspace, where you find the Timeline filled with auto-generated frames and the Library with auto-generated symbols. Flash recreates and renames symbols and layers each time you make a change in the Blur window and click Update Preview. If you've experimented a bit, don't be surprised to find names like Blur 10 and Blur 11. 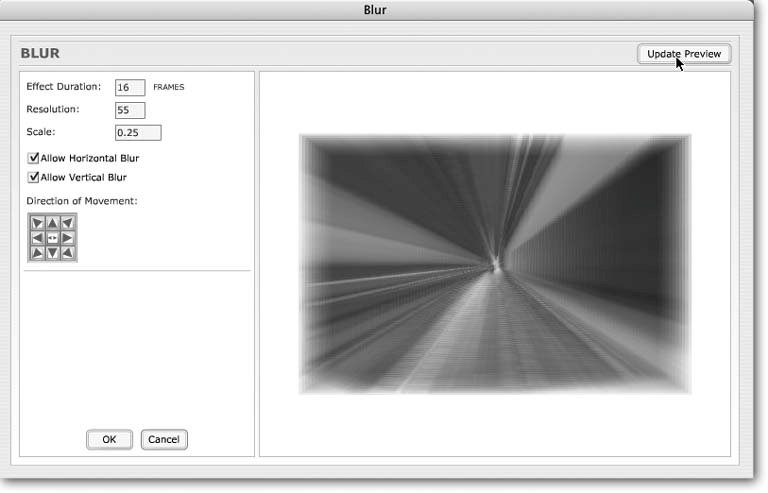 -
Click OK to save your changes and return your workspace . The Blur window disappears. On the Timeline, you see a 16-frame graphic symbol in its own layer. If you open the Library panel, you see that Flash has placed two symbols in the Library: the multiframe graphic symbol and a single-frame graphic symbol. (For the skinny on symbols and instances, check out Chapter 7.)
Tip: To preview your effect on the Stage, drag the playhead along the Timeline.
Here's a list of all the different settings you can change in the Blur window to create different effects: -
Effect Duration . How long you want this effect to last; in other words, the number of frames you want this effect to span. (Flash assumes 16 unless you tell it otherwise .) -
Resolution . The number of copies of your image you want Flash to display, to create the blurring effect. The larger the number you type in this box, the more abstract the effect (and the harder Flashand your computerhave to work to produce it; type 500 or so, and you may have time to go out for coffee while you wait for Flash to render your preview). -
Scale . The size of the image you want Flash to begin with before it starts blurring expressed as a percentage of the size of your original. For example, 0.25 tells Flash to begin with a copy of your image one-quarter the size of the original and then begin the blur. -
Allow Horizontal Blur . Turn on this checkbox to let Flash move your object left and right. -
Allow Vertical Blur . Turn on this checkbox to let Flash move your object up and down. -
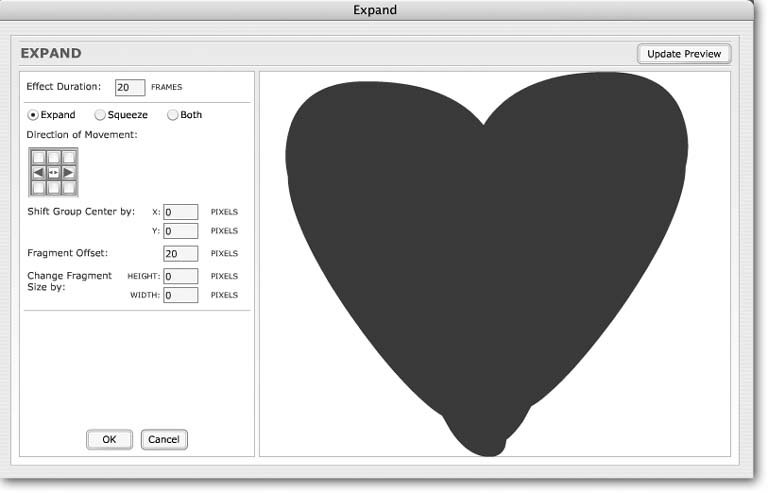
Direction of Movement . Click one of the nine arrows in this box to tell Flash which direction to blur your image. (If you want to click an arrow that appears grayed out, turn on the checkboxes next to Allow Horizontal Blur and Allow Vertical Blur.) Clicking the two tiny arrows in the middle of the box, as in the example in Figures 6-5 and 6-6, tells Flash to blur in all directions simultaneously to create a coming-straight-at-you effect. 6.1.3. Expand Using the Expand effect, you can make a bunch of letters , shapes, or other objects appear to stretch apart (expand) or squeeze together (contract). You can also make a single object appear to expand and contract, as you see in the following example. To apply the Expand effect: -
Open the file expand_begin.fla . You can download this file from the "Missing CD" page. -
-
In the Expand window, turn on the checkbox next to Both. Click the Fragment Offset box. and then type . Click the Change Fragment Size by (Height) box and then type 50 . Finally, click the Change Fragment Size by (Width) box and then type 50 . Test your changes by clicking the Update Preview button: A pulsing heart should appear in the preview area. -
Click OK to save your changes and return to your workspace . The Expand window disappears. On the Timeline, you see a 20-frame graphic symbol stretched out in its own layer. If you open the Library panel, you see the same symbol. (With its Flash-assigned name, it's hard to miss .) If you like, you can drag a few more instances of your beating heart onto the Stage and view the results by choosing Control Test Movie. Here's a list of all the settings you can change in the Expand window: -
Effect Duration . How long you want this effect to last; in other words, the number of frames you want this effect to span. (Flash assumes 20 unless you tell it otherwise.) -
Expand . Tells Flash to move multiple objects apart and to stretch single objects. -
Squeeze . Tells Flash to push multiple objects together and to compress single objects. -
Both . Tells Flash to alternate expanding and squeezing (see above). -
Direction of Movement . Click one of the three arrows in this box to tell Flash which direction to expand (or contract) your images: left, from the center out, or right. -
Shift Group Center by (X, Y) . Expands or contracts horizontally (X) or vertically (Y), based on the direction you chose above. -
Fragment Offset . Tells Flash how far apart to position the objects during expansion (or contraction) with respect to each other. -
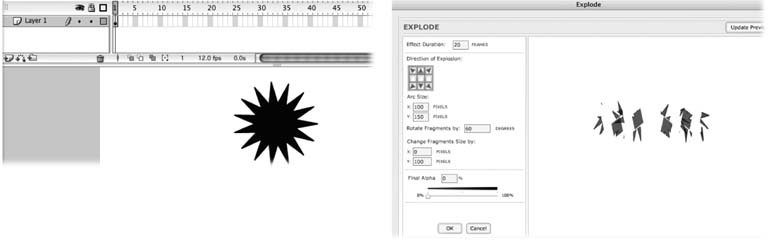
Change Fragment Size by (Height, Width) . Tells Flash to stretch or compress the objects themselves (height-wise, width-wise, or both) during expansion or contraction. Flash assumes 0 in both cases; you can type negative numbers (to compress objects) or positive numbers (to expand them). 6.1.4. Explode Applying the standard Explode effect to a graphic element makes the element appear to burst apart, with each piece gradually turning transparent as it spins and arcs away from ground zero. The Explode effect is pretty effective on a single bitmap or shape, as you see in the steps below. But it also works well on grouped objects, such as the letters in a block of text. To apply the Explode effect: -
Open the file explode_begin.fla . You can download the file (along with a working copy of the example, explode.fla), from www.missingmanuals.com/cds. -
-
Click the Arc Size (Y) box and then type 350 . Then, click the Change Fragments Size by (X) box and then type 100 . Click the Update Preview button to see the results of your changes. In the preview area, you see the larger pieces (fragments) that explode higher. -
To save your changes and return to your workspace, click OK . The Explode window disappears. On your Timeline, spanning the first 20 frames, you see the graphic symbol Flash created. Flash renamed your layer, too. In Figure 6-9, the layer name is Explode 13 . (Flash adds 1 to the name each time you preview any effect, beginning with the last time you launched the program.) In the Library, you see that Flash has been busy, indeed, organizing 16 single-frame movie clip symbols and one multiframe graphic symbol into two folders. Here's a list of all the settings you can change in the Explode window to create different exploding effects: Figure 6-9. You can drag instances of any of these symbols onto the Stage to create your own effects, if you like, and even change the color, transparency, position, or skew of the instances, but you can't edit the symbols. If you tryby double-clicking the name of one of the movie clip symbols, for exampleFlash immediately erases the frames on the Timeline, thereby removing your effect. 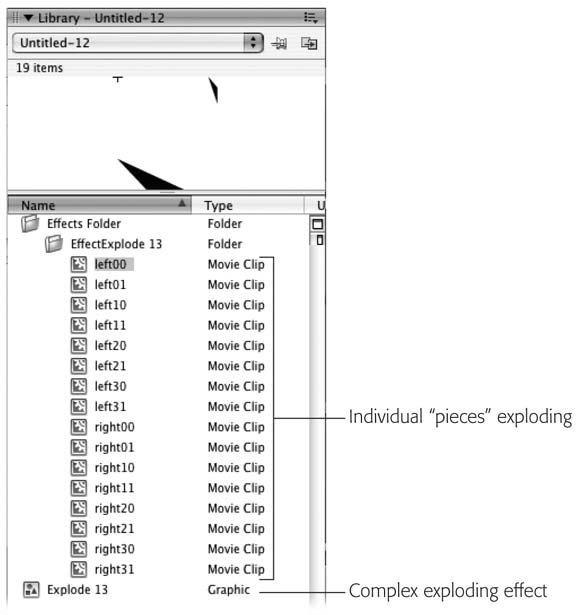
-
Effect Duration . How long you want this effect to last; in other words, the number of frames you want this effect to span. (Flash assumes 20 unless you tell it otherwise.) -
Direction of Explosion . Click one of the six arrows in this box to tell Flash which direction you want the explosion to move. -
Arc Size (X, Y) . Click the X box and then type a number to tell Flash how far (in pixels) you want the pieces to fly horizontally; click the Y box and then type a number to tell Flash how far (in pixels) you want the pieces to fly vertically. -
Rotate Fragments by . Click the box and then type a number to tell Flash (in degrees) how far to rotate each of the pieces. -
Change Fragments Size by (X, Y) . Tells Flash how much to stretch (or shrink) each piece (in pixels) during the explosion sequence. You can specify a number for width (X), for height (Y), or both. A number over 100 tells Flash to stretch the pieces; a number under 100 tells Flash to shrink them. -
Final Alpha . Tells Flash how transparent you want the pieces to be at the end of the explosion sequence. Flash initially assumes 0% (completely transparent), but you can type any number you want up to 100% (completely opaque ).
Note: Flash doesn't let you apply more than one Timeline effect to the same object in the same layer. If you want to apply multiple effectsfor example, you want an object to spin and explodeyou need to copy the object to multiple layers and then apply one effect per layer.
6.1.5. Transform (Shape Tween) The Transform effect lets you create a simple shape tween quickly and easily. (As you may recall from Chapter 3, a shape tween is a Flash-generated animated sequence that shows an object being scaled, rotated , recolored, faded, and/or repositioned.)
Note: You can create a lot of different effects with the Transform effect. Some of the most useful include spinning, fading in and out, flying on and off, and changing color.
Compared to creating a shape tween by hand, the Transform effect is a sweet deal indeed. Instead of having to hunt around in a bunch of panels to choose the effect you want, you have to deal with only one dialog box; and instead of having to test your tween by choosing a menu option or dragging the playhead, all you have to do when you apply the Transform effect is click a button to instantly preview your tween. The downside, of course, is the same as it is for any Timeline effect. When you apply an effect, Flash generates symbols, and you can't change those symbols by hand without breaking the effect. Not so if you create your tween effect by hand. (See the box on Section 3.1.1.) Another difference: You can't distort or skew an object using the Transform effect. (You can if you create a shape tween by hand.) To see how it works, download the example file transform_color_begin.fla from the "Missing CD" page. Then, to apply the Transform effect: -
Select the first keyframe in the apple layer . Flash highlights the fill (the green body of the apple). -
Select Insert Timeline Effects Transform/Transition Transform . The Transform window in Figure 6-10 appears. Here's where you create the color tween. -
Turn on the checkbox next to Change Color. Click the Final Color swatch and then, from the Color Picker that appears, choose a nice bright shade of red. Drag the Motion Ease slider all the way to the left, until the Motion ease box contains the number 100 . Test your changes by clicking the Update Preview button. In the preview area, the green apple slowly turns red. -
Click OK to save the effect and return to your workspace . You notice that Flash has renamed the apple layer; now its name is Transform (followed by the number of times you've previewed an effect since you last launched Flash). You also notice that Flash has placed two graphic symbolsa single-frame graphic symbol and a 30-frame graphic symbolin the Library. (If you don't see the Library panel, select Window Library.) -
Test Movie to view the completed animation. In the test window, you see the apple redden; the stem and blossom (the frames on the stem layer) aren't affected. (You can find a completed, working example on the "Missing CD" pagetransform_color.fla.)
Note: Because Flash keeps the frames and symbols it creates when it generates Timeline effects neatly organized in their own separate layers, you can add your own layers without worrying about getting stuff mixed up.
Figure 6-10. Depending on the settings you change in this window, you can create completely different effects. For example, to move an object in a straight line, type numbers for Change Position by/Move Position by (X is horizontal, Y is vertical). To make an object rotate, type a number for Spin. And to make an object disappear, type 0 in the Final Alpha box. You can combine effects, if you like, to make an object appear to spin across the screen and then disappear. 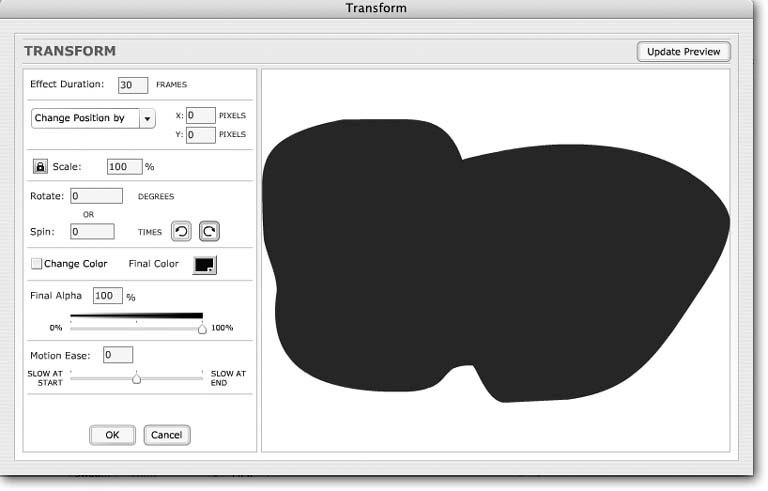
Here's a list of all the settings you can change in the Transform window: -
Effect Duration . How long you want this effect to last; in other words, the number of frames you want this effect to span. (Flash assumes 30 frames unless you tell it otherwise.) -
Change Position by/Move to Position (X, Y) . Tells Flash to create a straight-line motion tween. Select "Change Position by" to type the number of pixels you want Flash to move the object based on the object's original position; click "Move to Position" if you want to type a fixed position on the Stage. (X is horizontal; Y is vertical.) -
Lock/Scale (X, Y) . You can tell Flash to shrink or expand the width or height (or both) of the object. Clicking the Lock icon lets you type individual scaling percentages for the horizontal (X) and vertical (Y) dimensions of your object; clicking it again locks the scaling to a single, overall, uniform percent (Scale). -
Rotate or Spin and Left/Right . You can rotate an object once, or spin it as many times as you like. Click the Rotate box and then type the number of degrees you want Flash to rotate the object. (If you type a number greater than 360, Flash just assumes you want to spin the object and fills in the Spin box accordingly .) Or click the Spin box and type the number of times you want Flash to spin the object. Click Left to rotate (or spin) the object to the left; click Right to rotate (or spin) the object to the right. -
Change Color . Turn on this checkbox to create a color tween. -
Final Color . Click this swatch and then, from the Color Picker that appears, choose the color into which you want Flash to morph the original color (or colors) of your object. Flash ignores the Final Color swatch unless you've turned on the Change Color checkbox (see above). -
Final Alpha . Click this box and type the percentage of transparency you want your object to transition to. Flash assumes an Alpha of 100 percent (fully opaque), but you can type any number you like from (fully transparent) to 100 . If you prefer, you can drag the slider instead of typing in a number. -
Motion Ease . Click this box and then type a number to tell Flash how uniformly you want it to apply the effect. For example, zero applies the effect evenly; a negative number tells Flash to start slow and speed up; and a positive number tells Flash to start fast and slow down. Instead of typing in a number, you can drag the slider. 6.1.6. Transition (Fade/Wipe) The Transition effect lets you create two classic transitions you're probably familiar with if you've ever had to sit through any kind of computer-based presentation: -
Fade in/Fade out . An object appears transparent at first and then gradually becomes more opaque (a fade-in ) or appears opaque at first and then gradually becomes transparent (a fade-out ). -
Wipe . An object appears onscreen bit by bit, as though it's being drawn as you watch. Although you can certainly use the Transition effect to create presentation-or slideshow-like animations, in which one image-filled frame fades or wipes after another, you don't have to stop there. You can apply multiple Transition effects in other words, tell Flash to create multiple transition layersto create composite images that fade or wipe piece by piece. You can also create an effect that looks like text is typing itself across the screen, as shown in the steps below. To try it out, download transition_begin.fla from the "Missing CD" page. Then, to apply the Transition effect: -
On the Stage, select the text block . Flash displays a blue selection box around the text. -
Select Insert Timeline Effects Transform/Transition Transition . The Transform window in Figure 6-11 appears. Figure 6-11. The Transition effect is one of the simplest to apply. All you have to do is tell Flash whether you want to fade an object in (or out) or wipe the object in (or out). To create an even more artistic effect, slice your image into pieces and distribute each piece to a separate layer; then apply a different Transition effect to each piece. 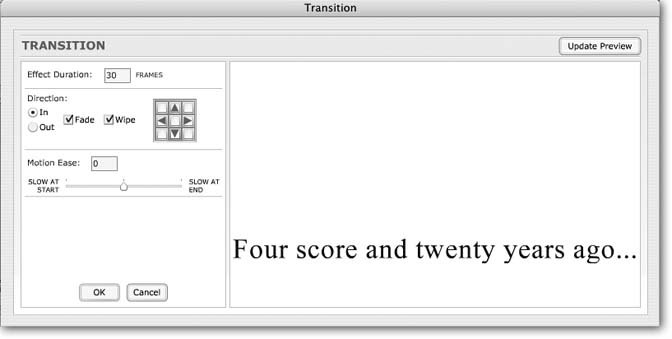 Your mission: Change the settings to make the text look as though it's being typed onto the screen, one letter at a time. -
Turn off the Fade checkbox. In the Direction box, click the right arrow . Take a look at your changes by clicking Update Preview. -
Click OK to save your effect and return to your workspace . Flash renames your layer, fills the first 30 frames with a multiframe graphic symbol, and places a reusable copy of the symbol (as well as reusable copies of the single-frame symbols it generated) in the Library.
Tip: Flash complains if you try to add a keyframe to the transition layer it created, even if the keyframe you're adding comes after the frame span of the effect. So if you want to create a slideshow-type animation (where images wipe, or fade, in and out one after another) and still be able to modify each Transition effect through the settings window, you need to place each image on its own separate layer, and apply the Transition effect to each image separately.
You may want to create a different transition effect. To do so, you need to change one or more off the settings you find on the Transition window: -
Effect Duration . How long you want this effect to last: in other words, the number of frames you want this effect to span. (Flash assumes 30 frames unless you tell it otherwise.) -
In/Out . Turning on the In checkbox tells Flash to begin with a transparent version of the object and slowly fade (or wipe) it in. Turning on the Out checkbox tells Flash to begin with the object as is and slowly fade (or wipe) it out. -
Fade . Tells Flash to add transparency (or opacity) to the object, depending on whether you select In or Out (see above). -
Wipe . Tells Flash to make the object appear or disappear, little by little. -
Direction Arrows . Click one of the four arrows to make the effect move from left to right, right to left, top to bottom, or bottom to top. -
Motion Ease . Click this box and then type a number (or drag the slider) to tell Flash how uniformly you want it to apply the transition. For example, 0 applies the transition evenly; a negative number tells Flash to start slow and speed up; and a positive number tells Flash to start fast and slow down. 6.1.7. Modifying a Timeline Effect You can't modify a Timeline effect the way you can modify a tween you've created by hand. In other words, you can't modify a Timeline effect by clicking on the Timeline and creating keyframes, adding or deleting frames, or editing the symbols Flash placed on the Stage. (If you do, you breakor even removethe effect. See the box on Section 6.1.1, "No Such Thing as a Free Lunch," for details.) Instead, to modify an effect, you need to change the effect settings with the same dialog box you used to create the effect. There's a file all set up with a wipe effect you can modify for practice. Download wipe2.fla from the "Missing CD" page. Then do the following: -
Click to select the first keyframe in layer Transition 16 . In the Layers window, Flash displays the pencil icon next to Transition 16 to let you know you've activated this layer. On the Stage, you see the symbol's registration point and a selection line. -
Choose Modify Timeline Effects Edit Effect . Flash displays the settings window for the Transition effect. You see the wipe in effect (wiping left) in the preview area.
Note: Another way to redisplay the effects setting window is to right-click the symbol on the Stage and then, from the shortcut menu that appears, chose Timeline Effects Edit Effect.
In the Transition window, head to the Direction box and click the right arrow; then click Update Preview to see the result of your changes . In the preview area, the image now wipes right. -
Click OK to save your change and return to the workspace . Flash renames your layer. -
Test the animation by choosing Control Test Movie . In the test window, you see four pieces of a single image, all wiping in from different directions to form a spiral drawing effect. 6.1.8. Deleting a Timeline Effect Deleting a Timeline effect deletes the graphic symbols and movie clip symbols Flash created when it applied the effect. It also deletes all of the additional instances of those symbols that you've created (if any). To delete a Timeline effect: -
On the Stage, select the symbol from which you want to delete the effect . Because Flash always changes your graphic element into a symbol when you apply a Timeline effect, you'll always be removing an effect from a symbol. -
Choose Modify Timeline Effects Remove Effect (or right-click the symbol on the Stage and then, from the shortcut menu that appears, select Timeline Effects Remove Effect) . Flash removes everything related to the effect, including the frames and images it placed on the Timeline, the symbols it placed in the Library, and any instances of the symbols you may have placed by hand in any layer in the current document. Flash also changes your layer name back to its original name, and the symbol on the Stage back into the form it was in (for example, editable object or bitmap) when you applied the effect.
Tip: You can remove multiple Timeline effects from multiple layers at the same time. On the Stage, select all the symbols from which you want to delete the effects. (When you do, Flash highlights all the related layers.) Then choose Modify Timeline Effects Remove Effect.
|