Callouts and Flash Hot Spots
As you’ve probably already discovered while recording your own creations, you can pack an awful lot of material into a relatively small video window. Thus far in this chapter, you’ve learned to add some “window dressing” in the form of a PIP window and some between- clip transition effects. We’re going to take things to the next level with callouts.
Imagine, if you will, an invisible layer (made of cellophane, or perhaps some equally transparent substance crafted by a higher alien intelligence) placed over the top of your video window, to which any number of static visual elements (arrows, bubble callouts, graphics, etc.) can be glued. If you want to draw attention to a particular area of the screen or post some kind of text signage, simply add a callout. Callouts appear over the top of your video for whatever period of time you specify.
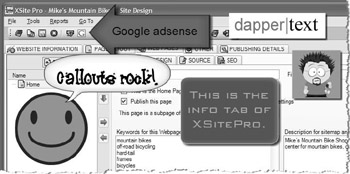
Callouts were available in the earliest versions of Camtasia, and combined with Flash hot spots into a single mechanism in Camtasia Studio 3. Flash hot spots are clickable areas of your video that allow you to temporarily halt playback (“Click here to continue”), move to a different section of the video (“Click here to find out more about this feature”), or even jump to a web URL (“Click here to visit us online”). Camtasia Studio lets you not only set up a transparent hot spot, but also assign hot spot interactivity to any pre-existing callout. If you know you want to make a callout clickable, this saves you the added step of installing a separate hot spot layer on top of it.
Camtasia Studio offers a whole library of preinstalled callouts for you to use in your creations, but you can also import any graphic image for use as a custom callout. We’ll be tackling the built-in callouts first, but not to worry - we’ll address adding your own custom images to your pool of callouts before the chapter is out.
Before we can do anything, though, we must first instruct Camtasia Studio that we’d like to add a callout and specify where we’d like it to go.
-
Enter the Callouts pane by choosing Callouts… from the Edit section of the Task List.
or
Choose Callouts… from the Edit menu.
-
Place your seek bar in the Timeline where you want the callout to appear.
-
In the Callouts pane, click Add Callout.
A callout will be added to the Timeline, which you should be seeing right in your Callouts track:
![]()
Additionally, you’ll see the actual callout in your Video Preview:
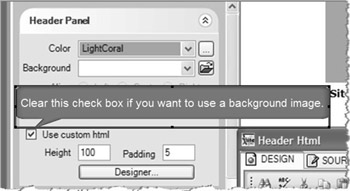
The added callout appears in your Video Preview, where you can easily place and size it relative to the other information on your screen.
Finally, you’ll also have access to a host of options for tweaking your callout on the Callout Properties pane:
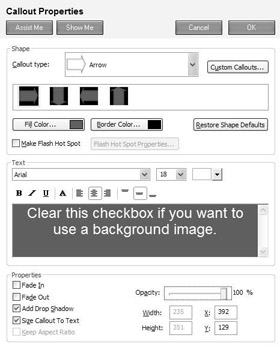
The available choices on the Callout Properties pane are divided into three sections: Shape, Text, and Properties.
| Note | Whenever you add a new callout, notice that the callout begins wherever you placed your seek bar on the Timeline and then stops after a given period of time (five seconds by default). If your callouts typically tend to run longer or shorter than that, you can change the default length of the callout by choosing Tools > Options… (Program tab), and then changing the value of the Callouts field in the section called Default Duration. |
Defining the Callout’s Shape
Now that we’ve got a callout on the Timeline, we’re going to tweak it using the settings in the Callout Properties pane. The first thing we’ll need to do is specify its shape. Click the drop-down arrow next to
Callout type, and you’ll see that you can change the current callout into one of 14 different types. You’ve got boxes, arrows, and callout bubbles (some filled with a color, others with no fill), and you’ve even got a few “special” callouts to which I’d like to draw your attention:
-
Highlight Rectangle. This is a solid block of semi-transparent color that you can use as a sort of virtual highlighter pen, marking things of interest on the screen.
-
Transparent Hot Spot. While all callouts can now have a hot spot attached to them, this is an invisible box you can use if there’s a portion of the actual video footage you wish to make clickable.
-
Text Callout. This callout is also invisible, save for the text that you enter. Note that you can add text to any callout, even your custom ones. Use this one if you want text and nothing else.
-
Blur Callout. Speaking of text, you may occasionally be recording windows that contain sensitive bits of text you’d rather your audience not be able to see. I’m talking about things like passwords, account numbers, salary figures, and the like. This callout will blur anything underneath it, thus rendering it illegible.
One cool thing about the various callout types is that each one remembers all the settings from the last time it was used. Whenever you add a new callout of the same type, it will retain all the properties of the last one (though these can of course be subsequently altered). This is really handy if you’re inserting, for example, a series of filled rounded rectangle callouts throughout your video, and you want to maintain consistency in terms of size, position, coloring, etc.
Once you’ve picked a callout type, you’ll next need to choose an orientation, which is essentially the direction your callout is facing.
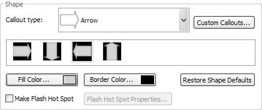
There are four orientation possibilities for this arrow callout, but for some callout types, you’ll have as many as eight.
Simply click the desired orientation, and the callout will be automatically updated in the Video Preview. In fact, any changes you make are updated in real time, so you’ll always be able to see exactly what you’re getting whenever you make a change.
Next, we need to give our callout some color. You’ve got two buttons for this: Fill Color and Border Color. Note that one or both of these may be grayed out depending on the callout type. Simply click the button, and choose a color from the corresponding palette that opens.
| Tip | Believe it or not, your custom callouts actually can be colored using these two color buttons. Whether or not you’ll actually achieve a desirable effect depends heavily on the image type. Two-tone GIF images recolor a lot better than photographic JPEGs with millions of colors. |
Of course, if you’ve really made a mess of things while playing around with the various settings, there’s a handy reset button called Restore Shape Defaults that will bring back that shape’s “factory defaults.” Note that this affects not only your Shape options, but also all properties of the callout.
Adding a Flash Hot Spot
One cool aspect of callouts is the ability to take any callout and make it clickable. To take advantage of this, you’ll need to produce your video in a format that supports some degree of interactivity, so only users of SWF and FLV output need apply. In fact, I strongly encourage you to check out these two formats anyway if you haven’t already done so, as they both have other strong merits that make them major assets in your file format arsenal. Take a peek at Chapter 12 for more info on all the formats. So, if management has stipulated that another output format be used (or if you think you’re too cool for school and don’t wish to heed my advice), then you may freely skip this section. The rest of you, follow me…
Here’s the general procedure for adding a Flash Hot Spot callout:
-
Add a new callout as you normally would and tweak it to your liking.
-
While on the Callout Properties pane, click the check box for Make Flash Hot Spot (for the Transparent Hot Spot callout type, it will be checked automatically).
-
The Flash Hot Spot Properties… button will become active. Click it.
-
The Flash Hot Spot Properties dialog will open. At the top of the dialog, you’ll have a check box option called Pause at end of callout. If this option is checked, then the playback head will actually stop at the conclusion of the callout to await instructions from the user. It’s a good option if you’re using callouts to set internal navigation in your video (e.g., “Click here to repeat this section” or “Click here to continue”). If you want the hot spot to be optional (such as making a URL in your video clickable), then clear this check box.
-
Now it’s time to choose the Action associated with clicking the hot spot. You’ve got four choices:
-
Click to continue. The playback head simply resumes as if it had never been stopped. This option is only available if you’ve opted to pause at the end of the callout.
-
Go to frame at time. You can direct the audience to a specific part of your video, down to the hour, minute, second, and centisecond.
-
Go to marker. If you’ve specified markers for all your important sections, then they’ll be listed in the Go to marker drop-down list, complete with time and name (if given).
-
Jump to URL. This is a powerful option that will let your audience access web sites directly from your video. If you don’t want the video window to be replaced by the new URL, then make sure that Open URL in new browser window is checked. The Jump to URL option will accept pretty much any valid web URL, including mailto links, so if you want to add a “Click here to e-mail us” link to your callout, it’s easy to do so (e.g., mailto: joeschmo@xyz.com).
-
-
Click OK to confirm your choices and set the hot spot.
Remember what I said about your hot spots only playing nice with SWF and FLV (hence the reason they call them Flash hot spots). If you start producing in a different format, you’ll get a warning message telling you that your callouts won’t be interactive, and what a pity that would be.
Adding Text
You’ve probably noticed by now that several of your callout types, such as rectangle, bubble, notepad, etc., look as though they were designed to hold some kind of textual message. Well, friends, you can add text to any callout you’ve got (even custom ones). You’ve got all kinds of great uses for text-based callouts, including:
-
Special instructions to your audience
-
Supplementary information on your topic (think VH1’s “Pop-Up Video”)
-
A dialogue bubble for your PIP image or a static image of someone
-
Captioning a piece of narration (This has been mostly supplanted by the Captions feature, which we’ll talk more about at the end of this chapter.)
-
Quickly titling a segment without having to do a full title clip
-
A small text callout, consisting of only asterisks or some other placeholder character, for blocking out sensitive information in your video
Adding text to a pre-existing callout is actually rather simple. Everything happens right here in the Text section of your Callout Properties pane:
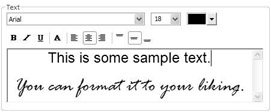
The first thing to do is simply to click in the big text field and start typing. Words will start to appear over your callout in the Video Preview. Once it’s there, you’ve got all the standard formatting options. Check out the section called “Adding Title Clips” in Chapter 10 if there are any editing commands you’re unsure of.
| Tip | If importing text from other applications, note that your basic clipboard hotkeys (Ctrl-C, Ctrl-X, and Ctrl-V) all work just fine. (Secret tip: You can actually paste tables onto your callouts from any word processing or spreadsheet application. Just try to get the sizing right prior to copying and pasting the table. If you need to resize things in Camtasia Studio, the text will resize just fine, but the table itself will not.) |
Adjusting the Callout’s Properties
Now that you’ve got the desired message on your callout, it’s time to do a little fine-tuning regarding how it’s displayed. If you look in the Properties section on your Callout Properties pane, you’ve got a few miscellaneous options:
-
Fade In. When introduced, the callout will gradually fade in rather than simply “popping” onto the screen. Unfortunately, you cannot control the speed of this fade effect.
-
Fade Out. Same thing, except it happens on the callout’s exit.
-
Add Drop Shadow. This adds an eye-catching shadow effect to the callout. It is available for every callout type except Text callouts (this includes custom callouts).
-
Keep Aspect Ratio. If you plan on resizing the callout, checking this box first will lock the callout’s aspect ratio so that the shape’s width and height will resize proportionately. It helps avoid that neat “Silly Putty” effect brought about by careless resizing.
-
Size Callout to Text. This is a dandy option for automatically resizing your callout to accommodate your ever-expanding text as you type. It saves you from the back-and-forth hassle of “type, resize, type, resize, etc.” You cannot manually adjust the width or height of your callout when this feature is enabled.
-
Opacity. This slider allows you to set the level of visibility for your callout, ranging from 1% (nearly invisible) to 100% (totally opaque). You can use it to achieve a cool, semi-transparent effect, though this can increase your file size, so use it sparingly if bandwidth is an issue for you.
Finally, you have the ability to numerically adjust both the size and position of your callout using the Width/Height and X/Y fields respectively. You can make use of these fields or simply click and drag the callout inside your Video Preview (or perform some combination of the two).
To recap, this is how we move a callout:
-
In the Video Preview, click and hold the mouse cursor anywhere inside the callout’s green border, and drag to a new location.
or
-
In the Properties section of the Callout Properties pane, adjust the X and Y fields to indicate the number of pixels to the right and downward from the upper left-hand corner of the video window you’d like the lower right-hand corner of your callout to be.
And you can also resize your callout in one of two ways:
-
In the Properties section of the Callout Properties pane, click the Keep Aspect Ratio check box if you’d like your sizing changes to maintain the callout’s original dimensions.
-
In the Video Preview, click and hold the mouse cursor on one of the eight black resizing squares on the callout’s green border. Drag one of the squares to size the callout up or down.
or
In the Properties section of the Callout Properties pane, adjust the Width and Height fields to indicate the number of pixels wide and/or high you’d like your callout to be. If your Keep Aspect Ratio check box is checked, then the other field will automatically self-adjust after you’ve altered one of these fields.
Adding Custom Callouts
Arrows and dialogue bubbles are all well and good, but what about when you want to slap your corporate logo or individual portraits of your management team onto your video? Can you add those elements as callouts? Yes, you can. If you look toward the top of the Callout Properties pane, you’ll notice a button we haven’t talked about yet: Custom Callouts…. Give this button a click to open the Custom Callout Manager dialog:
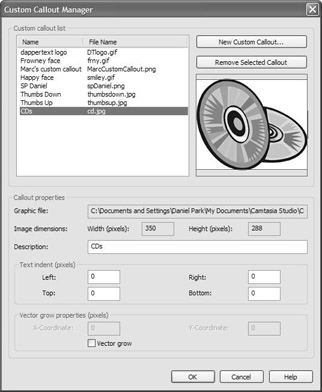
You’ll start out with a list window of custom callouts (which should be empty if you haven’t yet added any callouts on your own). Let’s remedy this by adding a custom callout or two.
You can start your own library of custom callouts by following these easy steps:
-
From the Custom Callout Manager dialog, click the button labeled New Custom Callout….
-
An Open dialog will appear, prompting you to navigate to an image. You can choose from BMP, GIF, JPEG, and PNG images. This chapter’s folder on the companion CD has a few images for your use if you don’t have anything else handy. Select your image and click Open.
-
The callout name and file name will appear in the Custom callout list window. Certain details about your callout, including its file path and dimensions, will appear in the corresponding fields. Custom callouts are automatically saved inside a special Custom Callouts folder, which can be found inside your Camtasia Studio folder within My Documents.
-
Your callout is given the default name “Custom Callout.” Feel free to alter the Description field to give your callout a name that’s a bit more descriptive and interesting.
Those are the basics of adding a custom callout. Any time you wish to remove a callout from the list, simply click the callout’s name in the Custom callout list, and then click the Remove Selected Callout button. Of course, if you really want a lot of control, there are a few advanced options with which you’ll want to familiarize yourself.
If the callout is designed to contain text, then the Text indent fields will let you specify margins for your custom callout so that nothing important in the image gets obscured. Take a look at these two “picket sign” callouts:
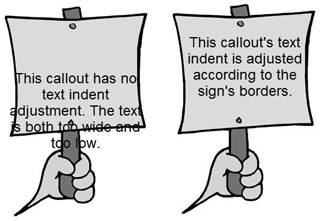
The first callout has no Text indent adjustments, whereas the second one makes use of Text indent to shift the text up so that it corresponds with the actual sign.
So how do we accomplish this? Well, the values of these fields represent the number of pixels inward from the left, right, top, and bottom you’d like your text to be. In the preview of your custom callout, the red box indicates the acceptable area for text, and the dimensions of this box will change automatically as you adjust the four Text indent fields.
The next set of options has to do with how the image is scaled. All custom callouts are raster images, pictures that are made up of lots and lots of pixels. Unlike vector images, which are not comprised of pixels but rather rendered mathematical calculations, raster images do not scale particularly well, as seen in the following example:
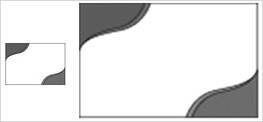
Left, an image at original size. Right, the same image blown up (notice the blocky pixelated effect).
Camtasia Studio has a special method of scaling certain callouts called Vector grow to help circumvent the problem of scaling up your custom callouts. Note that this system doesn’t actually vectorize your callouts, but rather allows them to scale with no loss in quality by fundamentally changing the way the image is scaled. When you click Vector grow, you are given the opportunity to choose a one-pixel wide column (X-Coordinate) and a one-pixel tall row (Y-Coordinate) that will repeat themselves over and over as the image is scaled up. The rest of the image won’t change in scale at all. These coordinates are represented by green lines in your callout’s image preview.
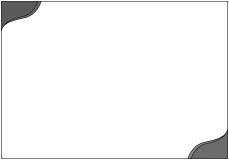
The same image from before, this time blown up with Vector grow in effect. As you can see, the corners are actually the same size as before.
Of course, there are a couple of caveats. Because of the nature of this scaling technique, only certain kinds of callouts need apply. First, the image needs to be more or less symmetrical. Second, rectangular shapes tend to fare better than round ones, since circles tend to become rounded rectangles as they’re stretched outward:
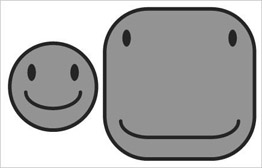
| Tip | The Vector grow feature doesn’t care for circles. My smiley face just got a little blockheaded. |
As for those images that don’t fare so well under vector growth, just try to import the image at a size that would best represent its real- world usage within Camtasia Studio. After all, resizing your callout as little as possible will always yield better quality results.
Now that you’ve got a custom callout or two, you might be wondering how you actually add them to your project. The answer is simple: the same way that you add all your other callouts. If you take a peek now at your Callout type drop-down list, you may have a surprise in store if you scroll down a ways… yep, there’s your custom callout. All the same orientation choices, callout properties, and yes, coloring options, apply to your custom callouts in addition to your regular ones. So feel free to play around to see what neat (if unintentional) effects come about as a result. Remember, if you mess things up beyond all recognition, a simple click of the Restore Shape Defaults button will put it all right again.
EAN: 2147483647
Pages: 146