Add-In Options Dialog
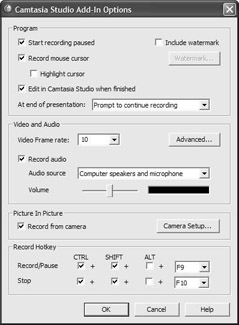
The second button from the right on the toolbar is Camtasia Studio Recording Options. Clicking this button brings up the Camtasia Studio Add-In Options dialog. This is essentially a one-screen amalgamation of all the effects and tools options from the Camtasia Recorder that are most pertinent to recording a PowerPoint presentation.

The dialog is divided into five sections: Program, Video and Audio, Picture In Picture, Record Hotkey, and Watermark. Let’s look at each of these in turn.
Program Options
There are six preferences in the Program section, all of which can be toggled on and off. They are:
-
Start recording paused. Leaving this box checked will start the recording in paused mode, so that you can do a final sanity check prior to beginning the recording. It’s also handy for getting everything set up while people are filing into your presentation, and then postponing the actual recording until you begin to speak. This avoids having to edit out the 15 minutes of “audience murmur” you unintentionally recorded before your presentation got underway.
-
Record mouse cursor. This option, which is checked by default, will include the mouse cursor when recording your presentation. This is a matter of personal taste. If you plan on using PowerPoint’s Pointer Options settings to do any drawing on the screen, I would recommend that you keep it enabled. If you feel that the mouse cursor will distract the viewer, then turn it off.
-
Highlight cursor. If Record mouse cursor is enabled, then you also have the option of having a highlight appear around the mouse. It takes the form of a translucent circle that moves with the mouse cursor in order to help the user keep better track of the cursor. Like the cursor highlight of the Camtasia Recorder, it is only seen at playback time, not at record time. Unlike the Recorder’s cursor highlight tool, you cannot configure the cursor highlight to use other shapes, colors, and opacities - I’m afraid you’re stuck with a small, mustard-yellow, translucent circle. But it does get the job done.
-
Edit in Camtasia Studio when finished. When checked, Camtasia Studio will automatically launch upon the conclusion of recording, and your saved project will be immediately imported, ready for editing. If unchecked, your work is saved, but Camtasia Studio will not open.
-
At end of presentation. While you can always stop the recording using the Ctrl+Shift-F10 hotkey (or some other hotkey that you specify), you can choose what will happen when you get to the end of the presentation. You can have the recording end automatically, continue recording, or prompt you about what to do.
-
Include watermark. This option lets you add a watermark to your recordings. We’ll discuss this option in detail a bit later in its own section.
Video and Audio Options
This section of the dialog allows you to choose the settings that affect how your video and audio streams are recorded, such as frame rate, codecs, audio source, and record volume.
-
Video Frame rate. The frame rate is the number of frames per second at which the add-in records your presentation. You may either choose a frame rate from the drop-down list or simply type a number into the field. The frame rate you select will depend on your content. If your presentation has a gazillion animations like bouncing text and wacky slide transitions, you’ll want to go with a higher frame rate so that you can capture all these elements fluidly. On the other hand, if your presentation is pretty static, and the only movement that happens on the screen is the appearance of the next slide, then you can easily get away with four (or even fewer) frames per second.
-
Record audio. Checking the Record audio box will include audio with your presentation, either from a microphone, the computer’s own system sound, or both at once. Just make the appropriate choice in the Audio source drop-down list. Note that the system sound option is good for recording presentations where the audio narration has already been recorded within PowerPoint. However, keep in mind that this option might not be available to you if your sound card doesn’t support recording audio from the system (fortunately, most modern cards do). It may be time for an equipment upgrade if your sound card can’t manage this.
-
Volume slider. No matter which option you choose, you have a Volume slider that will let you quickly adjust the recording volume for your selected audio source. You can test the volume by speaking into the microphone and monitoring the activity on the colored volume bar. Ideally, your volume should be within the range of yellow/orange, without going into the red area (where some clipping may occur). For the full lowdown on recording audio narration, please see Chapter 10, “Working with Other Media: Audio, PIP, and Title Clips.”
-
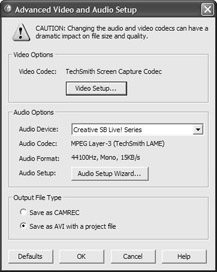
Advanced… button. This button brings up a dialog allowing you to change the default codecs and choose an audio recording device.

You’re presented with options for both video and audio. Let us first tackle the former. A click on the Video Setup… button will let you choose the video codec from a drop-down list. The default is the TechSmith Screen Capture Codec, and I strongly recommend you leave it alone. Even if you have a ton of animations, TSCC can most likely capture it all without dropping any frames. Then, if you find the resulting file size too large, you can encode using another codec after you’ve edited your project. The only possible exception I can think of is if you have many real-world videos embedded into your slides - this may necessitate a codec like MPEG-4. But I would still give it a shot with TSCC, just so that you can have a lossless original.
Note You may notice here that the default key frame rate for TSCC is lower than it is in the Camtasia Recorder, at one key frame per 300 frames. Since PowerPoint slides tend to remain static for longer periods of time, you can get away with fewer key frames. Please see the previous chapter for a full discussion of key frames and delta frames.
Let’s move on to the Audio Options. First, you’ll need to choose an Audio Device from the drop-down list, indicating which device you wish to record from (usually the sound card). It can be set to make use of the Windows default, or you can choose something different. You will also see details of the chosen audio codec as well as that codec’s attributes on this screen. To change them, just click the Audio Setup Wizard… button.
The wizard dialog is exactly the same as in Camtasia Recorder, allowing you to choose a manual input if one of the preselected sources doesn’t cut it for you. To change the output format, just click the Audio Format… button. Again, notice that the default is MPEG Layer-3 (TechSmith LAME). Remember that I warned you about using lossy audio codecs for recording in the previous chapter, but since live presentations aren’t done in a pristine studio environment, using a lossy codec here probably isn’t as big a deal. However, when making archival copies of presentations, if you have a nice audio setup and a system that can handle the load, I would recommend setting the codec back to uncompressed (PCM), at 44,100 Hz, 16-bit, mono. Since you may want to distribute this file on the web at some point, you’ll obviously want to use a different audio codec later in the production process. But if you have the drive space and enough processing power to make a fluid capture, I’m generally for creating the highest-quality original possible, and then compressing and downsampling as needed.
Click Next, and you’ll be able to have the wizard automatically set the recording volume, if desired. Click Finish when satisfied.
Tip Keep in mind that if you ever lose your bearings when experimenting with the video and audio codecs, you can always go back to the factory defaults by clicking the Defaults button in the Advanced Video and Audio Setup dialog.
-
Now, getting back to the Advanced Video and Audio Setup dialog, notice that there’s one more set of options we haven’t yet touched, specifically Output File Type. This will let you choose how the video is saved. You can either save it as a CAMREC file, with the camera, marker, and caption streams encapsulated into the file, or you can save it to AVI with a project file. The project file will house your marker information and captions, but camera video will not be recorded. The latter option also doesn’t give you the option of whether or not to include captions from your PowerPoint notes - it does so automatically. Both of these are perfectly viable options, though I personally prefer the convenience of having everything tucked into a single CAMREC file. When finished with the Advanced options, click OK to return to the Add-In Options dialog.
Picture In Picture Options
This section controls the implementation of camera video in your PowerPoint recordings. Camtasia Studio offers you the ability to include a camera view of yourself. You can present this extra video stream either superimposed over your screen video or in a side-by- side formation, so that you never need to worry about the camera video covering up something important on your slide. This has exciting implications for PowerPoint. You can essentially hand someone a presentation you gave some months ago, and rather than having to decipher your cryptic titles and brief notes from the PowerPoint slides, they’re practically transported into the front row of the lecture hall where you delivered that presentation. They can view the slides, hear your voice, and see your face.
-
Record from camera. If you’re the kind of presenter that stands stock-still at the podium, you can probably get away with using a simple webcam. However, if you’re like me and you like to move around a bit, it probably behooves you to recruit a volunteer to shoot you with a camcorder that is attached to your computer via IEEE 1394 (Firewire) or USB. You’ll end up with better, more professional footage.
To enable the camera video, click the Record from camera check box. Make sure that there’s actually some sort of video capture device attached to your computer; otherwise, this entire section will be grayed out.
-
Camera Setup. To choose a capture device and adjust settings, click Camera Setup…. Just as with the Camera tab of the Tools Options dialog in Camtasia Recorder, this dialog will let you pick a capture device from the drop-down list. As a courtesy, it also offers Camera Properties… and Video Format… buttons that link to the various settings of your video device’s camera driver. These settings are different for every video device, so please consult your device’s documentation to learn about all the different settings.
Record Hotkey Options
This is just a quick preference setting that allows you to adjust the hotkey that toggles the Record/Pause and Stop commands. The Record toggle hotkey is Ctrl+Shift-F9 by default, and Stop is Ctrl+Shift-F10. You can use any combination of the Ctrl, Shift, and Alt modifier keys plus alphanumerical characters, F-keys, or the Print Screen key (PrtScr). The Escape key (Esc) will stop the presentation and possibly the recording as well, depending on what you’ve chosen in the At end of presentation drop-down list.
Watermark Options
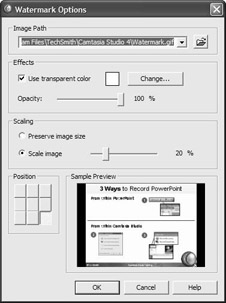
Do you have a corporate logo or other image you want to use to “brand” your video? Consider using it as a watermark. Just click the Include watermark check box (located up in the Program section of the dialog) to get things started. But we’re obviously not done yet, as we must at least choose the image file that will serve as our water- mark. This is done by clicking the Watermark… button. You’ll need to specify a file path of the image to use in the Image Path field. You can type the path into the field directly, click the drop-down arrow to select from the most recently used watermarks, or click the Browse button to maneuver through your directories to find the file.
There are also some preferences that can be set on the Watermark Options dialog. These options are a somewhat watered-down version of the Watermark tab in the Camtasia Recorder Effects Options dialog. But the basics are all represented:

You can do any of the following within this dialog:
-
Select a color within the image that will be transparent
-
Change the opacity of the watermark, from fully transparent to fully opaque
-
Scale the image to an appropriate size
-
Choose from any of nine screen positions
Caution In Chapter 6, “Special Effects of the Camtasia Recorder,” I cautioned you against using watermarks within the Recorder except in very rare circumstances. This caveat applies here, too. Using watermarks at record time means that you will not be able to change or remove them later. If you’re going to use a watermark, it’s far better to do so in Camtasia Studio, where you can always change your mind if you later decide you want to change it or remove it entirely.
EAN: 2147483647
Pages: 146